I once found myself staring at a mountain of leftover pizza, stale bread, and a half‑empty jar of sourdough starter that I’d been neglecting for weeks. The kitchen smelled like a deserted Italian trattoria after a midnight rush, and I was half‑thinking about ordering takeout. Then, in a flash of reckless brilliance, I whispered to myself, “What if I could turn this chaos into a single, glorious, handheld masterpiece?” The idea was half‑madness, half‑genius, and entirely driven by the desperate need to rescue my leftovers before they turned into science experiments. I grabbed the sourdough discard, tossed in the cheese, meats, and veggies, and set out to create something that would make even the most skeptical aunt gasp in delight.
Picture the scene: the oven humming like a contented cat, the dough stretching under my fingertips with the give of a well‑kissed lover, the aroma of olive oil and herbs swirling together like a Mediterranean love story. You can hear the faint sizzle of the crust as it begins to brown, feel the warmth radiating from the tray, and taste the tangy undertone of the sourdough that makes every bite sing. The texture? Imagine the perfect balance between a chewy interior that stretches like a warm blanket and a crisp, golden edge that shatters like thin ice under a gentle tap. It’s the kind of sensory overload that makes you forget you ever had leftovers in the first place.
Most recipes for Italian‑style stuffed breads either drown you in butter or leave you with a dough that’s as tough as shoe leather. I’ve tried them all, and I’ll be honest — I ate half the batch before anyone else got a chance to try it. This version, however, flips the script. By harnessing the natural acidity of sourdough discard, we get a dough that’s tender, flavorful, and surprisingly forgiving. The secret? A splash of olive oil that adds richness, a dash of Italian herbs that bring the whole thing to life, and a method that lets you fold in leftovers without turning the dough into a soggy mess.
I dare you to taste this and not go back for seconds. The combination of tang, melty cheese, and savory fillings is hands down the best version you’ll ever make at home. And the best part? You’ll never look at a leftover container the same way again. Let me walk you through every single step — by the end, you’ll wonder how you ever made it any other way.
What Makes This Version Stand Out
- Tangy Backbone: The sourdough discard injects a subtle acidity that lifts every flavor, preventing the cheese from feeling heavy and giving the crust a lively bite.
- Chewy Yet Light: Thanks to the discard’s natural gluten development, the dough stays soft and elastic, yet it bakes up airy and light, like a cloud that’s been toasted.
- One‑Pan Simplicity: No need for a separate sauce pan or extra baking sheet; everything comes together on a single sheet, saving time and dishes.
- Leftover Hero: This recipe transforms random bits of cheese, meat, and veg into a cohesive, restaurant‑quality dish that even picky eaters adore.
- Flavor Depth: The Italian herbs and olive oil create a fragrant base that makes each bite feel like a trip to a sun‑kissed piazza.
- Make‑Ahead Magic: You can prep the dough a day ahead, letting the discard do its work, and still achieve a fresh‑baked finish when you’re ready.
- Crowd‑Pleaser: Whether it’s a family dinner or a game‑day snack, the golden edges and melty center spark instant applause.
- Budget Friendly: By using leftovers and a starter you already have, you cut costs while creating a gourmet experience.
Inside the Ingredient List
The Flavor Base
Sourdough Discard is the star of this show. It brings a tangy note that cuts through the richness of the cheese and meats, creating a balanced palate. Skipping it would leave the dough flat and bland, like a story without a plot twist. If you’re out of discard, you can substitute an equal amount of plain yogurt mixed with a splash of lemon juice, but you’ll lose some of that authentic sourdough complexity.
Olive Oil does more than add flavor; it lubricates the dough, making it supple and easy to stretch. A high‑quality extra‑virgin olive oil adds fruity undertones that mingle beautifully with the herbs. When you’re short on olive oil, a neutral oil like grapeseed works, but the final taste won’t have that Mediterranean kiss.
The Texture Crew
All‑purpose Flour provides the structural backbone, giving the dough its shape and chew. Using bread flour would make the crust too dense, while cake flour would make it crumbly. For a gluten‑free twist, try a blend of rice flour and xanthan gum, but expect a different mouthfeel.
Salt is the unsung hero that amplifies every other flavor while strengthening the gluten network. A pinch too little and the dough tastes flat; too much and you’ll overpower the subtle sourness. Sea salt adds a mineral depth that table salt can’t match.
The Unexpected Star
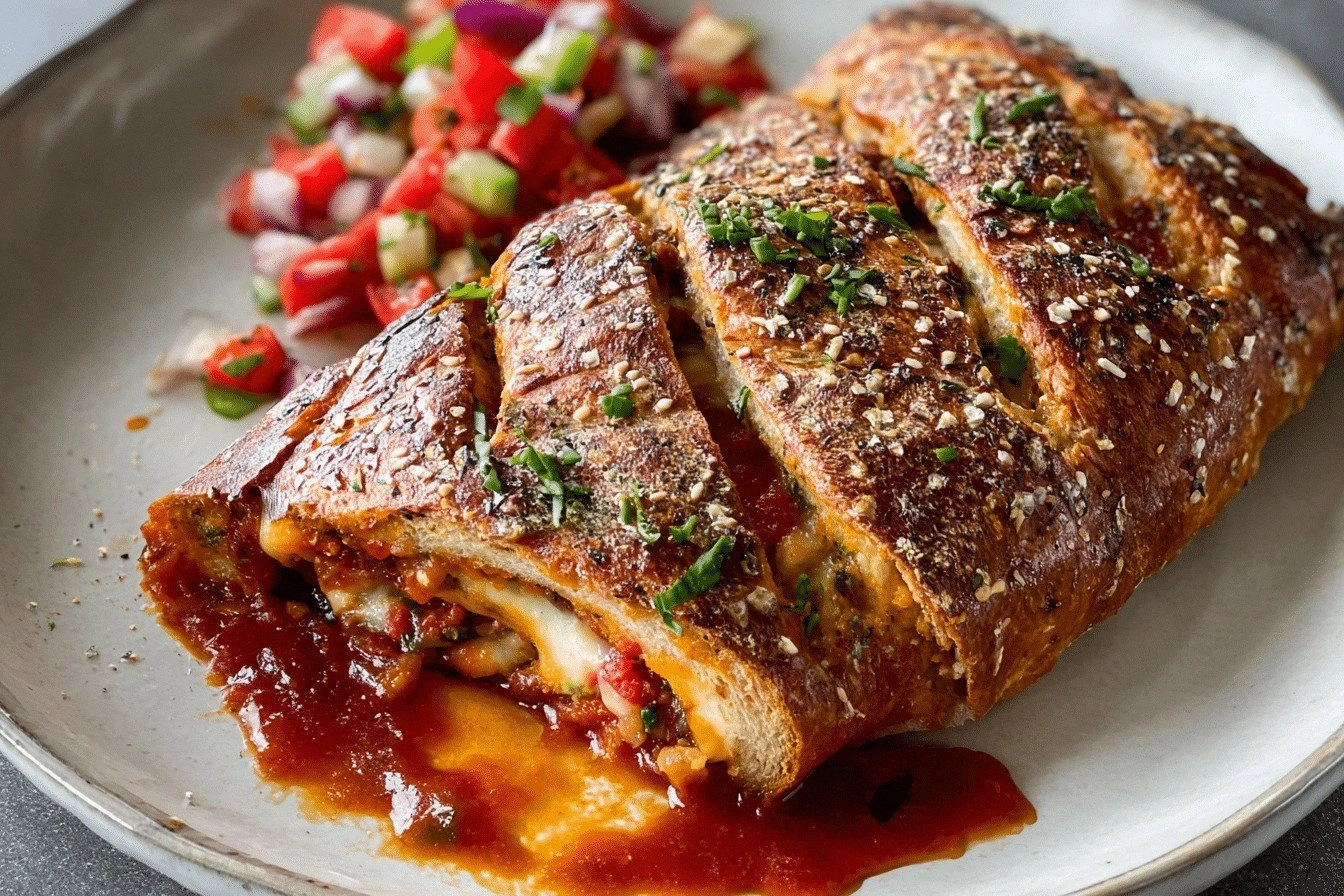
Cheese, whether mozzarella or provolone, is the melty heart of this stromboli. Its stretchiness creates that pull‑apart effect we all crave. If you skip the cheese, you’ll end up with a dry, uninteresting roll. For a sharper bite, blend in a tablespoon of grated Parmesan.
Meats like salami, pepperoni, or ham bring savory depth and a pleasant chew. Their fat content keeps the filling moist, preventing the dough from drying out. If you’re vegetarian, swap the meats for smoked tofu or roasted chickpeas for a protein boost.
The Final Flourish
Vegetables such as bell peppers, onions, and mushrooms add freshness and a subtle crunch that cuts through the richness. They also contribute moisture, which can be a double‑edged sword; too many can make the dough soggy. Lightly sautéing them first locks in flavor while reducing excess water.
Italian Herbs—oregano, basil, or a pinch of Italian seasoning—infuse the whole dish with an authentic Mediterranean aroma. Fresh herbs give a bright pop, while dried herbs provide a more concentrated flavor. If you’re out of herbs, a sprinkle of garlic powder and crushed red pepper flakes can keep the taste profile lively.
Everything's prepped? Good. Let's get into the real action...
The Method — Step by Step
Start by gathering your sourdough discard, flour, olive oil, and salt in a large mixing bowl. Sprinkle the flour over the discard, then drizzle the olive oil and sprinkle the salt. Using your hands, combine everything until a shaggy dough forms. It should feel slightly sticky but manageable; if it’s too wet, dust the surface with a bit more flour. This is the moment of truth: the dough should come together in about two minutes of vigorous kneading.
Turn the dough onto a lightly floured countertop and knead for 5‑7 minutes. You’ll notice it becoming smoother, more elastic, and less tacky. The texture should be supple, like a well‑conditioned piece of leather. Watch Out: Over‑kneading can make the dough tough, so stop once it passes the “windowpane test” – you can stretch a small piece until it’s translucent without tearing.
Watch Out: If the dough feels too dry, add a tablespoon of water; if it’s too wet, sprinkle a tablespoon of flour. Adjust slowly.Shape the dough into a ball, lightly coat it with a drizzle of olive oil, and place it back in the bowl. Cover with a damp towel and let it rest for 30 minutes at room temperature. This short bulk fermentation lets the discard’s natural acids work their magic, softening the crumb and developing flavor. You’ll hear a faint bubbling sound as the dough relaxes—listen closely, that’s the dough breathing.
While the dough rests, prepare the filling. Dice your chosen vegetables, slice the meats, and shred the cheese. If you’re using bell peppers or onions, give them a quick toss in a hot skillet with a splash of olive oil for 2‑3 minutes—just enough to soften them without losing crunch. This step adds a caramelized depth that elevates the final taste.
Preheat your oven to 425°F (220°C) and line a baking sheet with parchment paper. Lightly flour a rolling pin and roll the rested dough into a rectangle about ¼‑inch thick. The dough should be large enough to hold a generous amount of filling without tearing, roughly 12×16 inches.
Kitchen Hack: Sprinkle a thin layer of cornmeal on the parchment before placing the dough; it prevents sticking and adds a subtle crunch to the bottom.Evenly distribute the cheese over the dough, leaving a 1‑inch border around the edges. Layer the meats and vegetables on top of the cheese, then sprinkle the Italian herbs for that aromatic punch. Press the toppings gently into the cheese so they meld together during baking. This is where the magic happens: the cheese acts as glue, holding the fillings in place.
Starting from the long side, carefully roll the dough over the filling, using the parchment paper to help you lift and guide it. Pinch the seam and the ends to seal, then gently roll the whole thing back onto the parchment to smooth out any air pockets. The final shape should be a tight, elongated loaf, reminiscent of a classic stromboli.
Brush the top of the stromboli with a light coating of olive oil and sprinkle a final pinch of salt and herbs. This creates a glossy, flavorful crust that crackles as it bakes. Slide the parchment onto the prepared baking sheet and pop it into the oven.
Bake for 20‑25 minutes, or until the crust is a deep golden‑brown and the cheese inside is bubbling furiously. The edges should pull away from the pan, and you’ll hear a faint crackle as the steam escapes. If you’re unsure, tap the bottom—it should sound hollow.
Remove the stromboli from the oven and let it rest for 5‑10 minutes before slicing. This resting period allows the cheese to set slightly, preventing a messy, gooey mess when you cut. Slice into 1‑inch thick pieces and serve while still warm. That first bite? Pure, unadulterated comfort—cheese stretch, tangy crust, and a chorus of flavors dancing on your tongue.
That's it — you did it. But hold on, I've got a few more tricks that'll take this to another level...
Insider Tricks for Flawless Results
The Temperature Rule Nobody Follows
Never bake a stromboli at a temperature lower than 425°F. The high heat creates that coveted “oven spring” where the crust puffs up instantly, giving you that airy interior. If you lower the temp to save energy, you’ll end up with a dense, doughy loaf that feels more like a bread roll than a stromboli. Trust me, the extra 5 minutes in a hotter oven is worth every second.
Why Your Nose Knows Best
Your sense of smell is the ultimate timer. When the crust starts to emit a nutty, toasted aroma, you’re within two minutes of perfection. If you hear the faint hiss of steam escaping the parchment, the interior is bubbling just right. Rely on these cues instead of obsessively watching the timer; the kitchen is a living organism, not a strict stopwatch.
The 5‑Minute Rest That Changes Everything
After baking, let the stromboli rest for exactly five minutes before cutting. This short pause lets the cheese settle, preventing a molten river when you slice. Skipping this step is a common rookie mistake that leads to a soggy plate and a frustrated eater.
The Secret of a Cracker‑Thin Edge
If you love that ultra‑crisp edge, brush the exposed sides with a mixture of melted butter and garlic before the final 5 minutes of baking. The butter caramelizes, giving the outer rim a buttery snap that shatters like a crisp wafer. A friend tried this once and declared the stromboli “the best thing since sliced bread.”
The Hydration Hack
Add a teaspoon of honey to the dough if you’re working with a very sour discard. The honey balances the acidity, resulting in a milder tang that lets the cheese and herbs shine. This tiny sweetener also aids browning, giving you that gorgeous mahogany crust.
Creative Twists and Variations
This recipe is a playground. Here are some of my favorite ways to switch things up:
Mediterranean Veggie Delight
Swap the meats for roasted eggplant, sun‑dried tomatoes, and feta cheese. The smoky eggplant pairs beautifully with the tangy discard, while feta adds a briny punch. Perfect for a vegetarian crowd that still craves bold flavors.
Spicy Southwest
Add black beans, corn, jalapeños, and a blend of cheddar and pepper jack. Finish with a drizzle of chipotle mayo after baking for a smoky heat that cuts through the richness.
Breakfast Stromboli
Incorporate scrambled eggs, breakfast sausage, and a sprinkle of sharp cheddar. Top with a light dusting of powdered sugar and a drizzle of maple glaze for a sweet‑savory breakfast treat.
Sweet Apple & Cinnamon
Use thinly sliced apples, a pinch of cinnamon, and a swirl of cream cheese. This dessert version transforms the savory base into a warm, comforting pastry—great for an after‑dinner surprise.
Herb‑Infused Garlic Bread
Mix minced garlic and fresh rosemary into the dough before rolling, then brush the top with butter and sprinkle Parmesan. The result is a fragrant, herb‑laden bread that can double as a side dish.
Storing and Bringing It Back to Life
Fridge Storage
Wrap the cooled stromboli tightly in plastic wrap, then place it in an airtight container. It will stay fresh for up to three days. When you’re ready to eat, reheat in a preheated 350°F oven for 10‑12 minutes, covered with foil to prevent drying.
Freezer Friendly
Slice the stromboli into individual portions, wrap each piece in parchment, then seal in a freezer bag. It freezes beautifully for up to two months. To revive, bake directly from frozen at 375°F for 20‑25 minutes, adding a splash of water to the pan to generate steam.
Best Reheating Method
For the crispiest crust, use a cast‑iron skillet on medium heat, adding a teaspoon of water and covering for a minute to steam the interior, then uncover to crisp the bottom. This technique restores the original texture without making it soggy.