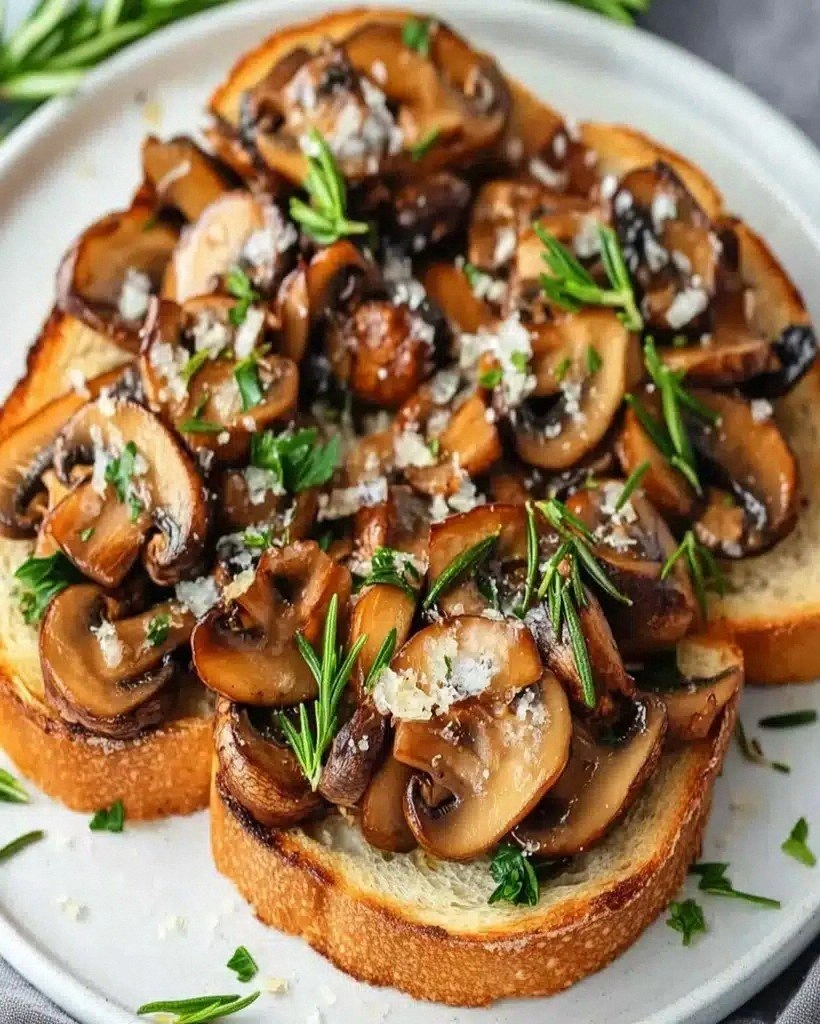
Last Tuesday I found myself standing in my kitchen at 11:47 p.m., still in my work shirt, hair doing that static-cling thing from the dry winter air, and absolutely ravenous. The fridge door hung open like a yawning mouth, revealing the usual suspects: half a wilting romaine heart, a jar of pickles, and a container of mushrooms I'd bought on a whim three days earlier. I was this close to ordering Thai food that would arrive lukewarm and cost more than my first car payment, when those mushrooms caught my eye. They sat there looking all humble and earthy, but something about their quiet confidence made me shut the door, roll up my sleeves, and declare war on my growling stomach. What happened next was nothing short of culinary alchemy: twenty-three minutes later I was perched on a barstool, plate balanced on my knee, eating what I can only describe as the single best piece of toast that has ever existed in my apartment. The mushrooms had transformed into these silky, garlicky, rosemary-scented nuggets of pure comfort, their juices soaking into the crunchy sourdough like edible velvet. I ate the first piece standing up, then immediately made a second. And a third. I finally stopped at four, mostly because I ran out of bread, but also because I realized I needed to share this revelation with the world before I accidentally ate an entire loaf by myself.
Here's the thing about mushrooms on toast: most recipes treat it like an afterthought, some sad vegetarian option you slap together when you can't be bothered. They'll tell you to sauté mushrooms with a bit of butter, maybe toss in some garlic if they're feeling fancy, and call it a day. But that's like saying a Ferrari is just a car with four wheels — technically true, but you're missing the entire point. The version I'm about to walk you through treats every element like it matters, because guess what? It absolutely does. We're talking about mushrooms that get seared until their edges caramelize into crispy little frills that shatter like thin ice, swimming in a sauce so packed with butter, wine, and herbs that you'll want to drink it with a spoon. The toast isn't just a vehicle either — it's a crunchy, buttery platform that stays crisp even under its saucy burden. And the whole thing comes together in less time than it takes to watch an episode of whatever Netflix show you're currently bingeing.
What makes this recipe borderline dangerous is how it manages to feel both incredibly luxurious and completely accessible at the same time. You could serve this at a fancy brunch and watch people Instagram it like it's some $18 café creation, or you could eat it in your pajamas while binge-watching true crime documentaries. The ingredients cost less than a fancy coffee, but the flavor is rich and complex like something you'd pay way too much for in a bistro with Edison bulbs and exposed brick. Plus, and this is crucial, it's practically foolproof. I've made this when I was so tired I could barely see straight, when I was distracted by phone calls, when my neighbor decided to practice trumpet at 9 p.m. — and it still turned out incredible every single time.
The secret weapon here is timing things so that your mushrooms get that gorgeous golden crust while your bread toasts to perfect crunch, and the whole thing comes together in one pan without any fussy techniques. No need for sous-vide machines or specialty salts or whatever gadget is currently trending on cooking TikTok. Just a skillet, some good ingredients, and about fifteen minutes of your time. By the end of this recipe, you'll understand why I now keep mushrooms and good bread on hand at all times, like some people keep chocolate or ice cream. Because once you taste this, midnight hunger pangs will never be the same again. Let me walk you through every single step — by the end, you'll wonder how you ever made it any other way.
What Makes This Version Stand Out
Before we dive into the nitty-gritty, let me tell you exactly why this isn't just another mushrooms-on-toast situation. I've eaten my way through countless versions of this dish — from sad café attempts that taste like wet cardboard, to overcomplicated restaurant versions with truffle oil drizzled in pretentious spirals — and I can say without hesitation that this is hands down the best version you'll ever make at home.
- Edge-to-Edge Caramelization: Instead of crowding the pan and steaming your mushrooms into rubbery submission, we use a ripping-hot skillet and cook in batches so each piece develops those gorgeous golden-brown edges that taste like they were kissed by a fireplace. This isn't just about looks — those crispy bits pack so much umami you'll want to eat them like potato chips.
- The Butter-Wine One-Two Punch: Most recipes use either butter OR wine, but we're using both in a very specific sequence that creates a sauce so glossy and rich it should have its own Instagram account. The butter gives us that luxurious mouthfeel while the wine deglazes all those beautiful brown bits and adds brightness that cuts through the richness.
- Rosemary Timing That Actually Works: Here's where most recipes mess up — they either add the rosemary too early and it turns bitter, or too late and it tastes like you're eating pine needles. We'll add it at the perfect moment so it infuses the oil without becoming aggressive, giving you woodsy aroma without the bitterness.
- The Bread Choice That Changes Everything: Not all toast is created equal, and we're not just grabbing whatever sad sandwich bread is lurking in the back of your freezer. I'll tell you exactly what to look for and how to toast it so it stays crunchy even under all those juicy mushrooms.
- Garlic That Doesn't Overwhelm: Nobody wants to taste nothing but raw garlic burning their tongue for the next three hours. We're using a technique that mellows the garlic just enough while keeping its punch, so you get that perfect balance where it enhances rather than dominates.
- The Five-Minute Rest That Makes Magic: This might be the most important step that everyone skips. We're letting the mushrooms hang out off-heat for a few minutes so they can reabsorb some of their juices, creating this incredible self-basting effect that makes them taste like they've been slow-cooking for hours.
Alright, let's break down exactly what goes into this masterpiece, because understanding your ingredients is what separates good home cooks from the ones who make people moan involuntarily when they take a bite.
Inside the Ingredient List
The Flavor Base
Your mushrooms are obviously the star here, but not all fungi are created equal. I'm personally obsessed with using a mix of cremini and shiitake because they bring different superpowers to the party. Creminis have that deep, earthy flavor that tastes like walking through a forest after rain, while shiitakes add this incredible meaty texture and subtle sweetness that makes carnivores question their life choices. If you can only find one type, go with cremini — they're basically baby portobellos and have way more personality than those bland white button mushrooms that taste like disappointment and refrigerator air.
The butter situation is non-negotiable, and I'm not talking about that sad stick that's been in your freezer since Obama's first term. You want good, fresh butter because it's going to brown slightly and develop these nutty, caramel notes that make the whole dish taste like it took way more effort than it did. Salted or unsalted doesn't matter much here since we'll season at the end, but if you're using salted butter, ease up on the additional salt until you've tasted the final product. And please, for the love of all that is delicious, don't substitute margarine or oil — you'll lose all that gorgeous flavor development that happens when butter hits a hot pan.
Garlic is where things get interesting, because we're not just mincing it and throwing it in willy-nilly. We're going to smash the cloves with the flat of our knife, remove the papery skin, and slice it thin so it cooks quickly but doesn't disappear completely. This gives you these little pops of garlic flavor throughout rather than having it completely melt into the background. If you're a garlic fiend like me, you might be tempted to add more, but trust the process — too much raw garlic will steam and turn bitter, ruining all our beautiful mushroom work.
The Texture Crew
Bread choice will make or break this entire experience, and I'm not being dramatic here. You need something with structure and flavor that can stand up to all those juices without turning into a soggy mess that collapses when you pick it up. My absolute favorite is a good sourdough with a sturdy crust and lots of irregular holes — those nooks and crannies are going to catch all the mushroomy goodness like tiny flavor traps. The slight tang of sourdough also plays beautifully against the rich, earthy mushrooms in a way that makes your taste buds do a happy dance.
Rosemary might seem like an afterthought, but it's actually providing crucial aromatic backbone that makes everything taste more expensive than it is. Fresh is non-negotiable here — dried rosemary has the texture of pine needles and the subtlety of a foghorn. Look for sprigs that are bright green and flexible, not brown and brittle. And here's the thing that'll blow your mind: we're using the stems too. Those woody stalks have tons of flavor and we'll fish them out later, so you get all the aroma without the tough bits that get stuck in your teeth.
The olive oil isn't just for greasing the pan — we're using it strategically to raise the smoke point of our butter so we can get the pan ripping hot without burning our precious dairy. Use something decent but don't break out the $40 bottle your aunt brought back from Tuscany. A good everyday extra-virgin works perfectly, and the fruity notes will complement the earthiness of the mushrooms in ways that'll make you feel like you're dining in a European café rather than your possibly-too-small kitchen.
The Unexpected Star
Wine is our secret weapon here, and before you panic about opening a whole bottle for two tablespoons, hear me out. A dry white wine adds acidity that cuts through all that richness and helps deglaze the pan, lifting up all those gorgeous brown bits that are packed with flavor. If you don't have wine or prefer not to cook with alcohol, you can use a splash of vegetable broth with a squeeze of lemon, but the wine really does something magical here. It creates this glossy sauce that coats the mushrooms like edible lacquer, making them look as incredible as they taste.
Lemon zest might seem like overkill when we already have wine, but trust me on this one. A tiny bit of fresh zest added right at the end wakes up all the other flavors like turning on a light in a dim room. It doesn't make things taste lemony — it just makes everything taste more like itself. Use a microplane if you have one, or the smallest side of your box grater, and only zest the yellow part. The white pith underneath is bitter and will make your beautiful mushrooms taste like disappointment and regret.
The Final Flourish
Parmesan is optional but highly recommended, and here's why: a little shower of freshly grated cheese melts into all the nooks and crannies of the mushrooms, creating these little pockets of salty, nutty perfection. Don't use the pre-grated stuff that comes in a plastic tub — it has cellulose added to prevent clumping, which also prevents it from melting properly. Grab a block of real Parmigiano-Reggiano if you can swing it, or even a good domestic Parmesan will work. And don't add it while the pan is screaming hot or it'll just clump up and get greasy — wait until things have cooled slightly so it melts into silky threads.
Everything's prepped? Good. Let's get into the real action...
The Method — Step by Step
- Start by heating your largest skillet over medium-high heat for about two minutes — you want it good and hot so that when you flick a drop of water on it, it dances and evaporates immediately. While it's heating, clean your mushrooms with a damp paper towel, brushing off any dirt clinging to them. Don't run them under water — they'll absorb it like tiny sponges and then steam instead of brown, which is the culinary equivalent of wearing wet socks: technically functional but deeply disappointing. Slice the cremini mushrooms about a quarter-inch thick, and tear the shiitake caps into bite-sized pieces, discarding the tough stems or saving them for vegetable stock.
- Now here's where most recipes go wrong — they dump everything in at once and wonder why their mushrooms release a flood of liquid and turn grey and sad. We're going to work in batches, and yes, this extra step is absolutely worth it. Add one tablespoon each of butter and olive oil to your hot pan, swirling until the butter foams and just starts to brown. Add enough mushrooms to cover the bottom in a single layer, then step away from the pan. Don't stir, don't poke, don't fuss with them for a full two minutes. This is when the magic happens — the edges are starting to caramelize and turn golden, developing that incredible nutty flavor that makes people close their eyes when they taste it.
- After two minutes, give the pan a gentle shake — if the mushrooms release easily, it's time to flip. If they're still sticking, give them another 30 seconds. They'll tell you when they're ready. Flip them over and let the other side brown for another minute or two, then transfer them to a plate. Repeat with the remaining mushrooms, adding more butter and oil as needed. By the end, you'll have a plate of gorgeously golden mushrooms that smell like a forest in autumn, and some seriously impressive brown bits stuck to your pan. Don't you dare wash that pan — those bits are liquid gold.
- With all your mushrooms cooked and resting on their plate, it's time to build the sauce. Reduce the heat to medium and add another pat of butter to the pan. When it melts and starts to foam, add your sliced garlic and let it sizzle for about 30 seconds — you want it fragrant but not brown. Now here's the game-changer: add your white wine and watch as it deglazes the pan, lifting all those beautiful brown bits into what will become the most incredible sauce. The wine should bubble vigorously and reduce by about half, which takes roughly two minutes and makes your kitchen smell like you know what you're doing even if you're wearing mismatched socks and haven't done dishes in three days.
- Return all your mushrooms to the pan, along with any juices that have collected on the plate — that's pure flavor that we definitely want back in the mix. Add the rosemary sprigs and toss everything together, letting it cook for another minute so the herbs can release their essential oils. The sauce should be glossy and coating the mushrooms like expensive fabric. If it looks dry, add a splash more wine or a tablespoon of water. Season with salt and pepper, but go easy — you can always add more later, but you can't take it out. Remove the pan from heat and let it rest for five minutes. This is crucial — the mushrooms will reabsorb some of their juices and become even more flavorful.
- While your mushrooms are resting, toast your bread. Don't just pop it in the toaster and call it a day — we're going for maximum crunch and flavor here. Heat a dry skillet over medium heat and add your bread slices, pressing down gently with a spatula. Toast for about two minutes per side until golden and crisp. While the second side is toasting, rub the toasted side with a cut clove of garlic — this adds incredible flavor without being overwhelming. You should hear a satisfying crunch when you press on the bread, not a sad squish that indicates soggy disappointment.
- Now for the assembly — and yes, this part matters more than you think. Place your toasted bread on plates and drizzle with a tiny bit of olive oil. Spoon the mushroom mixture over the toast, making sure to get plenty of that gorgeous sauce. Don't be shy here — you want it to soak into the bread a bit, but not so much that it becomes mush. Think of it as the difference between a perfectly dressed salad and one that's swimming in dressing. If you're using Parmesan, grate it over the top now while the mushrooms are still warm enough to melt it slightly but not so hot that it turns into a greasy mess.
- Finish with a final flourish of lemon zest and a crack of black pepper. Serve immediately, ideally with someone you like enough to share with, though I won't judge if you eat both pieces standing at the counter while making inappropriate noises of satisfaction. The contrast between the crunchy toast and the silky mushrooms should make you close your eyes involuntarily, and the combination of butter, wine, and herbs should taste like something you'd pay way too much for in a restaurant with moody lighting and uncomfortable chairs.
That's it — you did it. But hold on, I've got a few more tricks that'll take this to another level...
Insider Tricks for Flawless Results
The Temperature Rule Nobody Follows
Here's something that'll change your mushroom game forever: they need to be at room temperature before they hit the pan. I know, I know — you're thinking "who has time for that?" But pulling your mushrooms out of the fridge 15 minutes before cooking makes the difference between mushrooms that brown beautifully and ones that steam in their own sweat. Cold mushrooms hitting a hot pan create condensation, which is basically the enemy of caramelization. It's like trying to get a tan while someone's spraying you with a hose — technically possible but deeply counterproductive. If you forgot to take them out (and we've all been there), just give them an extra minute or two in the pan before you start the browning process.
The same goes for your butter — if it's straight from the fridge, it'll cool down your pan and you'll miss that crucial initial sear. Cut off what you need and let it sit on the counter while you're prepping everything else. This tiny bit of planning pays off in mushrooms that develop that gorgeous golden crust that makes people think you've been cooking for years instead of just following a really good recipe.
Why Your Nose Knows Best
Your sense of smell is your most underutilized cooking tool, and with mushrooms, it's absolutely crucial. When they're perfectly browned, they'll smell nutty and almost meaty — like walking into a steakhouse but somehow more sophisticated. If they smell raw and mushroomy, they need more time. If they smell burnt and acrid, you've gone too far and need to dial back the heat immediately. I'll be honest — I ruined my first three attempts at this recipe because I was following some arbitrary timing I'd read somewhere instead of trusting my nose. Now I cook by aroma, and my mushrooms have never been better.
This is also how you'll know when to add your garlic — when the mushrooms smell incredible and the pan is starting to look a bit dry, that's your cue. The garlic should hit the pan and immediately make your kitchen smell like you're the kind of person who has their life together, even if your laundry is currently sitting in a pile that could qualify as a small mountain range.
The 5-Minute Rest That Changes Everything
Okay, this next part? Pure magic. After your mushrooms are cooked and sauced, resist the urge to immediately pile them onto toast and inhale them. Instead, take the pan off the heat and let everything rest for five minutes. During this time, something incredible happens — the mushrooms, which have been screaming hot and slightly tense, relax and reabsorb some of their juices. It's like they've been holding their breath and finally get to exhale. The sauce thickens slightly, the flavors meld together, and everything becomes more cohesive and luxurious.
I discovered this by accident when my doorbell rang mid-cooking and I had to deal with a package delivery. When I came back, the mushrooms had transformed from good to absolutely transcendent. Now I build this rest into my timing, using those five minutes to toast the bread, set the table, or just stare into the middle distance thinking about how much I love food. Your patience will be rewarded with mushrooms that taste like they've been slow-cooking for hours instead of minutes.
Creative Twists and Variations
This recipe is a playground. Here are some of my favorite ways to switch things up:
The French Onion Route
Caramelize a sliced onion for twenty minutes until it's deep golden and sweet, then add your mushrooms and continue with the recipe as written. The combination of sweet onions and earthy mushrooms tastes like French onion soup had a baby with mushroom bourguignon. Top with Gruyère instead of Parmesan for the full French bistro experience, even if you're eating it on your couch in sweatpants. This version is particularly dangerous because it makes your kitchen smell like you've been cooking all day when really you've just been binge-watching cooking shows while occasionally stirring something.
The Breakfast Champion
Add a fried egg on top and suddenly this becomes the most sophisticated breakfast you've ever made for yourself. The runny yolk mixes with the mushroom sauce to create this incredible sauce that you'll want to mop up with extra toast. I like to fry the egg in the same pan after the mushrooms are done — those browned bits add incredible flavor to the egg, and you only dirty one pan which is crucial when you're operating on limited caffeine. Add a dash of hot sauce if you're feeling spicy, or keep it classic with just salt and pepper.
The Truffle Upgrade
If you're feeling flush or it's a special occasion, finish with a few drops of good truffle oil instead of the lemon zest. Not the cheap stuff that smells like gasoline — invest in a small bottle of decent truffle oil and use it sparingly. A little goes a very long way, and it transforms this humble toast into something that tastes like it costs thirty dollars at a restaurant where they serve water in wine glasses. White truffle oil is more delicate and plays better with the rosemary, but black truffle oil works too if that's what you have.
The Creamy Dream
Add a splash of heavy cream at the very end and let it reduce for a minute to create a luxurious creamy sauce that coats everything like velvet. This turns it into more of a meal and less of a snack — perfect for those nights when you need comfort food but can't face mac and cheese again. The cream mellows out the wine and creates this gorgeous pinkish sauce that looks like you tried way harder than you did. Just be careful not to add too much or you'll drown the mushrooms and end up with mushroom soup on toast, which is a completely different (though still delicious) experience.
The Spicy Spanish Version
Swap the rosemary for fresh thyme, add a pinch of smoked paprika when you add the garlic, and finish with some Spanish olive oil and a few slices of jamón if you're feeling fancy. The smoked paprika adds this incredible depth and a beautiful color that makes the mushrooms look like they've been slow-cooking over a wood fire. This version pairs beautifully with a glass of Rioja and makes you feel like you should be eating it on a balcony in Barcelona instead of your kitchen table while scrolling through Instagram.
The Allium Explosion
Add some sliced shallots along with the garlic for extra sweetness and complexity, or throw in some sliced green onions at the very end for freshness and color. The combination of different alliums creates layers of flavor that make each bite slightly different — some bites are more garlicky, some more oniony, all delicious. This is particularly good if you're serving it to people who think they don't like mushrooms, because the other flavors help ease them into mushroom appreciation without overwhelming them with earthiness.
Storing and Bringing It Back to Life
Fridge Storage
Here's the thing about mushroom mixtures — they actually get better after a day in the fridge. The flavors have time to meld and deepen, creating something that tastes like you spent way more time on it than you did. Store your cooled mushroom mixture in an airtight container in the fridge for up to four days. The toast, however, is another story — that's a make-fresh situation unless you enjoy eating crackers that taste like despair. When storing, keep the mushrooms separate from any extra sauce in the pan, and spoon some of the sauce over the top before refrigerating to keep everything moist and happy.
Freezer Friendly
While the mushrooms freeze beautifully, I don't recommend freezing the assembled toast unless you enjoy eating cardboard that tastes vaguely of mushroom. Freeze the mushroom mixture in freezer bags, pressing out as much air as possible, for up to three months. Thaw overnight in the fridge or use the defrost setting on your microwave, then reheat gently in a pan with a splash of water or wine to bring it back to life. The texture won't be quite as perfect as fresh, but it's still miles better than most mushroom things you'll eat, and perfect for those nights when you need comfort food but can barely operate a can opener.
Best Reheating Method
The key to bringing leftover mushrooms back to life is gentle heat and a little liquid. Dump them in a cold pan with a splash of water or wine, then heat slowly over medium-low heat, stirring occasionally. The gradual warming prevents them from turning rubbery, and the liquid helps recreate that gorgeous sauce. Once they're heated through and the sauce is glossy again, they're ready for their toast debut. Whatever you do, don't microwave them unless you enjoy eating mushroom-flavored rubber bands. And definitely make fresh toast — yesterday's bread is only good for bread crumbs or feeding to ducks, not for this masterpiece.