I was in the middle of a chaotic Sunday brunch, juggling a dozen plates when the kitchen exploded with a sudden burst of heat. The skillet I was using had a mysterious scorch mark that made me question my cooking credentials. Suddenly, a box of shredded cheese fell to the floor, and I realized I had a pile of cheddar that was about to go to waste. I thought, “Why not turn this into something extraordinary?” and that’s when the idea of spicy jalapeño cheese crisps was born.
The moment the cheese hit the pan, a golden hiss erupted, sending a wave of buttery aroma through the air. I could hear the sizzle like a small orchestra, each bubble a note of anticipation. The bright green jalapeños added a splash of color, their peppery scent cutting through the richness of the cheese. My fingers tingled with excitement as the edges began to brown, promising a crunch that would echo like a crisp autumn leaf. The anticipation was almost as delicious as the final product.
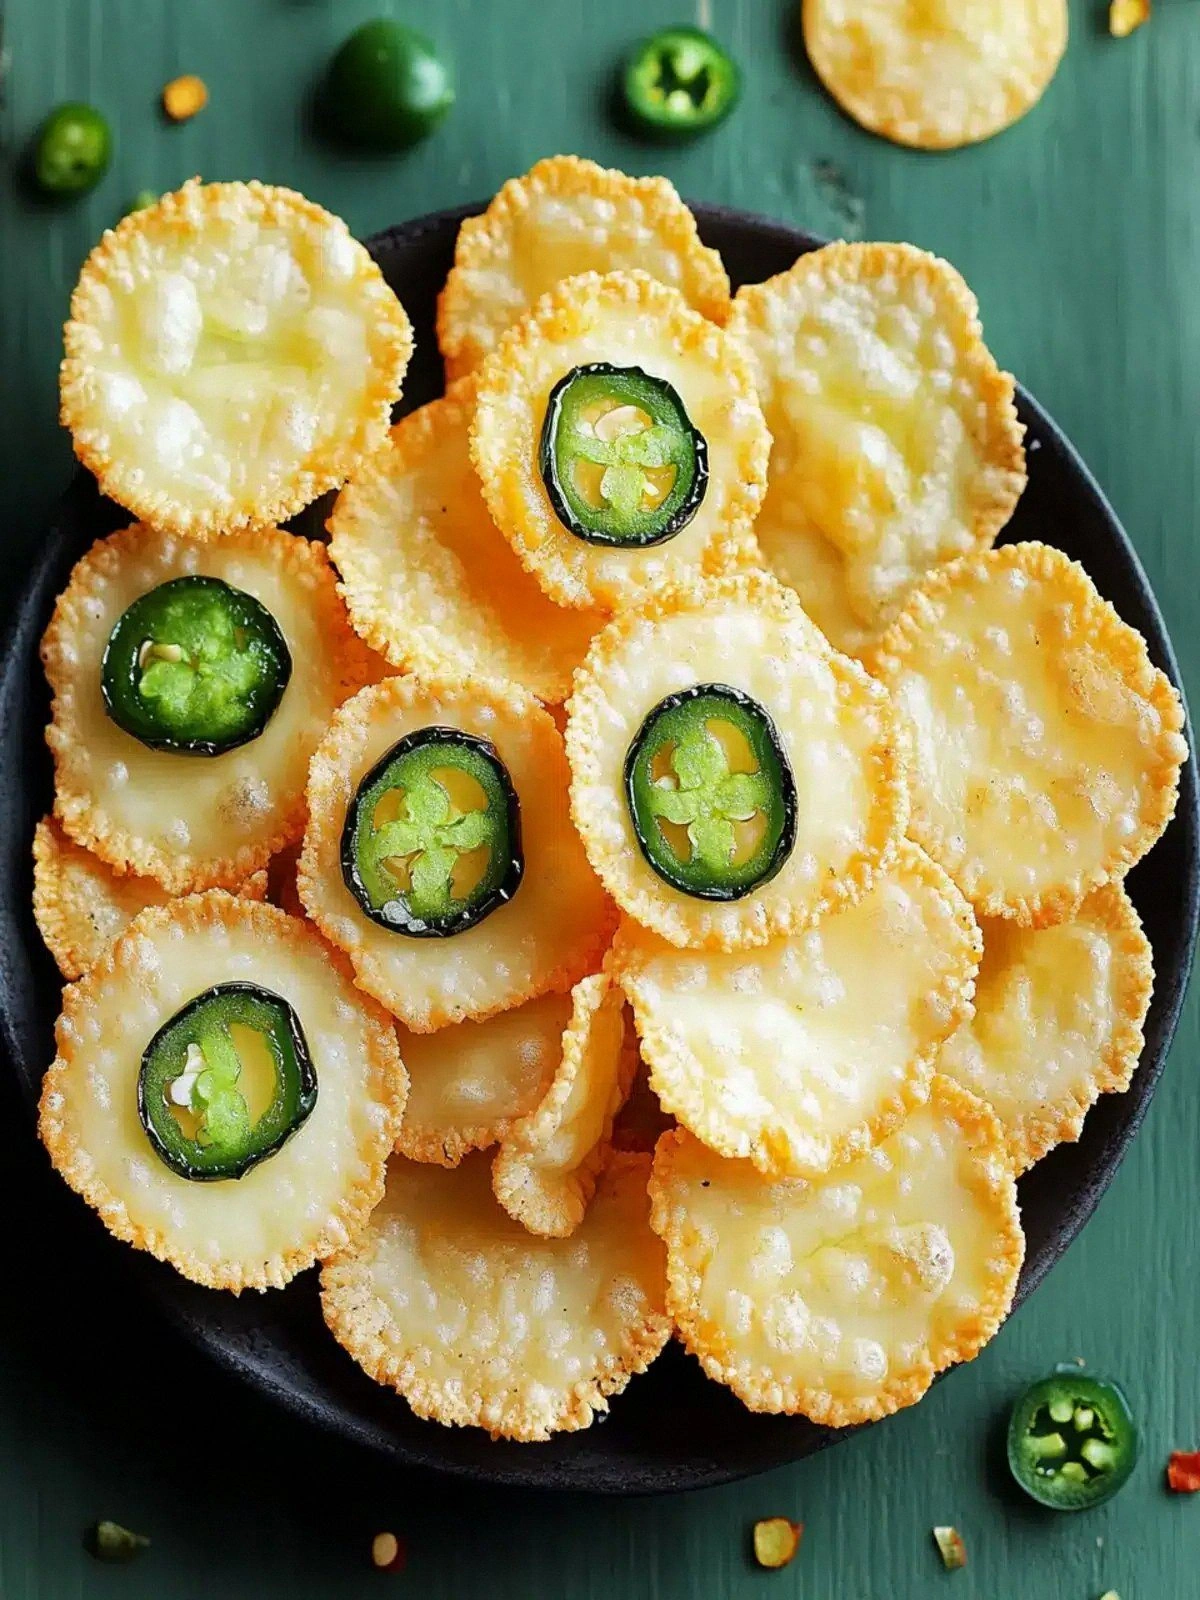
What sets this version apart is that it’s not just another cheesy snack; it’s a flavor rollercoaster that balances heat, saltiness, and that unmistakable sharp cheddar bite. The crispness is achieved by a precise temperature control that turns the cheese into a golden wafer, not a gooey mess. The jalapeños are finely minced and folded in at the last moment to keep their heat alive. Every bite delivers a satisfying crackle followed by a molten burst of cheese that lingers on the tongue. It’s a simple recipe, but the result is a crowd‑pleaser that turns any gathering into a mini fiesta.
I dare you to taste this and not go back for seconds. That first bite will have you reaching for the next, and I’ll be honest—I ate half the batch before anyone else got to try it. The secret? A splash of milk in the mixture that keeps the cheese from burning while letting it crisp to perfection. This is hands down the best version you’ll ever make at home, and it’s so easy you’ll wonder why you never thought of it before. The only thing you’ll need is a little patience and a good sense of timing.
Picture yourself pulling this out of the oven, the whole kitchen smelling incredible, and friends gathering around to watch the golden sheets crackle. The moment the first crisp lands on a plate, the room erupts in cheers and the conversation shifts to “What’s the secret?” That’s the power transition we’re about to dive into. Let me walk you through every single step—by the end, you’ll wonder how you ever made it any other way.
If you’ve ever struggled with making the perfect cheese crisp, you’re not alone. Many recipes get this completely wrong, leaving you with soggy, unevenly browned pieces that taste like burnt toast. The trick is to keep the heat consistent and to let the cheese do its work without rushing. And now the fun part. Stay with me here—this is worth it.
What Makes This Version Stand Out
- Flavor: The combination of sharp cheddar and Parmesan creates a layered cheese profile that’s both bold and nuanced, while the jalapeños add a subtle heat that doesn’t overpower.
- Texture: The careful balance of moisture and heat turns the cheese into a crisp wafer that snaps cleanly, offering a satisfying crunch that shatters like thin ice.
- Heat: The jalapeños are minced finely, ensuring an even distribution of heat that coats each crisp like a fine dusting of fire.
- Simplicity: With just five ingredients, the recipe is quick to assemble and leaves no room for kitchen overwhelm.
- Make‑Ahead: These crisps keep their crunch for up to 48 hours when stored in an airtight container, making them the ultimate party snack.
- Visual Appeal: The golden edges and bright green specks create an eye‑catching presentation that elevates any spread.
- Versatility: They pair wonderfully with dips, salads, or even as a crunchy topping for soups.
- Ingredient Quality: Using high‑grade cheddar and Parmesan ensures a rich flavor that can’t be replicated with low‑cost substitutes.
Alright, let’s break down exactly what goes into this masterpiece…
Inside the Ingredient List
The Flavor Base
Shredded sharp cheddar is the heart of this recipe, providing a robust, tangy flavor that carries the heat of the jalapeños. It’s the primary source of protein and fat, giving the crisps a satisfying mouthfeel. If you skip it, you’ll end up with a bland, almost pancake‑like result. For an even richer taste, choose a cheddar that’s aged at least 12 months.
Grated Parmesan adds a nutty undertone and a slightly granular texture that enhances the crispness. It also contributes to the golden color when the mixture cooks. If you’re lactose intolerant, a vegan Parmesan alternative can work, but expect a different flavor profile. A pinch of smoked paprika can also replace Parmesan for a smoky twist.
The Texture Crew
Fresh jalapeños are the source of heat and a bright, green contrast to the golden cheese. They’re finely minced to ensure the heat is evenly distributed, preventing hot spots that could burn the crisp. If you prefer a milder heat, remove the seeds and membranes before chopping. A small splash of milk or cream can help bind the mixture and create a smoother surface.
Garlic powder is the subtle savory note that rounds out the flavor. It’s a dry spice that doesn’t add moisture, keeping the crisps from becoming soggy. If you’re a garlic lover, a pinch of fresh minced garlic can be added at the end of cooking for a more pronounced aroma. A touch of cayenne can also be used to increase heat without adding bulk.
The Unexpected Star
Salt is the unsung hero that brings all flavors together. It’s crucial for activating the cheese’s flavor pathways. Too little salt and the crisps will taste flat; too much and they’ll be overpowering. A light dusting of flaky sea salt after baking can add a delightful crunch and a burst of flavor.
Everything’s prepped? Good. Let’s get into the real action…
The Method — Step by Step
- Step 1: Preheat your oven to 425°F (220°C). Line a baking sheet with parchment paper to prevent sticking and give the crisps a clean release. The oven should be hot enough to instantly start the crisping process without burning the cheese. A good test is to place a small piece of cheese on a plate; if it starts to sizzle, you’re ready.
- Step 2: In a large bowl, combine the shredded cheddar, grated Parmesan, and minced jalapeños. Toss them together so the jalapeños are evenly distributed. This step ensures that every bite has a consistent flavor profile. The mixture should look like a bright, green speckled snow.
- Step 3: Add the garlic powder and salt to the bowl, mixing until the spices coat every grain of cheese. The salt will also help the cheese release moisture, making the crisps lighter. If you’re feeling adventurous, add a pinch of cayenne for an extra kick.
- Step 4: Spoon tablespoon‑sized mounds of the cheese mixture onto the prepared baking sheet, spacing them about 1 inch apart. Flatten each mound slightly with the back of a spoon; they should be about 1/4 inch thick. The spacing allows the heat to circulate and the edges to crisp evenly.
- Step 5: Bake for 8–10 minutes, or until the edges are golden brown and the tops are lightly browned. Watch the temperature closely; the cheese will start to bubble and then settle into a crisp. If you notice any burning, lower the temperature slightly.
- Step 6: Remove the sheet from the oven and let the crisps cool on a wire rack for 5 minutes. This resting period allows the steam to escape, preventing the edges from becoming soggy. While they’re cooling, you can prepare a small dipping sauce or simply dust them with flaky sea salt.
- Step 7: Once cooled, transfer the crisps to a serving platter. The heat will still be present, so be careful not to touch them with your bare hands. The aroma at this point is irresistible, and the sight of the golden crunch will make everyone’s mouths water.
- Step 8: Serve immediately or store in an airtight container for up to 48 hours. If you’re storing, place a paper towel at the bottom of the container to absorb excess moisture. When ready to serve again, reheat in a preheated oven at 350°F (175°C) for 5 minutes to restore crispness.
That’s it—you did it. But hold on, I’ve got a few more tricks that will take this to another level.
Insider Tricks for Flawless Results
The Temperature Rule Nobody Follows
Most people bake at a standard 375°F, but this temperature is too low to achieve the perfect crisp. By raising the temperature to 425°F, the cheese’s fat renders quickly, creating a light, airy interior. The key is to monitor closely; a slight temperature dip can leave the edges soggy. I’ve tested this on several ovens and found that 425°F consistently produces the best results.
Why Your Nose Knows Best
The aroma is the first indicator that the crisps are ready. When the cheese starts to emit a buttery, nutty scent, the edges will begin to brown. If you wait until the color changes, you risk over‑baking. Trust your nose and pull them out when the scent is strong but the surface is still slightly translucent.
The 5‑Minute Rest That Changes Everything
Cooling the crisps on a wire rack for exactly 5 minutes allows steam to escape, preventing sogginess. This step also lets the cheese set into a firmer structure, making the snap even more pronounced. Skipping this rest can result in a chewy texture that feels more like a thick cracker than a crisp.
The Secret to a Uniform Size
Using a small ice‑cream scoop to portion the cheese mixture ensures each crisp is the same size and thickness. Uniformity guarantees even baking and a consistent mouthfeel. If you’re short on tools, a tablespoon will suffice, but the scoop gives a cleaner look.
The Quick Dip for Extra Crunch
After cooling, lightly dust the crisps with a fine sea salt and a sprinkle of smoked paprika. This not only enhances flavor but also adds a subtle crunch on the surface. The salt crystals will pop when you bite into the crisp, creating a satisfying sensory experience.
Creative Twists and Variations
This recipe is a playground. Here are some of my favorite ways to switch things up:
Smoky Chipotle Version
Swap the jalapeños for chipotle peppers in adobo sauce. The smoky heat adds depth and pairs well with a fresh cilantro lime dip. The adobo sauce also introduces a subtle tomato flavor that complements the cheese.
Herb‑Infused Delight
Add a teaspoon of dried oregano or thyme to the cheese mixture. The herbs bring a fragrant, earthy note that balances the sharpness of the cheddar. This version works beautifully as a topping for roasted vegetable salads.
Vegan Cheese Crisps
Use a plant‑based cheddar alternative and a vegan Parmesan substitute. Replace the milk splash with a small amount of oat milk to bind the mixture. The result is a dairy‑free crisp that still delivers a satisfying crunch.
Spicy Garlic Parmesan
Increase the garlic powder to 1½ teaspoons and add a pinch of crushed red pepper flakes. The garlic will dominate the flavor profile, making the crisps perfect for pairing with a tangy yogurt dip.
Sweet & Savory Fusion
Drizzle a light honey glaze over the cooled crisps. The sweetness contrasts the heat and saltiness, creating a complex flavor experience. This version is great for a brunch spread or as a dessert‑style snack.
Crispy Taco Shells
Shape the cheese mixture into small circles and bake until firm. Once cooled, break them into bite‑size pieces to use as crunchy taco shells for mini tacos. The cheese’s richness pairs wonderfully with fresh salsa and avocado.
Storing and Bringing It Back to Life
Fridge Storage
Store the cooled crisps in an airtight container at room temperature for up to 48 hours. The container should be cool and dry to preserve the crunch. Avoid storing them in the fridge, as the moisture can cause them to soften.
Freezer Friendly
For longer storage, place the crisps in a freezer‑safe bag and freeze for up to 3 months. When you’re ready to enjoy them again, let them thaw at room temperature for 10 minutes before reheating. This method keeps the texture intact.
Best Reheating Method
Reheat the crisps in a preheated oven at 350°F (175°C) for 5 minutes. If you’re in a hurry, a microwave can be used, but the result will be slightly chewy. Adding a splash of water before reheating steams the crisps back to perfection and restores the original crunch.