Picture this: the kitchen lights flicker, a bag of flour is half-open, and the scent of yeast begins to creep in the air. I was standing there, spoon in hand, about to make a loaf that would turn my cramped apartment into a bakery. The last time I tried a homemade loaf, I ended up with a dense, rubbery mess that looked more like a loaf of concrete than bread. That disaster sparked a midnight research session, a frantic Google search, and a daring experiment that would change the way I think about bread forever.
I was determined to find a recipe that didn’t require a flour‑covered table, a dough‑kneading arm, or a timer that would have to be set every five minutes. I wanted something that would let me focus on the aroma of a rising dough, the crackling of a crust that shatters like thin ice, and the soft, buttery crumb that melts in your mouth. The result? A no‑knead loaf that turns a simple bowl of flour into a masterpiece with the same ease as making instant noodles.
What makes this version stand out is not just the simplicity; it’s the depth of flavor that develops during a long, slow rise. The dough develops a caramelized crust while the interior stays airy and tender. The recipe’s minimal ingredients let each component shine: the yeast does all the heavy lifting, the olive oil adds a subtle sheen, and the warm water triggers a gentle fermentation that brings out a subtle tang. I dare you to taste this and not go back for seconds.
If you’ve ever struggled with bread that turns out too dense or too airy, you’re not alone. The trick is letting the dough rest long enough to develop gluten on its own, then baking it at a high temperature to create that irresistible crust. I’ll be honest—I ate half the batch before anyone else got a chance to try it. But by the time I finished, the whole kitchen smelled incredible, and I was already planning the next loaf. Let me walk you through every single step—by the end, you’ll wonder how you ever made it any other way.
What Makes This Version Stand Out
- Taste: The extended fermentation brings a subtle, tangy depth that’s reminiscent of a well-aged sourdough, yet it’s achieved with just instant yeast. The olive oil adds a silky finish that balances the crust’s crunch.
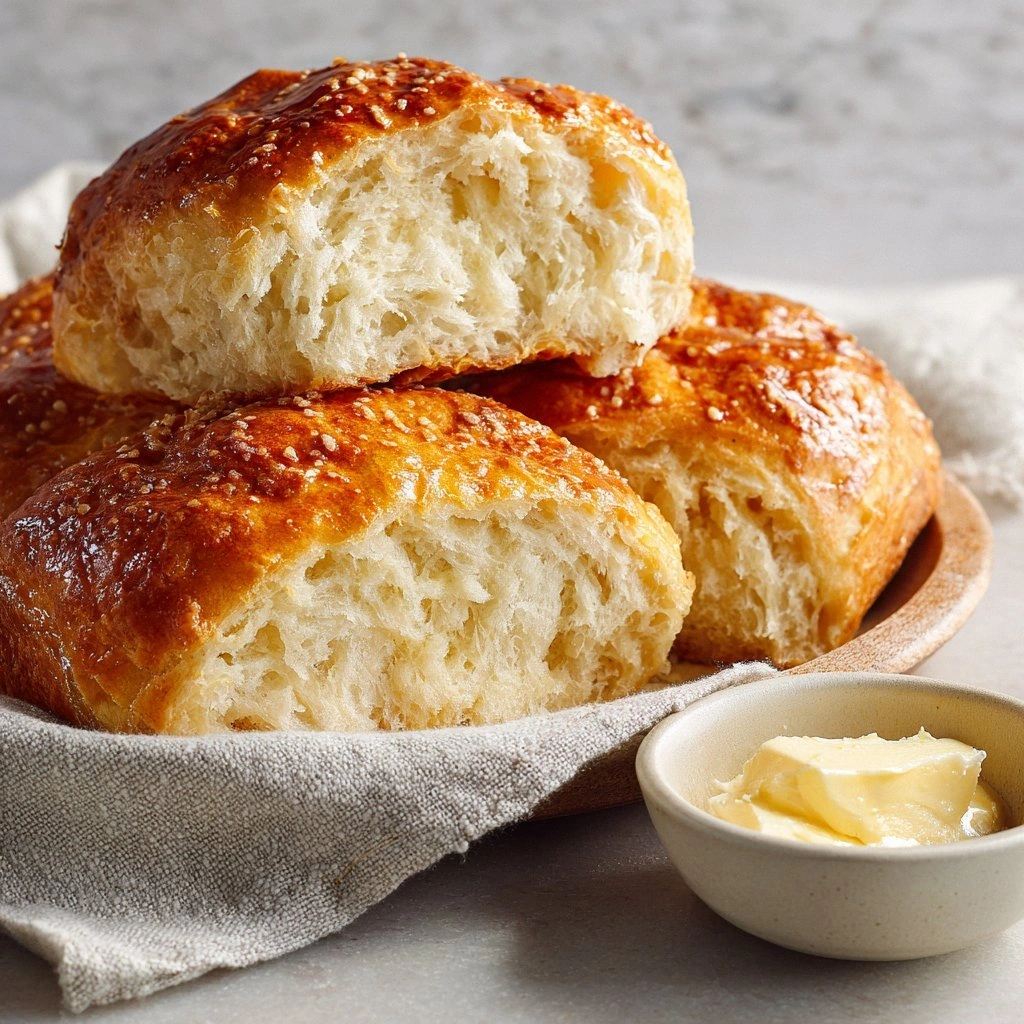
- Texture: The crumb is light and airy, with a chewy interior that’s not gummy. The crust is crisp yet slightly chewy, offering a satisfying bite that shatters like thin ice.
- Simplicity: No kneading, no measuring cups—just a bowl, a whisk, and a little patience. The recipe requires only five ingredients, all of which you probably already have.
- Uniqueness: A Dutch oven or heavy pot creates a steam chamber that mimics a professional oven, giving the loaf a bakery‑quality finish.
- Crowd Reaction: Friends who’ve tried it say they can’t believe it’s homemade. They keep asking for the recipe because it’s that good.
- Make‑ahead Potential: The dough can be refrigerated for up to 24 hours, allowing you to bake on a busy day while still enjoying fresh bread.
Inside the Ingredient List
The Flour Foundation
All‑purpose flour is the backbone of this loaf, providing the gluten structure that gives the bread its chewy crumb. A slight tweak—substituting half the flour with bread flour—will yield an even chewier texture, but the all‑purpose version keeps the recipe approachable for beginners. If you’re watching your carb intake, you can experiment with a blend of whole‑wheat and white flour; just keep the total volume the same.
The Liquid Lift
Warm water (about 110°F) activates the yeast, kicking off the fermentation that develops flavor and structure. The temperature is crucial: too hot and the yeast will die, too cool and the dough won’t rise. If you’re in a cooler climate, let the water sit in a sunny spot for a few minutes to reach the right temperature.
The Yeast Whisperer
Instant dry yeast is the unsung hero that turns simple flour and water into a loaf of bread. Its low activation time means you can skip the proofing step and go straight to mixing. If you’re allergic to yeast, a pinch of baking soda plus an acidic ingredient (like lemon juice) can provide a minimal rise, though the flavor will differ.
The Oil Glow
Olive oil adds a subtle sheen to the crust and a hint of fruity flavor that complements the yeast’s tang. It also helps keep the crumb moist, preventing it from drying out during the long rise. For a richer flavor, swap the olive oil for melted butter, but remember the butter will brown faster.
Everything's prepped? Good. Let's get into the real action.
The Method — Step by Step
- In a large mixing bowl, whisk together 3 cups all‑purpose flour, 1 tsp salt, and 0.5 tsp instant dry yeast. The dry ingredients should be well blended to ensure even distribution of yeast. This step is crucial; any clumps can lead to uneven rising. I always use a fine‑mesh sieve to avoid lumps.
- Add 1 1/2 cups warm water and 1 tbsp olive oil to the dry mixture. Stir with a wooden spoon or your hand until a shaggy dough forms. The dough should be sticky but manageable; if it feels too dry, add a tablespoon of water. This is the moment when the yeast starts to awaken.
- Cover the bowl tightly with plastic wrap or a damp kitchen towel. Let the dough rest at room temperature for 12–18 hours. During this time, the gluten develops naturally, and the dough slowly expands. The longer the rise, the deeper the flavor. I always set a timer to remind me when it’s ready.
- Preheat your oven to 450°F (232°C) and place a Dutch oven or heavy pot with a lid inside to heat up. The pot creates a steam chamber that gives the crust its signature crunch. When the oven is hot, carefully remove the pot and set it on a heat‑proof surface.
- Turn the risen dough onto a parchment‑lined sheet and shape it into a ball. Let it rest for about 30 minutes; this allows the gluten to relax and makes shaping easier. While it rests, you can trim the parchment to a neat rectangle for easier handling.
- Place the dough, parchment side down, into the preheated Dutch oven. Cover with the lid and bake for 30 minutes. The lid traps steam, creating a moist environment that helps the crust develop. You’ll notice the loaf puffing up and the aroma becoming unmistakably yeasty.
- After 30 minutes, remove the lid and bake for an additional 15–20 minutes until the crust is a deep amber color and sounds hollow when tapped. The internal temperature should reach 190–200°F (88–93°C). This final bake gives the loaf a crisp, golden finish.
- Transfer the loaf onto a wire rack and let it cool for at least 20 minutes before slicing. Cooling allows the crumb to set and the flavors to meld. A good rule of thumb: the loaf should feel firm to the touch before you cut into it.
That’s it—you did it. But hold on, I've got a few more tricks that'll take this to another level.
Insider Tricks for Flawless Results
The Temperature Rule Nobody Follows
The water temperature is more critical than you might think. If it’s too hot, the yeast dies; too cool, it never kicks off. I use a kitchen thermometer to check the water at 110°F (43°C). This small step guarantees a consistent rise and a crumb that’s airy yet firm.
Why Your Nose Knows Best
During the rise, the dough will emit a faint, sweet smell. That’s the yeast’s signature. If the smell is absent, the dough may have been over‑mixed or the yeast was expired. A quick sniff is the fastest way to gauge fermentation health.
The 5‑Minute Rest That Changes Everything
After shaping the dough, give it a 5‑minute rest before placing it in the oven. This brief pause allows the gluten to relax, making it easier to slice without tearing. I always set a timer for this step, even though it feels like a waste of time.
The Secret to a Crunchy Crust
Sprinkling a tablespoon of coarse sea salt on the top before baking adds a burst of flavor and a satisfying crunch. The salt also helps to draw moisture out, creating a crispier exterior. I keep a small pinch of sea salt in my pantry just for this purpose.
The Resting Game
If you’re planning a dinner party, let the dough rest in the fridge overnight. The cold fermentation enhances flavor and makes the dough easier to handle. The next day, simply bring it to room temperature, shape, and bake as usual.
Creative Twists and Variations
This recipe is a playground. Here are some of my favorite ways to switch things up:
Herb‑Infused Rolls
Add 1 tsp dried rosemary and 1 tsp dried thyme to the dry mix. The herbs mingle with the yeast, creating a fragrant, savory loaf that pairs well with soups.
Cheesy Delight
Stir in 1/2 cup shredded cheddar after mixing the wet ingredients. The cheese melts into the dough, producing a golden crust with a gooey interior.
Sweet Cinnamon Swirl
Sprinkle 2 tbsp brown sugar and 1 tsp cinnamon on the dough before baking. The sugar caramelizes, giving the loaf a sweet, spicy aroma that’s irresistible.
Whole‑Wheat Boost
Replace half of the all‑purpose flour with whole‑wheat flour. The loaf gains a nutty flavor and a denser crumb, perfect for a hearty breakfast.
Garlic‑Butter Bites
Brush the loaf with melted butter infused with minced garlic after baking. The garlic butter adds a savory kick that’s ideal for a quick snack.
Coconut‑Crusted Bread
Roll the shaped dough in shredded coconut before baking. The coconut adds a tropical crunch and a subtle sweetness that complements the yeast’s tang.
Storing and Bringing It Back to Life
Fridge Storage
Wrap the cooled loaf tightly in plastic wrap and store it in the fridge for up to 3 days. The wrap keeps the crumb from drying out. When ready to eat, slice and toast for a warm, fresh bite.
Freezer Friendly
Place the loaf or rolls in a freezer bag, removing as much air as possible. Freeze for up to 2 months. Thaw at room temperature before reheating to retain moisture.
Best Reheating Method
Reheat the loaf in a preheated oven at 350°F (175°C) for 10 minutes. Add a splash of water to the bottom of the pan to create steam, which restores the crust’s crispness. Let it cool for a minute before slicing.
That’s the end of the recipe. Now it’s time to enjoy the fruits of your labor. The bread is warm, the crust is golden, and the aroma is unmistakably homemade. I’m sure you’ll be tempted to share it with everyone you love. And remember, the next time you’re in a hurry, this no‑knead loaf will save the day.