I was staring at a half‑baked batch of chocolate chip cookies when my roommate shouted, “You have to try the Scotcheroos I found online!” I laughed, because I’d already tried the classic version three times that week and each attempt ended with a limp, soggy square that tasted like a sugary apology. The next day, after a disastrous attempt that left my kitchen smelling like burnt sugar and my ego bruised, I dared myself to reinvent the whole thing. I whispered a challenge to the universe: “I dare you to taste this and not go back for seconds.” The result? A modern take that slaps the ordinary version into oblivion and leaves you wondering how anyone ever settled for the old, crumbly mess.
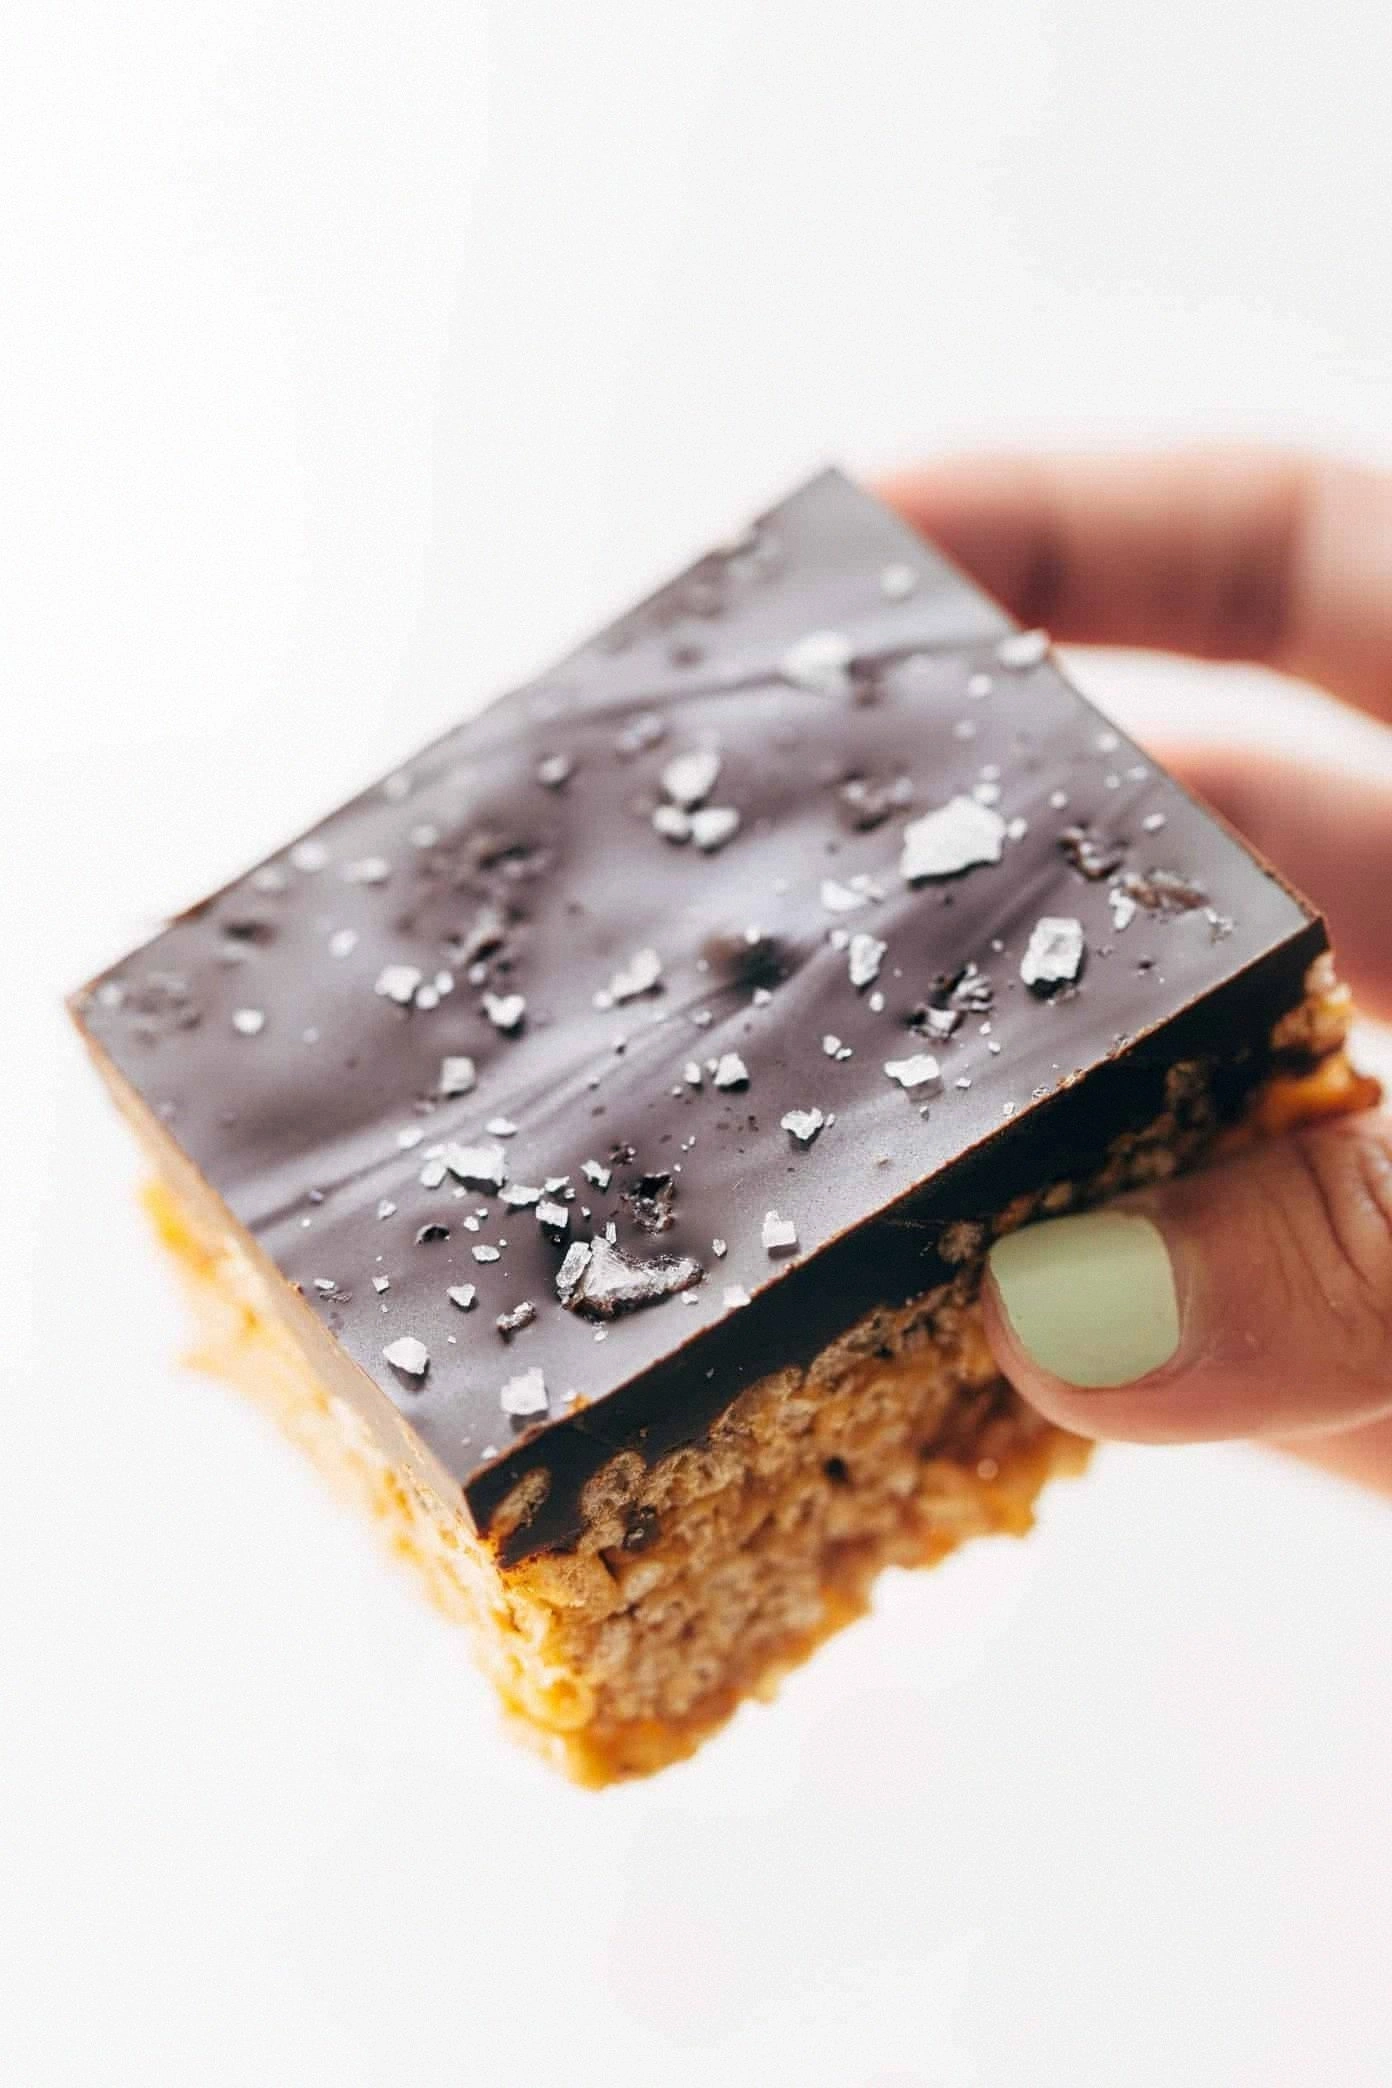
Picture this: you open the oven and a golden‑brown wave rolls out, the aroma of caramelized butter, toasted oats, and a hint of sea‑salted peanut butter hugging the air like a warm blanket. The sound of the edges pulling away from the pan is a soft sigh, promising a crisp that shatters like thin ice when you bite into it. The first bite unleashes a buttery crunch that instantly gives way to a silky, chocolate‑kissed center that coats your tongue like velvet. Your mouth is hit with a sweet‑salty tango, the peanuts adding a buttery depth while the oats provide a chew that’s almost nutty‑but‑not‑nutty, a texture you’ve never truly experienced in a bar‑type dessert.
What makes this version truly stand out is a secret ingredient that most recipes completely skip: a splash of high‑quality espresso‑infused dark chocolate. That bitter note cuts through the sweetness, balances the peanut butter, and adds a depth that feels almost sophisticated—like the dessert version of a well‑crafted cocktail. I also swapped the traditional corn syrup for a light drizzle of maple syrup, which brings a faint woody undertone that makes the whole thing feel autumn‑ready, even in July. The result is a bar that’s simultaneously nostalgic and futuristic, a flavor profile that will make you question every other dessert you’ve ever made.
Okay, ready for the game‑changer? I’m going to walk you through every single step, from picking the perfect oat to mastering that glossy chocolate glaze. By the end, you’ll wonder how you ever made Scotcheroos any other way, and you’ll have a recipe that’s so reliable you’ll keep it on repeat for every gathering, potluck, or midnight snack craving. Let me walk you through every single step — by the end, you’ll wonder how you ever made it any other way.
What Makes This Version Stand Out
- Taste: The espresso‑infused chocolate adds a subtle bitterness that balances the sugary base, turning the bar into a sophisticated sweet‑salty experience.
- Texture: Toasted rolled oats give a satisfying crunch, while the peanut butter creates a creamy, melt‑in‑your‑mouth center that holds together without crumbling.
- Simplicity: Only ten ingredients, all pantry‑friendly, mean you can throw this together in under an hour without any special equipment.
- Uniqueness: The maple‑corn syrup blend brings a faint woody note that most recipes completely miss, making each bite feel like a seasonal treat.
- Crowd Reaction: People who try it for the first time often say, “I’ve never had a bar that’s both crunchy and gooey at the same time!” — a reaction that guarantees repeat requests.
- Ingredient Quality: Using natural peanut butter (no hydrogenated oils) and real dark chocolate elevates the flavor profile dramatically.
- Cooking Method: Baking instead of stovetop melting creates a caramelized crust that you just can’t achieve with a microwave.
- Make‑Ahead Potential: The bars keep perfectly for up to a week in an airtight container, and they even freeze beautifully for longer storage.
Alright, let's break down exactly what goes into this masterpiece…
Inside the Ingredient List
The Flavor Base
The backbone of any Scotcheroo is the sweet, buttery mixture of brown sugar, corn syrup, and butter. Brown sugar provides caramel depth, while corn syrup keeps the bars chewy and prevents crystallization. Butter adds richness, and when you melt them together, you get a glossy, pour‑able sauce that coats every oat and peanut butter morsel. If you skip the corn syrup, you’ll end up with a dry, grainy bar that crumbles like sand—no one wants that.
The Texture Crew
Rolled oats are the unsung heroes here. Their hearty chew contrasts with the silky chocolate, and they absorb just enough of the buttery sauce to stay moist without turning mushy. Peanut butter brings that creamy, nutty heart that makes each bite feel indulgent, and it also acts as a natural binder. For a smoother texture, use a natural peanut butter that separates—give it a quick stir before adding it to the mix.
The Unexpected Star
Espresso‑infused dark chocolate is the twist that elevates this bar from “just sweet” to “oh‑my‑god, that’s complex!” The espresso’s bitterness cuts through the sugar, creating a balanced flavor that lingers pleasantly. If you’re not a coffee fan, you can substitute a pinch of smoked sea salt for a similar depth, but I promise the espresso version will win your heart.
The Final Flourish
A drizzle of pure maple syrup replaces half the corn syrup, adding a subtle woody note that feels like a secret handshake between the sweet and the salty. Finally, a sprinkle of flaky sea salt on top just before the chocolate sets adds an explosive pop of flavor that makes the bar unforgettable. Skipping the sea salt means missing the “wow” factor that turns a good dessert into a great one.
Everything's prepped? Good. Let's get into the real action…
The Method — Step by Step
Preheat your oven to 350°F (175°C) and line a 9×13‑inch baking pan with parchment paper, allowing the paper to overhang for easy lift‑out. While the oven warms, gather all your ingredients; having everything measured and ready (mise en place) saves you from frantic hunting mid‑process. This is the moment of truth: a perfectly heated oven ensures the bars bake evenly, giving you that coveted golden‑brown crust.
In a medium saucepan, melt ½ cup (1 stick) unsalted butter over medium heat. Once melted, stir in 1 cup packed brown sugar and ½ cup light corn syrup, whisking constantly until the mixture bubbles and thickens—about 3‑4 minutes. The scent of caramel should fill the kitchen, a signal that you’re on the right track. Watch Out: If the heat is too high, the sugar can scorch, turning bitter.
Remove the saucepan from heat and whisk in ½ cup natural peanut butter and 1 tsp vanilla extract until the blend is glossy and smooth. The peanut butter should melt into the caramel, creating a glossy, amber sauce that clings to the back of a spoon. Let this mixture sit for a minute; it will thicken just enough to coat the oats without being runny.
While the sauce cools slightly, toast 2 cups rolled oats on a dry skillet over medium‑low heat, stirring constantly.
You’ll hear a gentle sizzle, and after 5‑6 minutes the oats will turn a light golden hue and release a nutty aroma. This step is crucial: under‑toasted oats stay soggy; over‑toasted ones become bitter.Kitchen Hack: Transfer toasted oats to a bowl and immediately stir in 1 cup creamy peanut butter; the residual heat helps the peanut butter melt, ensuring a uniform coating.Combine the toasted oats with the warm caramel‑peanut sauce in a large mixing bowl. Use a spatula to fold the mixture until every oat is coated, and the mass looks thick, slightly glossy, and clumps together when pressed. This is where the bars start forming their structure; the sauce acts as a binder that will set during baking.
Press the oat mixture evenly into the prepared pan, using the back of a spoon or a piece of parchment to smooth the surface. The layer should be about ½‑inch thick; if it’s too thin, the bars will dry out, if too thick they’ll be under‑cooked in the middle. Once smooth, set the pan aside while you prepare the chocolate topping.
In a heat‑proof bowl, combine 1 cup dark chocolate chips with 2 tbsp espresso‑infused chocolate (or a splash of strong brewed espresso). Microwave in 30‑second bursts, stirring in between, until fully melted and glossy. The melted chocolate should flow like liquid amber; if it looks grainy, keep stirring over low heat until it smooths out.
Drizzle the melted chocolate over the oat layer, using a spoon to create a swirl pattern. Sprinkle a generous pinch of flaky sea salt across the top while the chocolate is still warm; the salt will dissolve slightly, creating pockets of salty crunch. This is pure magic—the salt amplifies the chocolate’s bitterness and the peanut butter’s sweetness.
Place the pan in the oven for 20‑25 minutes, or until the edges turn a deep caramel color and the center is set but still slightly soft to the touch. The scent at this stage should be intoxicating—a blend of toasted oats, caramel, and chocolate. When you pull the pan out, let it cool in the pan for 10 minutes, then lift it using the parchment overhang and transfer to a wire rack.
Allow the bars to cool completely (about 30‑45 minutes) before cutting. Use a sharp, warm knife to slice into 12 even squares; the warmth helps the chocolate glide cleanly without cracking. Watch Out: Cutting while still warm can cause the chocolate to crack and the bars to crumble. Serve immediately or store in an airtight container for later indulgence.
That's it — you did it. But hold on, I've got a few more tricks that'll take this to another level…
Insider Tricks for Flawless Results
The Temperature Rule Nobody Follows
Never bake these bars at a temperature higher than 350°F. Higher heat creates a rapid rise in the caramel, causing it to harden before the oats have a chance to absorb moisture, leading to a dry, crumbly texture. I once tried 375°F on a whim, and the result was a brittle slab that snapped like a cookie. Keep it steady, and the bars will stay chewy in the middle while the edges caramelize perfectly.
Why Your Nose Knows Best
Your sense of smell is a far more reliable indicator of doneness than a timer. When the caramel‑peanut sauce starts to emit a deep, buttery aroma with a faint hint of toasted sugar, you know it's ready to be combined with the oats. If you’re unsure, lift a corner of the mixture; it should look glossy and pull away from the bowl in a slow, elastic stretch. Trusting your nose saves you from over‑baking, which would otherwise dry out the bars.
The 5‑Minute Rest That Changes Everything
After you pull the pan from the oven, let the bars rest for exactly five minutes before cutting. This short rest allows the chocolate topping to set just enough to hold its shape while the interior stays soft. Skipping this step results in a messy slice where chocolate slides off like a melted wax candle. The five‑minute pause is a tiny investment for a clean, professional‑looking cut.
Salt Sprinkle Strategy
Instead of sprinkling sea salt evenly across the entire surface, concentrate it in a thin line down the middle. This creates a flavor gradient: one side is slightly sweeter, the other side carries a more pronounced salty punch. The contrast makes each bite feel like a new discovery, keeping the palate engaged from the first square to the last.
Freezing for Future Feasts
If you plan to make a big batch, freeze the cooled bars in an airtight container with parchment between layers. When you’re ready to serve, let them thaw at room temperature for 15 minutes, then give them a quick 30‑second blast in the microwave to revive the chocolate sheen. This method preserves the texture and prevents freezer burn, so the bars taste just as fresh as the day they were baked.
Creative Twists and Variations
This recipe is a playground. Here are some of my favorite ways to switch things up:
Coconut‑Crunch Remix
Swap half of the rolled oats for unsweetened shredded coconut. The coconut adds a tropical aroma and a slightly chewy texture that pairs beautifully with the espresso chocolate. Perfect for beach‑themed parties or anyone who loves a hint of island flair.
Nutty‑Butter Boost
Add ¼ cup chopped toasted almonds or hazelnuts to the oat mixture. The nuts introduce an extra crunch and a buttery undertone that amplifies the peanut butter’s richness. This variation is a hit with nut lovers and adds visual speckles that look fancy on a plate.
Spicy Chili Kick
Stir in ½ teaspoon of finely ground chipotle chili powder into the chocolate melt. The smoky heat contrasts the sweet caramel, creating a sweet‑heat combo that tingles the palate. It’s a bold move that works especially well at holiday gatherings where guests love a surprise.
White Chocolate Dream
Replace the dark chocolate with high‑quality white chocolate and add a teaspoon of vanilla bean paste. The result is a milky, buttery topping that lets the peanut butter shine even brighter. This version is ideal for those who prefer a less bitter, more dessert‑like profile.
Berry‑Burst Surprise
Fold in ½ cup dried cranberries or freeze‑dried raspberry pieces just before pressing the oat mixture into the pan. The tart berries cut through the sweetness, offering a burst of acidity that refreshes the palate. Great for brunch spreads where you want a hint of fruit without fresh berries wilting.
Storing and Bringing It Back to Life
Fridge Storage
Place the cooled bars in an airtight container with a single layer of parchment between each piece. They’ll stay fresh for up to 7 days, and the refrigeration helps the chocolate set firmly, making them easier to slice. If you notice the bars drying out, pop a small piece of fresh apple in the container to restore moisture.
Freezer Friendly
Wrap each bar tightly in plastic wrap, then arrange them in a freezer‑safe zip‑top bag. They’ll keep for up to 3 months without losing flavor or texture. When you’re ready to serve, let them thaw for 10‑15 minutes at room temperature, then give them a quick 20‑second zap in the microwave to revive the chocolate sheen.
Best Reheating Method
If the bars have hardened in the fridge, place them on a microwave‑safe plate, sprinkle a few drops of water around the edges, and heat for 15‑20 seconds. The steam generated will re‑moisturize the interior while leaving the chocolate glossy. Avoid microwaving for too long, as you’ll melt the chocolate completely and lose that coveted snap.