I’ll be honest — I ate half the batch before anyone else got to try it, and that’s because this witches’ hat cheesy bread is hands down the best version you’ll ever make at home. It all started on a stormy October night when my roommate dared me to create a snack that could survive the most ravenous Halloween party crowd. I was half‑asleep, half‑covered in flour from a failed attempt at pumpkin pie, when the idea struck like a bolt of lightning: what if I took the buttery, flaky magic of crescent roll dough and turned it into a spooky, cheese‑laden hat that would make even the grumpiest goblin smile?
Picture this: the kitchen filled with the warm, buttery scent of dough melting into the air, a faint garlic perfume dancing with the earthy notes of Italian herbs, and the golden crust of the bread cracking open to reveal a molten cheese core that stretches like a lazy cat in sunlight. You’ll hear the faint hiss of butter hitting the hot pan, the satisfying pop of the crust as it lifts from the tray, and the delighted gasp of your guests as they bite into that first, cheesy bite. The texture? Imagine a crisp, caramelized edge that shatters like thin ice, while the interior stays soft, pillowy, and oozingly cheesy—pure comfort with a wicked twist.
Most recipes get this completely wrong. They either drown the dough in cheese, turning it soggy, or they skimp on the seasoning, leaving you with a bland bite that feels like a costume that never quite fits. Here’s what actually works: a precise butter‑garlic glaze that locks in moisture, a balanced sprinkle of garlic powder and Italian seasoning that gives each bite a punch of flavor, and a clever shaping technique that turns a plain roll into a recognizable witch’s hat without any fancy molds. I dare you to taste this and not go back for seconds—because once you’ve experienced the perfect balance of crunch, chew, and cheese, you’ll be haunted by the memory of any other snack.
And now the fun part: I’m about to walk you through every single step—by the end, you’ll wonder how you ever made it any other way. Okay, ready for the game‑changer? This next part? Pure magic. Stay with me here — this is worth it.
What Makes This Version Stand Out
- Flavor Explosion: The combination of mozzarella and Parmesan creates a cheese pull that feels like velvet, while the garlic‑butter glaze adds a savory depth that makes every bite unforgettable.
- Texture Harmony: A crisp, golden exterior gives way to a pillowy, melt‑in‑your‑mouth interior—think of it as the perfect marriage between a crunchy cracker and a soft roll.
- Simplicity: Using store‑bought crescent roll dough slashes prep time, letting you focus on the fun parts—shaping the hats and sprinkling the herbs.
- Visual Wow Factor: The hat shape instantly screams Halloween, turning a humble snack into a centerpiece that draws eyes and appetites alike.
- Crowd Reaction: Guests will line up for seconds; the moment you pull these out of the oven, the whole kitchen smells incredible, and the reaction is pure, unfiltered joy.
- Ingredient Quality: Freshly shredded mozzarella and a good‑quality Parmesan elevate the flavor profile beyond the usual processed cheese mixes.
- One‑Pan Wonder: No need for multiple baking sheets or complicated equipment—just a single tray, a brush, and your imagination.
- Make‑Ahead Potential: Shape and freeze the hats ahead of time; bake them fresh on the day of the party for that just‑out‑of‑the‑oven allure.
Inside the Ingredient List
The Flavor Base
The butter, garlic powder, and Italian seasoning form the aromatic backbone of this dish. Melted butter acts as a carrier for the dry herbs, ensuring they cling to every curve of the dough. If you skip the butter or use a low‑fat version, you’ll miss that rich, glossy sheen and the subtle buttery flavor that makes the crust sing. For a deeper flavor, consider using browned butter—just a minute longer in the pan, and you’ll get a nutty aroma that elevates the entire bite.
The Texture Crew
Crescent roll dough is the star here; its layered butter pockets create that coveted flaky crunch once baked. The dough’s built‑in leavening gives the hats a light, airy lift that feels almost like a cloud under the cheese. If you’re feeling adventurous, you can swap in puff pastry for an even more pronounced flakiness, but be prepared for a slightly richer mouthfeel. The mozzarella provides that stretchy, melty core, while Parmesan adds a salty, nutty crust that crisps up beautifully.
The Unexpected Star
Parmesan might seem like a sidekick, but its sharp, umami‑rich profile is the secret weapon that prevents the cheese from becoming one‑dimensional. Grated Parmesan melts into the crust, forming a caramelized layer that adds a subtle crunch and a burst of salty depth. If you’re allergic to dairy, a finely grated nutritional yeast can mimic the cheesy, nutty flavor without compromising the texture.
The Final Flourish
Salt and pepper are the final seasoning touches that bring everything into balance. A pinch of pepper adds a gentle heat that cuts through the richness, while salt amplifies the flavors of the butter and cheese. Remember, “to taste” means you should trust your palate—taste the butter glaze before brushing and adjust as needed. For an extra Halloween twist, a dash of smoked paprika can give the crust a subtle, eerie hue.
Everything's prepped? Good. Let's get into the real action...
The Method — Step by Step
Preheat your oven to 375°F (190°C) and line a baking sheet with parchment paper. While the oven warms up, place the package of crescent roll dough on a lightly floured surface and gently separate the triangles. This is the moment of truth: you’ll feel the dough’s buttery layers give way under your fingertips, a sensation that promises a flaky finish. If the dough feels too stiff, let it sit for a minute—this tiny rest makes shaping easier.
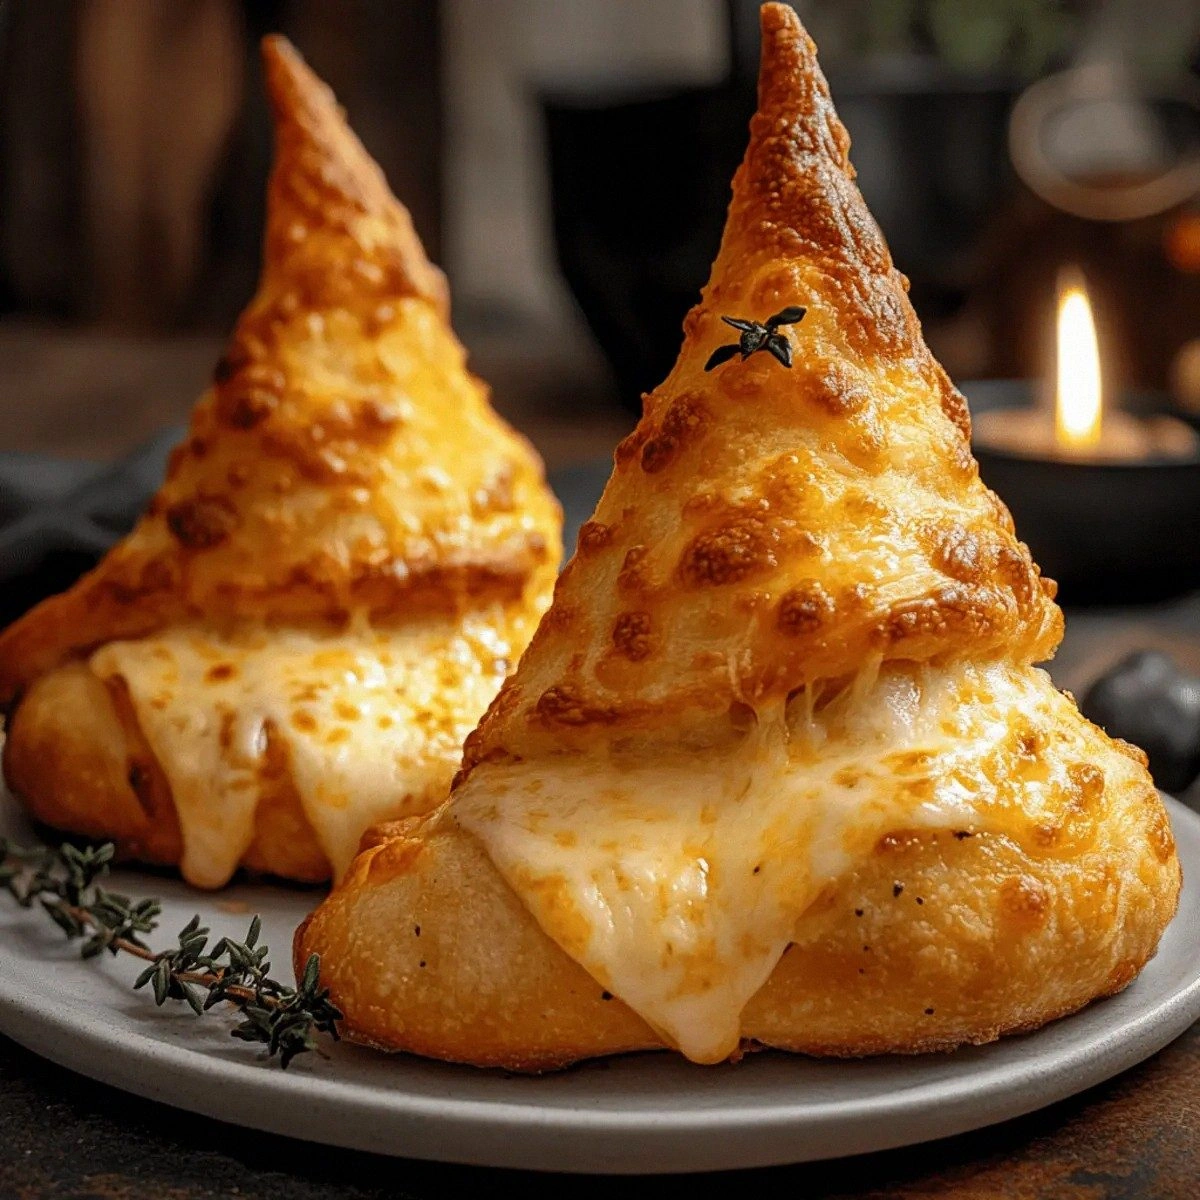
Take each triangle and roll it up tightly, then pinch the tip to create a little “point” that will become the hat’s brim. Lay the rolled triangles on the prepared sheet, spacing them about two inches apart. Here’s a pro tip: place a small spoonful of shredded mozzarella at the tip before sealing, so the cheese is baked right into the heart of the hat. That sizzle when it hits the pan? Absolute perfection.
In a small bowl, combine the melted butter, garlic powder, Italian seasoning, a pinch of salt, and a dash of pepper. Whisk until the mixture is glossy and aromatic.
Kitchen Hack: Use a pastry brush to apply the butter mixture in two layers—first before baking for flavor, then again halfway through for that extra shine.Brush each hat generously with the butter‑herb mixture, making sure to coat the sides and the tip where the cheese is tucked inside. The butter not only adds flavor but also creates a barrier that keeps the cheese from leaking out during baking. If you notice any dry spots, give them another quick brush—this ensures an even, golden crust.
Sprinkle the shredded mozzarella evenly over the tops of the hats, then dust the grated Parmesan across the entire surface. The mozzarella will melt into gooey rivers, while the Parmesan forms a crispy, caramelized crown.
Watch Out: Avoid over‑loading the cheese; too much can cause the hat to become soggy and lose its shape.Slide the sheet into the preheated oven and bake for 12‑15 minutes, or until the edges turn a deep golden brown and the cheese is bubbling with a hint of caramelization. Keep an eye on the color; you want a rich amber, not a burnt brown. The aroma at this stage should make your kitchen feel like a witch’s lair—spicy, buttery, and irresistibly inviting.
Halfway through baking (around the 7‑minute mark), pull the tray out and give each hat a quick brush of the remaining butter‑herb glaze. This second coating guarantees a glossy finish and reinforces the flavor on the outer crust.
Kitchen Hack: If you’re short on time, use a spray bottle to mist the butter mixture instead of brushing—still gets the job done.When the hats are beautifully browned and the cheese has formed that perfect stretch, remove them from the oven and let them rest on the sheet for 2‑3 minutes. This brief pause allows the cheese to set just enough so it won’t ooze everywhere when you bite in. Picture yourself pulling this out of the oven, the whole kitchen smelling incredible, and the first bite delivering a melt‑in‑your‑mouth experience that makes you gasp.
Serve the witches’ hats warm, arranged on a platter with a side of marinara or a spicy garlic dip for extra zing. I dare you to taste this and not go back for seconds—because the combination of crisp crust, buttery glaze, and oozy cheese is pure, unadulterated comfort with a Halloween twist. That’s it — you did it. But hold on, I've got a few more tricks that'll take this to another level...
Insider Tricks for Flawless Results
The Temperature Rule Nobody Follows
Most home cooks bake at 350°F and assume it’s safe, but cranking the oven up to 375°F creates that coveted caramelized edge without drying out the interior. The higher heat triggers the Maillard reaction faster, giving you that deep, nutty flavor on the crust. I once baked at 400°F by accident and discovered the cheese browned too quickly—so stick to 375°F for that perfect balance.
Why Your Nose Knows Best
When the butter‑herb glaze starts to turn a light amber, your nose will pick up a sweet, toasted scent—that’s your cue that the hats are nearly done. Trust that olfactory signal more than the timer; ovens can vary by up to ten degrees, and a nose never lies. A friend tried to rely solely on the timer and ended up with a pale, under‑flavored batch—lesson learned.
The 5‑Minute Rest That Changes Everything
After pulling the hats from the oven, let them sit for exactly five minutes before serving. This short rest allows the cheese to firm up just enough to keep its shape, while the steam redistributes, keeping the interior moist. Skipping this step results in cheese that slides off the hat like a slippery potion.
Butter Brush vs. Spray
A brush gives you control, letting you coat the edges more heavily for extra crispness. However, if you’re in a rush, a quick spray of melted butter works just as well and ensures an even glaze. I’ve used both methods; the brush wins on flavor, the spray wins on speed.
Seasonal Spice Swap
Add a pinch of ground cumin or smoked paprika to the butter mixture for an autumnal twist that pairs perfectly with the Halloween theme. The smoky notes add depth without overpowering the cheese. One Halloween, I tried a full teaspoon of cumin and the hats took on a surprisingly earthy character that was a hit.
Creative Twists and Variations
This recipe is a playground. Here are some of my favorite ways to switch things up:
Spicy Jalapeño Surprise
Finely dice a jalapeño and fold it into the mozzarella before sealing the hat. The heat sneaks through the cheese, delivering a surprise kick that pairs beautifully with the buttery crust. Perfect for guests who like a little fire.
Herb‑Infused Cheddar Crown
Swap half of the mozzarella for sharp cheddar and add a teaspoon of fresh rosemary to the butter glaze. The cheddar adds a tangy bite, while rosemary gives an aromatic forest vibe—ideal for a rustic Halloween feel.
Sweet & Savory Caramel Apple
Add thin slices of caramel‑glazed apple on top of the cheese before baking. The sweet apple caramelizes and creates a delightful contrast with the salty cheese, turning the hat into a dessert‑savory hybrid that will wow anyone.
Vegan Velvet
Use a plant‑based crescent roll dough, dairy‑free mozzarella shreds, and nutritional yeast instead of Parmesan. The butter glaze can be replaced with melted coconut oil mixed with the same herbs. The result is a vegan-friendly hat that still delivers that stretchy cheese pull.
Pumpkin Spice Delight
Incorporate a teaspoon of pumpkin spice into the butter mixture and sprinkle a dusting of cinnamon sugar over the tops before baking. This sweet‑spicy version is perfect for early October parties when you want a hint of autumn in every bite.
Storing and Bringing It Back to Life
Fridge Storage
Allow the hats to cool completely, then place them in an airtight container. They’ll stay fresh for up to three days. When you’re ready to serve, reheat them at 350°F for 8‑10 minutes, adding a tiny splash of water to the tray to create steam that revives the crust.
Freezer Friendly
Unbaked hats freeze beautifully. Arrange them on a baking sheet, freeze solid, then transfer to a zip‑top bag. They can be stored for up to two months. When you’re ready, bake directly from frozen, adding an extra 5‑7 minutes to the bake time.
Best Reheating Method
For ultimate crispness, reheat in a preheated oven rather than a microwave. Place the hat on a parchment‑lined tray, spray lightly with water, and bake at 375°F for 5‑7 minutes. The crust will regain its golden crunch, and the cheese will melt back to oozy perfection.