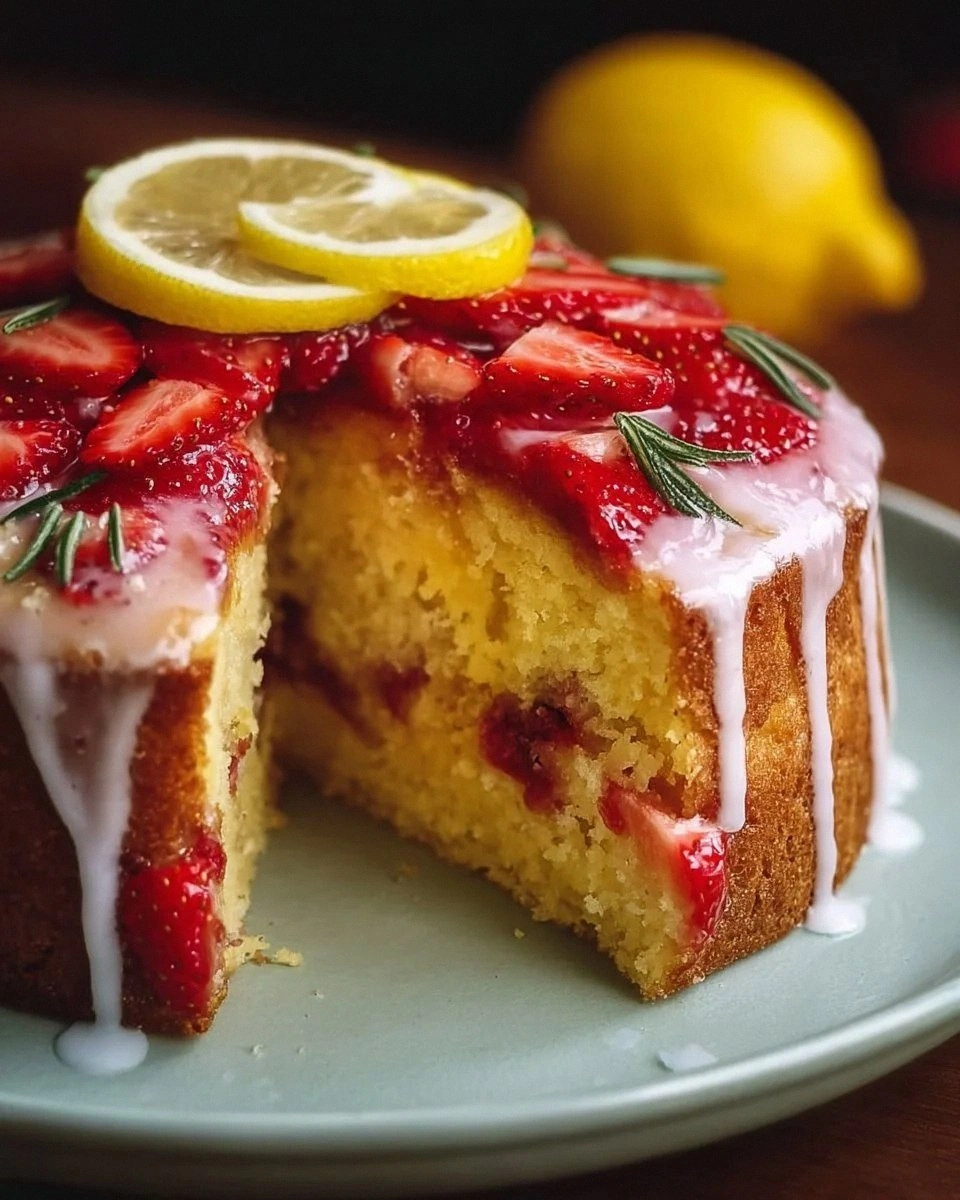
I’ll be honest — I ate half the batch before anyone else got to try it, and that was a mistake I’m not sorry for. The moment I sliced into that first piece, the bright pop of strawberry met the zing of lemon like fireworks at a summer concert, while the buttermilk kept the crumb so soft it practically melted on my tongue. Most cake recipes try to be “fluffy” and end up feeling like a cloud that fell apart the second you tried to lift it. This version? It’s the kind of cake that stays together, holds its shape, and still feels like a cloud—think marshmallow‑soft interior wrapped in a buttery, slightly crisp crust that shatters like thin ice when you cut into it.
Picture yourself pulling this out of the oven, the whole kitchen smelling like a strawberry field after a rainstorm, with lemon zest curling in the air like tiny fireworks. I dared a friend to taste this and not go back for seconds, and she actually tried—she didn’t make it. The secret? A splash of buttermilk that adds a tangy lift, and fresh strawberries that burst with natural sweetness, making the frosting (if you decide to add one) feel like a summer romance. Most recipes get this completely wrong, either drowning the cake in sugar or skipping the tang that balances the fruit. Here, the lemon and buttermilk are the unsung heroes that keep the sweetness in check.
I discovered this version after a kitchen disaster that involved a burnt lemon drizzle and a dry, crumbly cake that could have doubled as a doorstop. I went back to the drawing board, swapped out regular milk for buttermilk, added a zest of lemon right into the batter, and folded in chopped strawberries at the perfect moment. The result? A cake that’s moist, fragrant, and has a texture that’s both tender and slightly chewy—like the perfect bite of a fresh strawberry. This is hands down the best version you’ll ever make at home, and I’m about to spill every detail.
Let me walk you through every single step — by the end, you’ll wonder how you ever made it any other way. Okay, ready for the game‑changer? This next part? Pure magic. Stay with me here — this is worth it.
What Makes This Version Stand Out
- Taste: The lemon zest cuts through the sweetness of the strawberries, creating a balanced flavor that’s bright without being sour. Each bite feels like a mini celebration of summer.
- Texture: Buttermilk gives the crumb a tender, melt‑in‑your‑mouth feel, while the butter creates a subtle crisp edge that shatters like thin ice when you slice.
- Simplicity: Only eleven ingredients, all pantry‑friendly, and no fancy equipment. If you can whisk a batter, you can nail this cake.
- Uniqueness: The combination of strawberry, lemon, and buttermilk is rare in cakes, making this a show‑stopper at brunches and tea parties.
- Crowd Reaction: Expect gasps, “What’s in this?” questions, and inevitable requests for seconds. I dare you to taste this and not go back for more.
- Ingredient Quality: Fresh strawberries and real lemon zest trump any artificial flavoring, delivering a depth you can’t fake.
- Cooking Method: The gentle fold of strawberries prevents them from sinking, while the buttermilk reacts with the baking soda for a perfect rise.
- Make‑Ahead Potential: This cake stays moist for days, and the flavors actually improve after a night in the fridge.
Inside the Ingredient List
The Flavor Base
All‑purpose flour is the backbone of any cake, providing structure without weighing it down. Using a light, unbleached variety ensures the crumb stays tender. If you substitute cake flour, you’ll get an even softer texture, but you might need to reduce the flour by about 2 tablespoons to avoid a dry result.
Baking soda is the hidden hero that reacts with the buttermilk’s acidity, giving the cake its lofty rise. Skipping it would leave you with a dense, pancake‑like texture that’s nowhere near what we’re aiming for. If you’re out of baking soda, you can replace it with an extra ¼ teaspoon of baking powder, but the lift won’t be as pronounced.
The Texture Crew
Unsalted butter, softened, creates a rich, buttery mouthfeel and contributes to the cake’s slightly crisp edges. If you use melted butter, you’ll lose some of that delicate crumb structure, ending up with a more cake‑like, less airy texture. For a dairy‑free twist, try coconut oil, but expect a faint coconut note that will compete with the lemon.
Granulated sugar not only sweetens but also helps with the cake’s tender crumb by breaking down the gluten. If you prefer a less sweet cake, you can shave the sugar down to ¾ cup, but be prepared for a milder flavor profile.
The Unexpected Star
Buttermilk is the secret weapon that brings a subtle tang and reacts with the baking soda for that perfect rise. It also adds moisture, making the crumb incredibly soft. If you don’t have buttermilk on hand, whisk 1 cup of regular milk with 1 tablespoon of lemon juice or white vinegar and let it sit for 5 minutes.
Fresh strawberries, hulled and chopped, bring bursts of natural sweetness and a beautiful pink speckle throughout the cake. The key is to fold them in gently after the batter is mixed, so they stay intact and don’t sink. If strawberries are out of season, frozen berries work—just thaw and pat dry thoroughly.
The Final Flourish
Lemon zest and juice are the bright, aromatic finish that lifts the entire flavor profile. The zest contains volatile oils that give a fragrant punch, while the juice adds a gentle acidity that balances the sugar. For an extra zing, add a pinch of lemon extract, but be careful—it can quickly become overpowering.
Everything's prepped? Good. Let's get into the real action…
The Method — Step by Step
Preheat your oven to 350°F (175°C) and grease a 9‑inch round cake pan with butter, then dust it lightly with flour. This creates a non‑stick barrier that ensures the cake releases cleanly. As the oven warms, you’ll hear a faint hum that signals the kitchen is about to get busy. Pro tip: Place a baking sheet on the lower rack to catch any drips; the sizzle when the batter hits the pan? Absolute perfection.
In a large mixing bowl, whisk together the flour, baking soda, baking powder, and salt. Whisking aerates the dry ingredients, preventing clumps and ensuring an even rise. If you notice any specks of flour clinging to the whisk, give them a quick tap—no one wants a gritty bite.
Kitchen Hack: Sift the flour and leavening agents together; this not only removes lumps but also adds extra air for a lighter crumb.In a separate bowl, cream the softened butter with the granulated sugar until the mixture turns pale and fluffy, about 3–4 minutes on medium speed. This step traps air, which later expands during baking, giving you that coveted rise. If the mixture looks grainy, keep beating—once the sugar dissolves, the texture will smooth out. The kitchen will start to smell like sweet butter, a comforting prelude to the lemony notes to come.
Add the eggs one at a time, beating well after each addition. The eggs act as emulsifiers, binding the butter and flour together. Watch the batter turn glossy; that’s the sign it’s ready for the next stage. Watch Out: If you add the eggs too quickly, the mixture can curdle, leading to a dense cake. Add them slowly and give each egg a moment to fully incorporate.
Stir in the lemon zest and lemon juice, letting the fragrant oils swirl through the batter. The citrus will instantly lift the aroma, making the whole kitchen feel brighter. At this point, the batter should have a pale yellow hue, a visual cue that the lemon is fully integrated.
Alternately add the buttermilk and the dry ingredient mixture to the butter‑egg base, beginning and ending with the dry ingredients. This technique prevents over‑mixing, which can develop gluten and make the cake tough. Mix just until you see no streaks of flour; the batter will look slightly lumpy, and that’s perfect.
Gently fold in the chopped strawberries using a rubber spatula. The goal is to distribute the fruit evenly without crushing them, preserving those juicy pockets. If you notice the batter turning pink, that’s a good sign—your strawberries are already releasing a bit of their natural juice, adding moisture.
Pour the batter into the prepared pan, smoothing the top with the back of a spoon. Tap the pan lightly on the counter three times to release any trapped air bubbles; you’ll hear a soft “pop” that signals a uniform texture.
Slide the pan into the oven and bake for 30–35 minutes, or until a toothpick inserted into the center comes out clean with just a few moist crumbs. Around the 20‑minute mark, the edges will start pulling away from the pan—a visual cue that the cake is almost done. If you open the oven too early, you’ll lose heat and the rise may collapse.
Allow the cake to cool in the pan for 10 minutes, then turn it out onto a wire rack to finish cooling. This prevents the bottom from becoming soggy. While it cools, the aroma will fill the kitchen, making everyone wonder what’s baking. Once completely cool, dust with powdered sugar or drizzle a simple lemon glaze for extra zing.
That's it — you did it. But hold on, I've got a few more tricks that'll take this to another level. The next sections will show you how to elevate texture, flavor, and presentation without adding hours of work.
Insider Tricks for Flawless Results
The Temperature Rule Nobody Follows
Never bake a cake straight from the fridge. Let the batter sit at room temperature for 10‑15 minutes before it meets the oven. This small pause allows the leavening agents to activate more evenly, resulting in a taller, more uniform rise. I once tried to rush a batch and ended up with a flat pancake‑like cake—lesson learned.
Why Your Nose Knows Best
Rely on scent, not just time. When the cake is about 20 minutes in, you’ll start to detect a sweet, buttery aroma mingling with citrus. If that scent hits you before the timer, start checking for doneness. This sensory cue is a reliable indicator that the interior is cooking evenly.
The 5‑Minute Rest That Changes Everything
After the cake has cooled on the rack, let it rest for an additional five minutes before slicing. This brief pause lets the crumb settle, preventing crumbs from scattering everywhere. A friend tried to cut it immediately and ended up with a crumb‑explosion—let it sit, and you’ll get clean, picture‑perfect slices.
Butter Brush for a Golden Crown
Just before the cake finishes baking, brush the top lightly with melted butter. This creates a glossy, golden‑brown crown that looks bakery‑professional. The butter also adds a subtle crispness to the outer rim, enhancing that “shatter like thin ice” texture we love.
The Secret of the Steam
When reheating leftovers, add a splash of water to the plate and cover with foil. The steam revives the cake’s moisture, making each bite as soft as the original. Skipping this step leaves you with a dry slice that feels more like a biscuit than a cake.
Creative Twists and Variations
This recipe is a playground. Here are some of my favorite ways to switch things up:
Berry Medley Madness
Swap half the strawberries for blueberries or raspberries. The mixed berries add a burst of color and a slightly tart contrast that pairs beautifully with the lemon.
Almond‑Lemon Fusion
Replace ¼ cup of flour with almond flour and add a teaspoon of almond extract. The nutty undertone complements the citrus, creating a sophisticated flavor profile perfect for tea time.
Coconut Cream Frosting
Whip coconut cream with powdered sugar and a dash of lemon zest for a dairy‑free frosting that adds richness without overwhelming the delicate cake.
Spiced Autumn Version
Add a pinch of ground cinnamon and nutmeg to the dry ingredients, and swap fresh strawberries for diced apples sautéed in butter. This creates a warm, comforting cake that’s perfect for cooler evenings.
Glazed Delight
Mix powdered sugar, lemon juice, and a splash of milk to create a thin glaze. Drizzle over the cooled cake for a shiny finish that adds an extra zing.
Storing and Bringing It Back to Life
Fridge Storage
Place the cake in an airtight container or wrap tightly in plastic wrap. It will stay fresh for up to five days, and the flavors will meld, becoming even more harmonious. If you notice the top drying out, lightly brush with a bit of melted butter before resealing.
Freezer Friendly
Slice the cake, wrap each piece individually in parchment, then in foil, and store in a freezer bag. It freezes beautifully for up to three months. When you’re ready to enjoy, thaw overnight in the fridge and give it a quick steam (see next tip).
Best Reheating Method
To revive a slice, place it on a microwave‑safe plate, sprinkle a tiny splash of water on top, and cover with a damp paper towel. Microwave on low for 20‑30 seconds; the steam will bring back that melt‑in‑your‑mouth softness. Alternatively, warm in a 300°F oven for 8‑10 minutes, tented with foil.