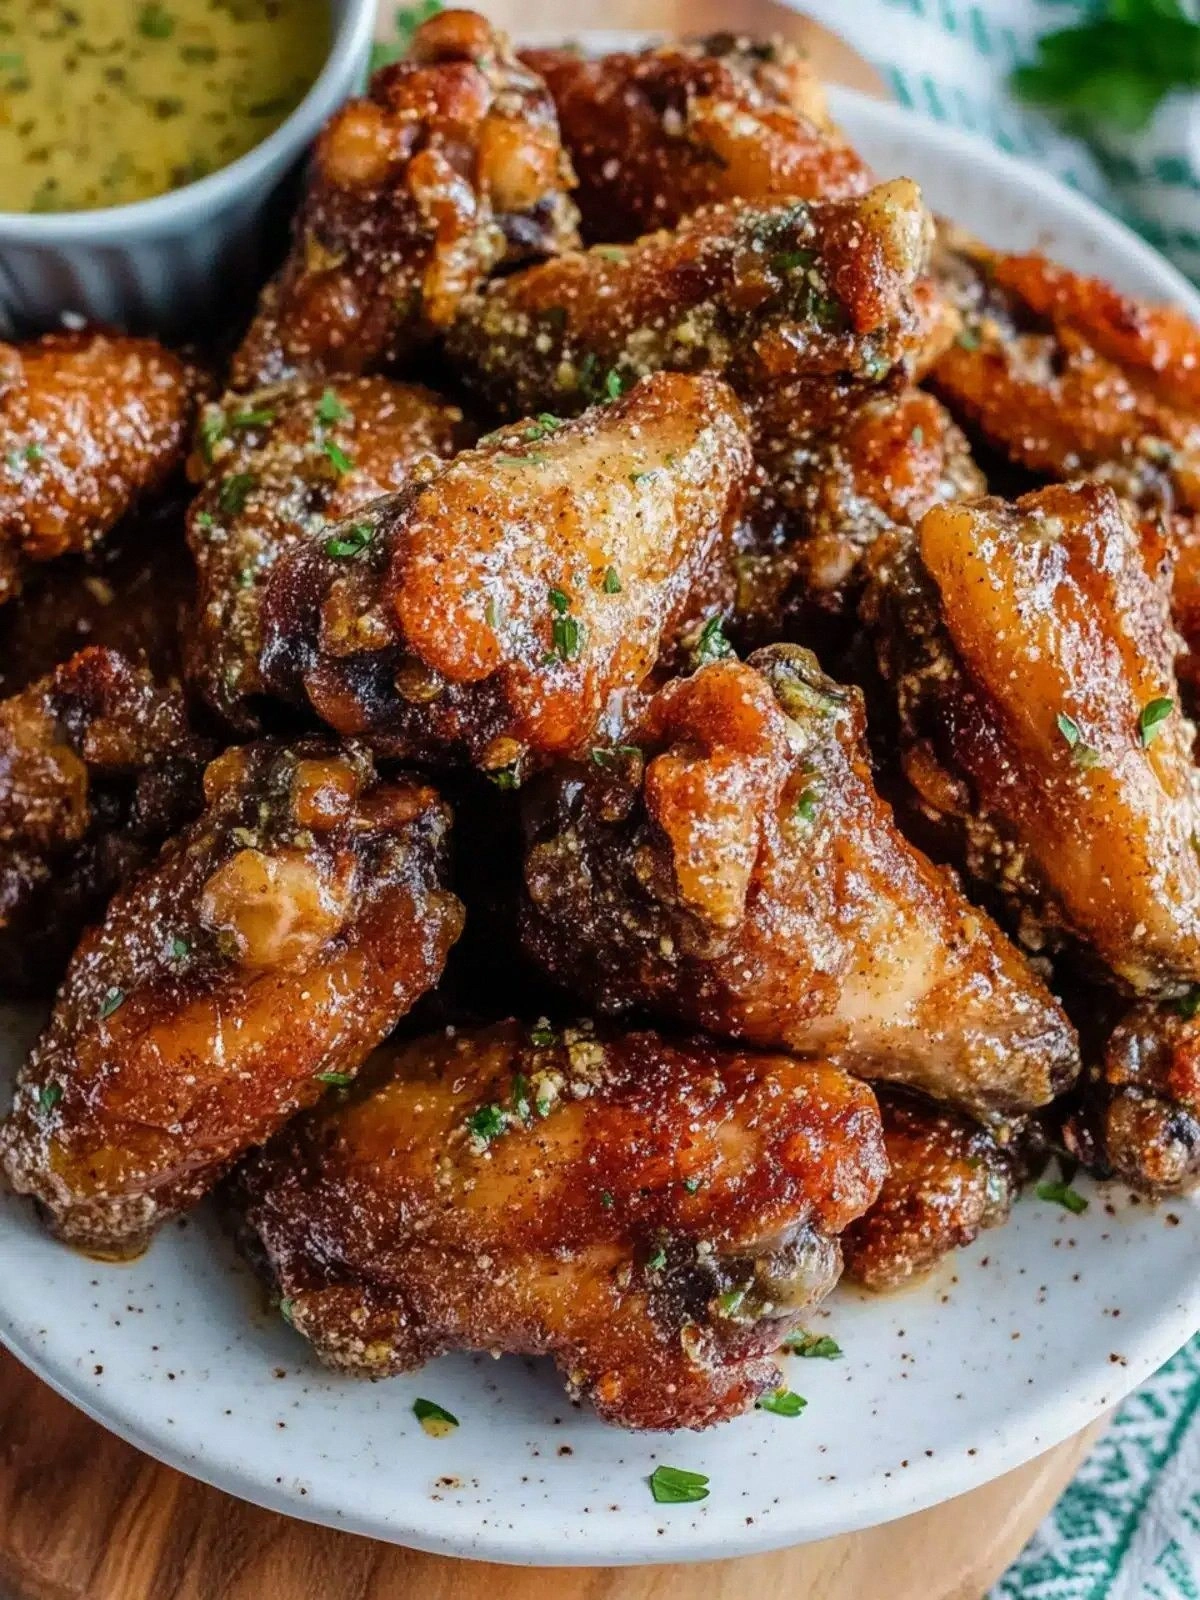
Picture this: a storm of sizzling wings, the air thick with butter and garlic, and your kitchen smelling like a wild west saloon. I was halfway through a chaotic weeknight dinner, the fridge empty, and the craving for something bold and comforting hit me like a freight train. I pulled out a sack of 5 pounds of fresh whole chicken wings, a splash of vegetable oil, and a handful of herbs that had been sitting in my pantry for months. The idea was simple—turn ordinary wings into a buttery, spicy masterpiece that would have everyone begging for seconds. I dared myself to taste this and not go back for seconds, and I think I succeeded.
First thing I did was trim the wings, giving them a clean, almost surgical look that made them look like they were ready for a rodeo. The butter was melted with the garlic, and the aroma hit me like a freight train—rich, buttery, and just a hint of heat from the cayenne. I sprinkled the fresh herbs over the wings, watching the green specks dance in the pan, like tiny flags in a desert wind. As the wings sizzled, the edges began to crisp, and I could already hear the crunch in my mind’s ear. That sizzle when it hits the pan? Absolute perfection.
Most recipes get this completely wrong by overcooking the wings or using too much oil, resulting in greasy, limp meat. I’ve been there, watching my wings turn into a soggy mess that no one could eat. The secret is in the balance—just enough oil to coat, enough butter to melt into a glossy glaze, and a pinch of cayenne to give that kick without overpowering. When the wings finish cooking, they should have a golden crust that cracks like thin ice, revealing tender meat inside. This is hands down the best version you'll ever make at home, and I promise you’ll taste the difference.
I’ll be honest—I ate half the batch before anyone else got a chance to try it, and it still tasted fresh after the first bite. The butter glaze clung to every nook and cranny, and the herbs added a fresh finish that cut through the richness. Picture yourself pulling this out of the oven, the whole kitchen smelling incredible, and guests gathering around the table like a posse of hungry cowboys. The next time you’re craving something that’s both comforting and daring, you’ll know exactly what to do. Let me walk you through every single step—by the end, you’ll wonder how you ever made it any other way.
What Makes This Version Stand Out
- Flavor: The butter and garlic create a silky, savory base that coats each wing like velvet, while the cayenne adds a subtle heat that lingers on the palate.
- Texture: The combination of pan searing and oven roasting gives the wings a crisp, crackling exterior that gives way to a juicy interior, like a perfectly baked scone.
- Ingredient Quality: Using fresh whole wings ensures the meat stays tender, and the herbs add a bright, green contrast that elevates the dish beyond basic fried wings.
- Time Efficiency: This recipe takes less than 45 minutes from prep to plate, making it ideal for a quick weeknight dinner or a spontaneous game‑night snack.
- Versatility: The glaze can be tweaked with honey, soy sauce, or different spice blends, allowing you to tailor the flavor profile to any taste or occasion.
- Make‑Ahead Potential: The wings can be cooked ahead and reheated without losing crunch, making them perfect for parties or potlucks.
- Presentation: The glossy, amber glaze makes the wings visually striking, turning an ordinary snack into a showstopper that will have guests asking for the recipe.
Inside the Ingredient List
The Flavor Base
Butter is the star of this sauce, lending a rich, velvety texture that clings to every wing. Minced garlic adds depth and a pungent aroma that awakens the senses. A dash of cayenne and paprika injects a gentle heat that balances the buttery sweetness. Skipping any of these will leave the dish feeling flat, as if you’re missing the main act of a concert.
The Texture Crew
Fresh whole chicken wings are the foundation—each wing contains both meat and skin, ensuring a juicy center and a crisp outer layer. A splash of vegetable oil prevents sticking and promotes even browning, creating a golden crust that snaps like a well‑tuned guitar string. If you’re in a pinch, a light coating of flour can help achieve an extra crunch, but it slightly changes the classic buttery feel.
The Unexpected Star
Fresh herbs—parsley and chives—are the final flourish that adds a burst of green, cutting through the richness. Their bright, peppery notes lift the entire dish, giving it a fresh, almost herbal finish. If you prefer a different herb, thyme or oregano can work, but they’ll shift the flavor profile toward a more earthy tone.
The Final Flourish
A final drizzle of melted butter over the baked wings locks in moisture and gives the glaze an irresistible shine. Sprinkling fresh herbs at this point ensures they remain vibrant and aromatic. A quick squeeze of lemon juice can add a bright zing that balances the buttery richness. Remember, the finishing touch can make or break the dish’s overall appeal.
Everything's prepped? Good. Let's get into the real action...
The Method — Step by Step
- Preheat your oven to 400°F (200°C) and line a large baking sheet with parchment paper. This step ensures even heat distribution and makes cleanup a breeze. The parchment also helps prevent the wings from sticking, so they can crisp up without a fuss. If you’re using a metal sheet, lightly oil it to keep the wings from sticking.
- Pat the wings dry with paper towels, removing any surface moisture. A dry surface is the key to crispness—think of it as preparing a canvas before painting. The drier the skin, the more it will brown and crackle during baking. If you forget this step, you’ll end up with soggy wings that won’t get that coveted crunch.
- In a large bowl, whisk together melted butter, minced garlic, cayenne, paprika, and a splash of vegetable oil until the mixture is smooth and fragrant. The butter acts as the base, while the oil helps the glaze spread evenly. This step is where the magic begins; if you rush it, you’ll miss the depth of flavor. The aroma that fills your kitchen right now is a prelude to the feast to come.
- Toss the wings in the butter mixture until each piece is fully coated. Use your hands to ensure even coverage; the glaze should cling like a second skin. This is the moment of truth—if the wings aren’t well coated, they won’t develop that glorious glaze. Make sure you’re not leaving any wing behind; every bite should taste buttery.
- Spread the wings on the prepared sheet in a single layer, ensuring no overlap. Overcrowding can cause the wings to steam instead of crisp. The edges should be slightly lifted from the pan, which allows heat to circulate. If you’re in a hurry, you can use a wire rack on top of the sheet to keep the wings elevated.
- Bake for 25 minutes, flipping halfway through, until the edges are crisp and the meat is cooked through. The internal temperature should reach 165°F (74°C). The wings should have a golden, caramelized crust that cracks when you bite. If you prefer a darker finish, leave them a few minutes longer, but watch for burning.
- Once baked, drizzle a bit more melted butter over the wings and sprinkle the fresh herbs on top. The butter adds a glossy shine and the herbs bring a fresh, aromatic contrast. This final touch elevates the dish from good to unforgettable. The wings should look like they’re ready to be served at a cowboy cookout.
- Serve immediately with ranch or blue cheese dip, or let them rest for 5 minutes before serving to allow the juices to redistribute. A quick rest ensures the wings stay juicy and the glaze stays intact. If you’re serving a crowd, keep the wings warm in a low oven (200°F) while you finish prep.
That's it — you did it. But hold on, I've got a few more tricks that'll take this to another level...
Insider Tricks for Flawless Results
The Temperature Rule Nobody Follows
Many cooks think a high temperature is always better, but a moderate 400°F actually gives the wings the best balance of crispness and tenderness. If you crank it up to 425°F, the edges will brown too quickly and the inside may stay undercooked. Keep your oven calibrated; a faulty thermostat can ruin an otherwise perfect batch. This rule has saved me from countless “too soft, too greasy” disasters.
Why Your Nose Knows Best
Trust the smell of butter and garlic as your cooking compass. When the butter starts to brown and you smell a nutty aroma, that’s the moment the wings are developing flavor. If the aroma feels flat, the butter may be too low in temperature or the garlic might have burned. A good nose will alert you before the wings become overdone.
The 5-Minute Rest That Changes Everything
Letting the wings rest for 5 minutes after baking allows the juices to redistribute, ensuring each bite is juicy. The glaze also sets slightly, giving the wings a more stable, glossy finish. Skip this step and you’ll find the wings a bit dry at the center. A friend once tried to skip it and the wings tasted like a dry biscuit.
Oil Balance for Crispy Perfection
The right amount of oil is the secret to a crisp exterior. Too little oil and the wings will stick; too much and they’ll be greasy. Aim for a light sheen on the wings—just enough to coat the surface. This balance can be tweaked with a spray bottle for even distribution.
Herb Timing for Freshness
Adding herbs too early can cause them to wilt and lose their bright flavor. Sprinkle them on just before serving, or finish the dish with a quick herb garnish. A friend tried adding herbs halfway through baking and the result was a flat, herbal aftertaste. Timing is everything.
Creative Twists and Variations
This recipe is a playground. Here are some of my favorite ways to switch things up:
Honey‑Cayenne Glaze
Swap the plain butter glaze for a honey‑cayenne blend to add a sweet, sticky finish. The honey caramelizes, creating a caramelized crust that pairs well with a smoky barbecue sauce. This version is perfect for a summer cookout or a sweet‑spicy snack.
Smoky Chipotle Twist
Add a tablespoon of chipotle in adobo for a smoky depth that lingers on the tongue. The chipotle also gives the wings a subtle orange hue, making them look as good as they taste. This is ideal for a night with friends who love a kick of heat.
Herb‑Infused Parmesan Finish
Grate fresh Parmesan over the wings after baking for a savory, nutty finish. The cheese crisps slightly on the edges, adding an extra layer of texture. This variation works well with a side of marinara or a light salad.
Citrus‑Zest Finale
Sprinkle lemon or lime zest over the wings for a bright, citrusy burst that cuts through the richness. The zest also adds a subtle aroma that elevates the dish’s overall appeal. It’s a great option for a light, refreshing snack.
Spicy Peanut Sauce
Serve the wings with a spicy peanut sauce for an Asian‑inspired twist. The sauce adds creamy texture and a nutty flavor that complements the buttery wings. This version is perfect for a party or a fun family dinner.
Storing and Bringing It Back to Life
Fridge Storage
Store leftover wings in an airtight container in the refrigerator for up to 3 days. The buttery glaze may thicken slightly, but the wings will remain flavorful. Reheat them in a 350°F oven for 10 minutes to revive the crispness. The container should be sealed to prevent the wings from absorbing fridge odors.
Freezer Friendly
Freezing is a great option if you have extra wings. Wrap them individually in parchment paper, then place in a freezer bag. They stay best for up to 2 months. Thaw overnight in the refrigerator before reheating to maintain texture. A quick flash in a skillet can also restore the crisp exterior.
Best Reheating Method
The oven is the king of reheating—preheat to 375°F, place the wings on a wire rack, and bake for 10-12 minutes. This method preserves the crunchy edges and keeps the butter glaze glossy. If you’re in a hurry, a microwave works but may leave the wings soggy; a quick skillet sear can rescue them.