Picture this: you’re in your kitchen, the oven preheating, a bowl of flour in your hand, and the scent of peanut butter swirling in the air. I was halfway through a frantic attempt to salvage a batch of over‑baked chocolate chip cookies when a neighbor’s voice floated through the kitchen door, “I swear this peanut butter and jelly cookie is the best thing I’ve ever made.” That moment was the spark that turned a simple nostalgia into a culinary obsession. I grabbed my notebook, scribbled a few notes, and set out to create a version that would make your taste buds do a double‑tap dance.
I’ve spent years hunting for that perfect cookie that balances the crunch of the crust with a chewy, jam‑laden center, and I finally found it. The secret? A precise marriage of textures and a subtle, unexpected twist that elevates the classic PB&J flavor to something that feels like a hug in every bite. Think of the buttery crumb that melts like silk, the sweet burst of strawberry jam that pops against the savory peanut butter, and the faint crackle of the edges that shatter like thin ice. I dare you to taste this and not go back for seconds.
What sets this recipe apart is that it doesn’t rely on gimmicks or fancy ingredients. It’s all about using high‑quality staples—smooth peanut butter, real strawberry jam, and fresh‑baked flour—that combine to create a cookie that’s hands down the best version you’ll ever make at home. The technique is simple, but the outcome is a cookie that feels like a childhood memory with a modern twist. I’ll be honest—after the first batch, I ate half before anyone else got a chance, and that’s saying something.
Imagine pulling these golden‑brown beauties from the oven, the kitchen filling with the comforting scent of toasted peanut butter and a hint of sweet berry. The moment the timer dings, you hear that satisfying sizzle as the cookie cools, the aroma intensifying like a promise of sweet satisfaction. That’s the moment you’ll want to pause, take a bite, and let the flavors unfold. Okay, ready for the game‑changer? Let me walk you through every single step—by the end, you’ll wonder how you ever made it any other way.
What Makes This Version Stand Out
- Texture: The cookie’s exterior is crisp yet the interior remains soft and chewy, offering a satisfying contrast that feels like a well‑balanced handshake of flavors.
- Flavor Depth: The use of a high‑quality peanut butter and a real strawberry jam creates a nuanced sweetness that isn’t cloying, but rather layered and memorable.
- Simplicity: With only ten core ingredients and a straightforward method, the recipe is accessible to beginners and seasoned bakers alike.
- Make‑Ahead Friendly: These cookies hold up wonderfully in an airtight container, making them ideal for potlucks, school lunches, or a midnight craving.
- Ingredient Quality: Each component is chosen for its contribution to flavor and texture—think whole‑grain flour for structure and dark brown sugar for depth.
- Visual Appeal: The classic PB&J swirl is unmistakable, making the cookies instantly recognizable and Instagram‑worthy.
- Versatility: The recipe’s base can be tweaked with nuts, chocolate chips, or different jams, ensuring it never feels stale.
- Crowd‑Pleaser: Whether you’re serving at a family gathering or a casual get‑together, these cookies are guaranteed to be a hit.
Inside the Ingredient List
The Flour Foundation
The backbone of any cookie is its flour. I use 2 cups of all‑purpose flour because it balances structure with tenderness. If you’re craving a gluten‑free version, swap in a 1:1 blend of rice flour and potato starch. Skipping the flour would leave you with a sticky, pancake‑like mess that can’t hold its shape.
For the best results, sift the flour with baking powder, baking soda, and salt before adding it to the wet mixture. This ensures even distribution of leavening agents, preventing uneven rise and pockets of dense dough. A small tip: keep the flour cool; if it’s too warm, the butter will melt prematurely, altering the cookie’s texture.
The Sweet Balance
Granulated sugar and brown sugar each play a distinct role. Granulated sugar gives a quick burst of sweetness and helps the dough spread evenly, while brown sugar adds moisture and a subtle molasses depth that complements the peanut butter. If you’re looking to cut calories, reduce the granulated sugar by a quarter, but keep the brown sugar the same to retain moisture.
Remember, sugar isn’t just about sweetness—it also affects the cookie’s browning. Too much sugar and the cookies will over‑brown; too little and they’ll be pale and under‑cooked. The 1 cup granulated to 1/2 cup brown sugar ratio strikes a sweet spot that’s both visually appealing and delicious.
The Peanut Butter Pulse
Smooth peanut butter is the heart of this cookie. Its natural oils create a tender crumb and a rich, nutty aroma that lingers on the palate. I recommend a natural, no‑added‑sugar peanut butter for the best flavor profile. If you prefer a crunchy texture, substitute half of the smooth peanut butter with crunchy peanut butter for a delightful contrast.
If you’re allergic to peanuts or simply want a different flavor, almond butter or cashew butter can be used, though the taste will shift. The key is to use a peanut butter that’s creamy and not overly sweet, so it balances with the jam without overpowering it.
The Jammed Surprise
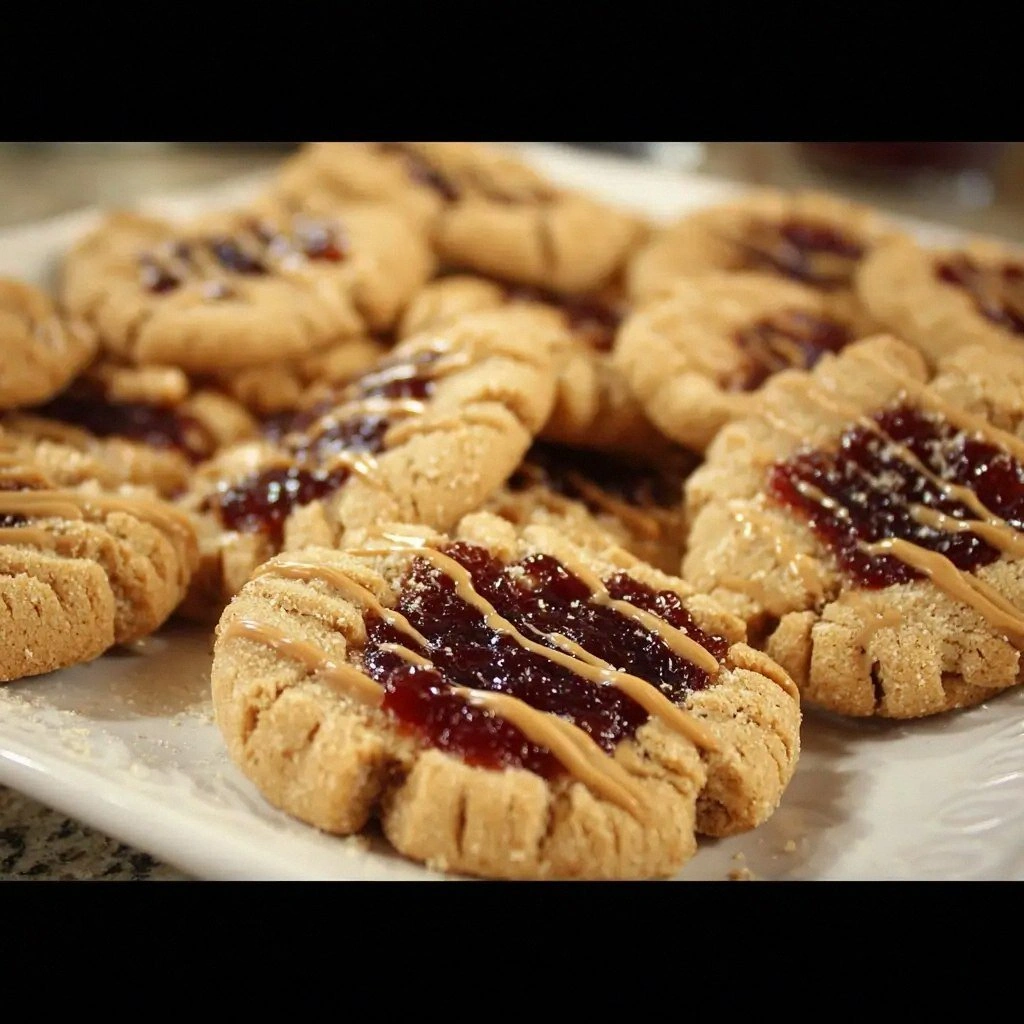
The jam or jelly is what turns a plain cookie into a nostalgic treat. I use 1/2 cup of strawberry jam because its bright, tart flavor cuts through the richness of the peanut butter. A good rule of thumb is to choose a jam with a high fruit content—look for a label that lists fruit as the first ingredient.
If you’re a fan of blueberry or raspberry, swap in a 1/2 cup of your favorite berry jam; the cookie will still maintain its classic PB&J feel. Just remember that darker jams can affect the final color, giving the cookie a deeper hue that’s visually striking.
Everything’s prepped? Good. Let’s get into the real action…
The Method — Step by Step
- Preheat your oven to 350°F (175°C) and line two baking sheets with parchment paper. This step ensures even baking and prevents the cookies from sticking, which can ruin the perfect finish. The parchment also makes cleanup a breeze, so you can focus on the baking process.
- In a medium bowl, whisk together 2 cups of flour, 1 tsp baking powder, 1/2 tsp baking soda, and 1/2 tsp salt. Sifting these dry ingredients before mixing guarantees a smooth, lump‑free dough. The leavening agents work together to create a light, airy interior that balances the dense peanut butter.
- In a separate large bowl, beat 1 cup of creamy peanut butter, 1 cup of granulated sugar, and 1/2 cup of packed brown sugar until the mixture is fluffy and pale. This process incorporates air into the dough, giving the cookies a tender crumb. Use a stand mixer or hand mixer for best results; a whisk will take longer.
- Add one large egg and 1 tsp vanilla extract to the wet mixture, beating until fully combined. The egg acts as a binder, ensuring the cookies hold together during baking. The vanilla adds a subtle warmth that enhances the peanut butter’s natural nutty notes.
- Gradually fold the dry ingredients into the wet mixture, stirring until just combined. Over‑mixing at this stage can develop gluten, resulting in tough cookies. Aim for a cohesive dough that’s slightly sticky but manageable.
- Gently fold in 1/2 cup of strawberry jam, taking care not to over‑mix. The jam should remain visible in the dough, creating pockets of sweet surprise in each bite. If you prefer a more even distribution, you can swirl the jam in with a spoon.
- If you’re adding optional ingredients, fold in 1/4 cup of chopped nuts and/or 1/4 cup of chocolate chips at this point. Nuts add crunch, while chocolate chips provide a sweet counterpoint. These additions should be mixed gently to maintain their texture.
- Using a tablespoon or a small cookie scoop, drop rounded dough onto the prepared baking sheets, spacing them 2 inches apart. The dough should be slightly flattened to create a uniform thickness. This uniformity ensures even baking and a consistent chew.
- Bake for 12–14 minutes, or until the edges are golden brown and the centers look set. The cookies will continue to firm up slightly as they cool. Keep an eye on the first batch to fine‑tune your oven’s quirks.
- Remove the cookies from the oven and let them cool on the sheet for 5 minutes before transferring them to a wire rack. The cooling period allows the cookies to set, preventing them from breaking apart. This final step is pure magic—watch the aroma intensify as the cookies cool.
That’s it—you did it. But hold on, I’ve got a few more tricks that will take this to another level. These insider tips will elevate the cookie’s flavor, texture, and overall experience, ensuring each bite is a moment of pure delight.
Insider Tricks for Flawless Results
The Temperature Rule Nobody Follows
Many bakers bake at 375°F, but that temperature can cause the cookies to spread too much, flattening the sweet center. I’ve found that 350°F is the sweet spot, allowing the dough to set before the edges brown. Keep your oven calibrated; a digital thermometer can save you from over‑baked cookies.
Why Your Nose Knows Best
During baking, the aroma of toasted peanut butter and caramelized sugar is a reliable indicator of doneness. When the smell intensifies to a nutty, slightly smoky note, it’s time to pull the cookies out. Trust your nose—it’s a seasoned judge of cookie perfection.
The 5‑Minute Rest That Changes Everything
Letting the cookies rest on the baking sheet for five minutes before moving them to a rack allows the interior to set. This brief pause prevents the cookies from breaking apart and ensures a consistent chew. It’s a simple step that often gets overlooked.
Use a Silicone Mat for Even Baking
A silicone baking mat keeps the cookies from sticking and promotes even heat distribution. This results in a uniform golden color and consistent texture. I’ve swapped parchment for silicone in the past, and the difference is noticeable.
Add a Splash of Water Before Reheating
If you’re reheating leftover cookies, add a tiny splash of water to the bottom of a pan. The steam will restore moisture, bringing back that soft, chewy center. It’s a quick trick that can revive stale cookies in minutes.
Use Room‑Temperature Peanut Butter
Cold peanut butter can make the dough too dense, resulting in heavy cookies. Let the peanut butter sit at room temperature for 15–20 minutes before mixing. This ensures a smooth, even dough that bakes evenly.
Creative Twists and Variations
This recipe is a playground. Here are some of my favorite ways to switch things up:
Chocolate Peanut Butter Twist
Swap the peanut butter for a dark chocolate‑infused peanut butter and use chocolate chips instead of nuts. The result is a decadent, chocolatey cookie with a hint of nutty sweetness. It’s a hit with chocolate lovers and PB&J purists alike.
Nut‑Rich Crunch
Add 1/4 cup of toasted walnuts or pecans for a nutty crunch. The toasted flavor pairs wonderfully with the jam, creating a layered taste experience. It’s perfect for those who love a bit of texture.
Berry‑Burst Variation
Replace strawberry jam with a mixed berry jam for a more complex fruity profile. The tartness of blueberries and raspberries balances the richness of the peanut butter. This version is ideal for spring and summer gatherings.
Spiced Cinnamon Swirl
Add 1 tsp of ground cinnamon to the dry mix and swirl in a tablespoon of honey before baking. The cinnamon adds warmth, while honey provides a subtle floral sweetness. The cookies take on a comforting, holiday‑like aroma.
Low‑Sugar Version
Reduce the granulated sugar by 25% and increase the brown sugar by 10% to maintain moisture. This tweak keeps the cookies sweet but lower in calories. It’s a great option for those watching their sugar intake.
Vegan Adaptation
Replace the egg with a flaxseed “egg” (1 tbsp ground flaxseed + 3 tbsp water). Use a plant‑based peanut butter and vegan jam. The texture remains similar, and the flavor profile stays true to the classic PB&J.
Storing and Bringing It Back to Life
Fridge Storage
Store cookies in an airtight container in the refrigerator for up to one week. The cold environment preserves the cookie’s freshness and prevents mold. If you want them crisp, place a slice of bread in the container; the bread will absorb excess moisture.
Freezer Friendly
Lay cookies flat on a parchment‑lined tray and freeze until solid, then transfer to a zip‑lock bag. They can stay in the freezer for up to three months. This method keeps the cookies firm and prevents freezer burn.
Best Reheating Method
To revive frozen cookies, preheat your oven to 350°F, place the cookies on a parchment sheet, and bake for 6–8 minutes. For an extra touch of moisture, add a tiny splash of water to a pan and steam the cookies for 2 minutes before serving. The result is a cookie that tastes freshly baked.