Love this? Pin it for later! 📌
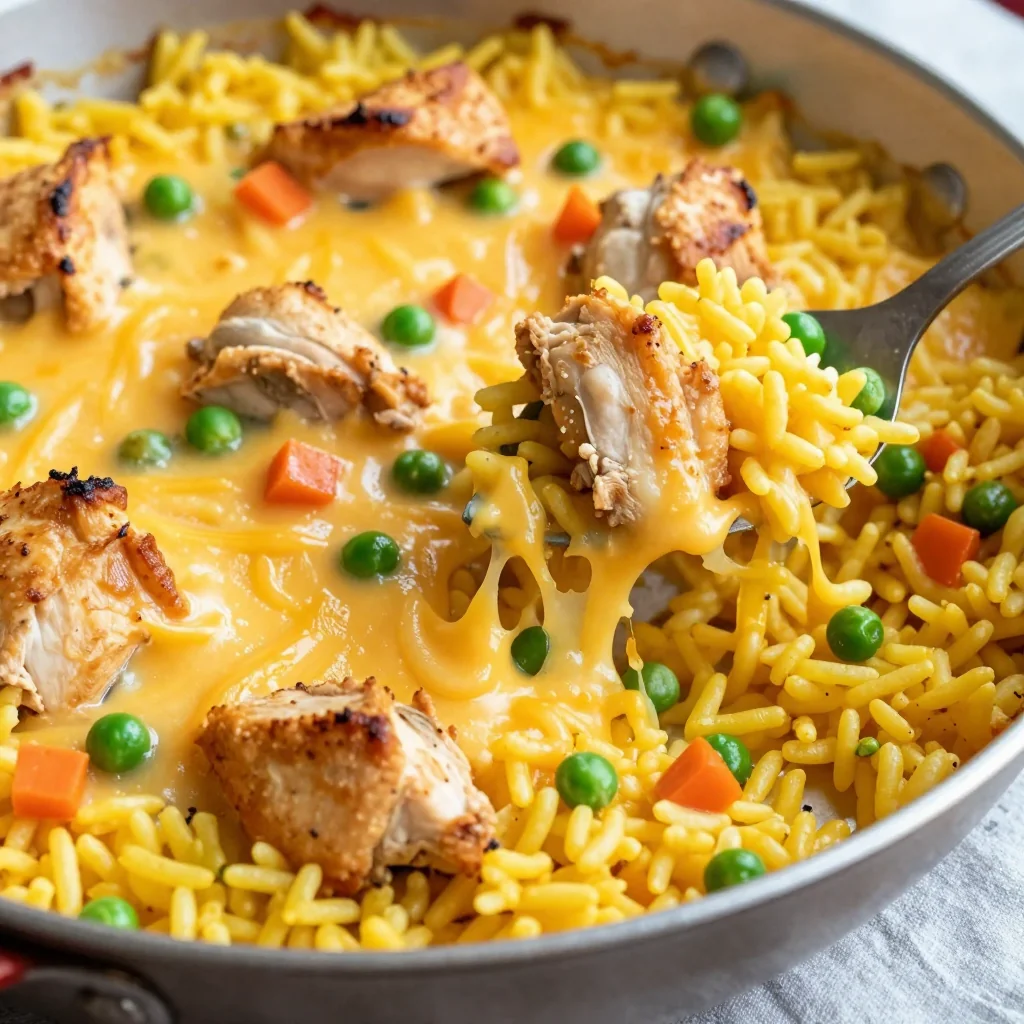
I still remember the first night I made this dish. It was a Tuesday, which in our house means soccer practice at 6:30 and a science project due Wednesday. My daughter stood at the counter, suspiciously eyeing the raw chicken while my son informed me that rice was "boring." Forty minutes later, they were both scraping the skillet clean and asking for seconds. The secret? It's not just the ridiculous amount of cheese or the tender chicken pieces that are perfectly sized for little mouths—it's the magic that happens when everything cooks together in one pan, creating a creamy, cozy meal that tastes like you spent hours stirring and nurturing it.
Now, this skillet has become our family's culinary security blanket. It's the recipe I text to other moms when they need something foolproof for potluck night. It's what my neighbor makes when her grandchildren visit because it's soft enough for toddlers but flavorful enough for teenagers. Most importantly, it's taught my kids that cooking doesn't have to be complicated to be delicious, and that sometimes the best meals come from tossing everything together and letting the pan work its magic.
Why This Recipe Works
- One Pan Wonder: Everything cooks together, meaning fewer dishes and more flavor as the rice absorbs all the savory chicken juices and cheesy goodness.
- Kid-Approved Texture: Small chicken pieces and tender rice create a soft, easy-to-eat meal that even picky eaters enjoy without complaint.
- Hidden Veggies: Finely diced carrots and peas disappear into the cheesy mixture, ensuring nutrition without negotiation.
- 30-Minute Miracle: From fridge to table in half an hour, making it perfect for those "what's for dinner" emergencies.
- Customizable Cheese Blend: Using both cheddar and mozzarella creates the perfect melt while maintaining that familiar orange color kids expect.
- Make-Ahead Friendly: Prep everything the night before and just dump and cook when you get home from work.
- Budget-Conscious: Uses affordable chicken thighs instead of breast, stretching your grocery budget without sacrificing flavor.
Ingredients You'll Need
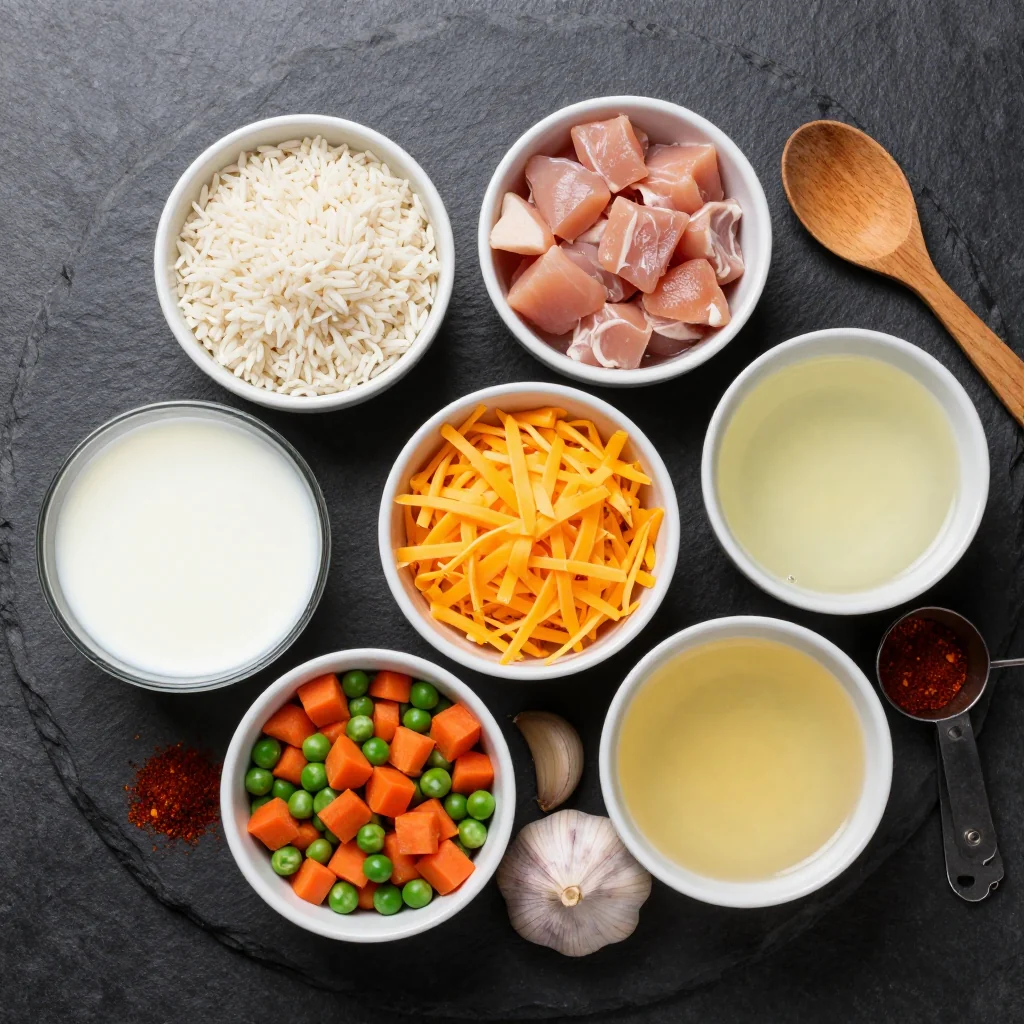
The beauty of this recipe lies in its humble ingredients, each chosen for maximum flavor and kid-friendly appeal. Let's break down what makes each component special and how to choose the best quality items for your family.
Chicken Thighs (1.5 pounds): I specify thighs over breast for three crucial reasons. First, they're more forgiving—thighs stay tender even if slightly overcooked, perfect for distracted parents. Second, they're significantly cheaper, usually half the price of breast meat. Third, they have more flavor thanks to their slightly higher fat content. Look for boneless, skinless thighs that are pale pink with minimal odor. If your kids are texture-sensitive, trim any large pieces of fat, but leave the small ones—they melt during cooking and add incredible richness.
Long-Grain White Rice (1 cup): Avoid instant rice here—it turns mushy. Standard long-grain rice like Mahatma or Uncle Ben's cooks perfectly in the allotted time, absorbing the chicken broth and becoming tender without losing its shape. Jasmine rice works in a pinch but cooks faster, so reduce liquid by 2 tablespoons. Brown rice requires 30 extra minutes and additional liquid, making it unsuitable for our quick weeknight version.
Sharp Cheddar Cheese (2 cups): Buy a block and shred it yourself. Pre-shredded cheese contains cellulose that prevents smooth melting, creating a slightly grainy texture kids notice. For the best flavor balance, use a mild or medium cheddar—too sharp and kids balk, too mild and you lose that classic mac-and-cheese familiarity. Store brand is fine here; save your money for better chicken.
Whole Milk Mozzarella (1 cup): This is your melting insurance policy. Mozzarella creates those Instagram-worthy cheese pulls that make kids excited to eat. Whole milk variety melts significantly better than part-skim, creating a creamier sauce that coats every grain of rice. If you can only find pre-shredded mozzarella, it's acceptable since we have the freshly shredded cheddar for flavor.
Low-Sodium Chicken Broth (2.5 cups): The rice cooking liquid and primary seasoning source. Low-sodium is crucial because the cheese adds plenty of salt, and you can always add more but can't take it out. Kitchen Basics or Pacific brands have the cleanest flavor. In desperate times, dissolve 2 teaspoons Better Than Bouillon in 2.5 cups hot water.
Frozen Mixed Vegetables (1 cup): The great negotiator. Peas and carrots provide color, nutrition, and a touch of sweetness that balances the savory cheese. Frozen works better than fresh here—they're already soft enough for kids and won't release excess water into the rice. If your children are vegetable-averse, pulse them briefly in a food processor so they disappear into the final dish.
How to Make Kid-Friendly Cheesy Chicken and Rice One Skillet
Prep and Season the Chicken
Pat chicken thighs dry with paper towels—moisture is the enemy of browning. Cut into 3/4-inch pieces, keeping them uniform so they cook evenly. In a bowl, toss with 1 teaspoon salt, 1/2 teaspoon pepper, and 1 teaspoon garlic powder. Let stand while you prep other ingredients; this brief rest allows seasoning to penetrate slightly.
Sear for Maximum Flavor
Heat 2 tablespoons olive oil in a large, heavy-bottomed skillet (I love my 12-inch Lodge cast iron) over medium-high heat until shimmering. Add chicken in a single layer—don't crowd or it steams instead of browning. Cook 3-4 minutes without moving it. When edges turn golden, flip and cook 2 minutes more. Remove to a plate; they'll finish cooking later.
Build the Flavor Foundation
Reduce heat to medium. Add diced onion to the same skillet—those browned chicken bits (fond) are pure flavor gold. Cook 2-3 minutes, stirring occasionally, until onion softens and picks up the caramelized chicken bits. Add minced garlic and cook 30 seconds until fragrant but not browned; burnt garlic turns bitter.
Toast the Rice for Nutty Depth
Add rice to the skillet and stir constantly for 1-2 minutes. This crucial step coats each grain with oil and lightly toasts it, creating a subtle nutty flavor that prevents mushy rice. You'll notice the rice turns slightly translucent around the edges—this is perfect. Don't skip this step; it's the difference between restaurant-quality and cafeteria-style.
Create the Cooking Liquid
Slowly pour in chicken broth while stirring constantly—this prevents the toasted rice from clumping. Add 1/2 teaspoon salt (the rice needs seasoning), 1/4 teaspoon pepper, and 1 teaspoon dried thyme. Bring to a gentle boil, stirring once to distribute rice evenly. The liquid should just cover the rice; add 2 tablespoons more broth if needed.
Simmer and Steam
Reduce heat to low, cover tightly, and simmer 15 minutes. Resist the urge to peek—lifting the lid releases steam needed for proper rice cooking. Meanwhile, shred your cheeses if you haven't already. After 15 minutes, quickly lift the lid and scatter frozen vegetables over the surface. Cover immediately and cook 3 minutes more.
Return Chicken and Add Creaminess
Remove lid and gently fold in the partially-cooked chicken pieces. The rice should be nearly tender with just a bit of liquid remaining. If rice is still crunchy and liquid is absorbed, add 1/4 cup more broth. Reduce heat to very low and stir in 1/2 cup milk—this creates the creamy base that makes this dish irresistible to kids.
The Grand Cheese Finale
Turn off heat and sprinkle both cheeses over the surface. Cover and let stand 3-4 minutes—the residual heat melts cheese perfectly without scorching it. When cheese is melted and gooey, gently fold everything together. The sauce should be creamy and coat the rice; if too thick, splash in more milk. Taste and adjust seasoning, remembering kids prefer milder flavors.
Rest and Serve Smart
Let stand 5 minutes before serving—this brief rest allows the sauce to thicken slightly and prevents burned tongues. Serve in shallow bowls with small spoons for little hands. Garnish with a sprinkle of extra cheese (kids love this touch) or finely chopped parsley if you're feeling fancy. Watch as even vegetable-skeptical children devour this comforting meal.
Expert Tips
Temperature Control is Key
If your rice burns on the bottom, your heat is too high. Once you add liquid and cover, the lowest setting on your stove is probably perfect. Every stove is different; if you smell toasting after 10 minutes, reduce heat immediately.
Cheese Storage Hack
Shred extra cheese and freeze in 1-cup portions. It grates beautifully when partially frozen and saves precious minutes on busy nights. Frozen shredded cheese melts just as well as fresh in this recipe.
Make-Ahead Assembly
Cut chicken and vegetables the night before. Store chicken in a zip-top bag with seasonings, vegetables in a separate container. In the morning, everything's ready to dump in the skillet when you get home.
Texture Troubleshooting
If rice is too firm after liquid absorbs, add 1/4 cup hot broth, cover, and cook 5 more minutes. If too mushy, remove lid and cook over medium heat, stirring gently, until excess liquid evaporates.
Double Batch Wisdom
This recipe doubles beautifully in a large Dutch oven. Make extra and portion into kid-size containers for lunch. It reheats perfectly with a splash of milk, making busy mornings easier.
Spice Level Control
If your kids are sensitive to pepper, reduce black pepper to 1/4 teaspoon and add a pinch of sugar to balance flavors. The mild profile makes this perfect for developing palates while remaining tasty for adults.
Variations to Try
Broccoli Bacon Bliss
Replace mixed vegetables with 1 cup finely chopped broccoli florets. Add 4 slices cooked, crumbled bacon with the cheese. Kids love the smoky flavor, and broccoli disappears into the cheesy sauce.
Prep tip: Microwave broccoli 1 minute before addingMexican Fiesta Style
Add 1 teaspoon cumin with the onions, use pepper jack cheese instead of mozzarella, and stir in 1/2 cup salsa with the milk. Top with crushed tortilla chips for crunch.
Mild version: Use Monterey Jack instead of pepper jackItalian Herb Garden
Replace thyme with 1 teaspoon Italian seasoning, add 1/2 cup sun-dried tomatoes with vegetables, and use provolone instead of mozzarella. Finish with fresh basil.
Kid tip: Use half the tomatoes if they're tomato-skepticalTuna Melt Makeover
Skip chicken and add 2 cans drained tuna with the cheese. Use frozen peas and carrots, and add 1 teaspoon Dijon mustard for depth. This pantry-friendly version is ready in 20 minutes.
Pro tip: Solid white tuna has better texture than chunk lightHam and Pineapple Hawaiian
Replace chicken with 2 cups diced ham, add 1 cup pineapple tidbits (drained) with vegetables. Use Swiss cheese for authenticity, though cheddar works for picky eaters.
Sweet note: Pineapple adds natural sweetness kids loveTurkey and Sweet Potato
Use ground turkey instead of chicken, add 1 cup finely diced sweet potato with the onion. The sweet potato cooks in the same time as rice and adds nutrition plus a touch of sweetness.
Texture tip: Dice sweet potato smaller than 1/2-inchStorage Tips
Refrigerator Storage
Cool completely before storing to prevent condensation that makes rice mushy. Transfer to shallow containers—rice cools faster and more evenly, reducing bacteria risk. Store up to 4 days in the coldest part of your fridge, not the door where temperatures fluctuate.
Pro tip: Portion into kid-size containers before refrigerating. Individual portions reheat more evenly and make packing lunches effortless.
Freezer Instructions
This dish freezes beautifully for up to 3 months. Portion into freezer bags, press out excess air, and lay flat to freeze—saves space and thaws quickly. Freeze without cheese topping for best texture, adding fresh cheese when reheating. Thaw overnight in refrigerator, never on the counter.
Safety note: Rice can harbor bacillus cereus, a bacteria that survives cooking. Cool quickly and freeze within 2 hours of cooking.
Reheating Perfection
Microwave: Add 1 tablespoon milk per cup, cover loosely, heat 60-90 seconds, stir, then heat 30-60 seconds more. Stovetop: Place in skillet with 2 tablespoons milk per cup, cover, and heat over medium-low, stirring occasionally, until warmed through. Add extra cheese for that fresh-made appeal.
Kid hack: Transform leftovers into lunch box muffins. Mix with an egg, press into muffin tins, top with cheese, bake 15 minutes at 375°F.
Frequently Asked Questions
Yes, but reduce cooking time and watch carefully. Cut breast into 3/4-inch pieces and sear only 2 minutes per side. Chicken breast dries out quickly, so remove it from heat when just barely pink in the center—it will finish cooking when returned to the skillet. The final dish will be slightly less rich but still delicious. Consider adding 1 tablespoon butter with the milk to compensate for the lower fat content.
Burning usually means heat that's too high or a lid that doesn't seal properly. Every stove's "low" is different—after bringing to a boil, set your burner to the lowest setting that maintains a gentle simmer. If you hear vigorous bubbling, it's too hot. Also, ensure your lid fits tightly; steam escaping causes hot spots. If your lid is loose, cover the skillet with foil before adding the lid. For cast iron skillets, the thickness retains heat longer, so remove from heat 2 minutes early and let residual heat finish cooking.
Absolutely! Replace milk with unsweetened oat milk (closest to dairy in texture) and use dairy-free cheese shreds. Daiya mozzarella melts well, while Violife cheddar provides the best flavor. Note that dairy-free cheese doesn't melt as smoothly, so stir vigorously to create a creamy texture. You can also skip cheese entirely and stir in 1/2 cup nutritional yeast for a cheesy flavor with added nutrition. The dish will be less rich but still comforting and kid-friendly.
The frozen vegetables are already pretty sneaky, but for extra-stealth mode, puree the vegetables with a splash of broth before adding. Cauliflower rice disappears completely—use 1/2 cup with 1/2 cup reduced rice. Zucchini grated on the fine side of a box grater melts into the sauce. Butternut squash puree stirred in with the milk adds nutrition and natural sweetness. Start small (1/4 cup) and increase as kids adjust. The orange color from cheese masks most additions.
Cook completely but stop before adding cheese. Transfer to a slow cooker on warm setting (or refrigerate if serving next day). Thirty minutes before serving, stir in 1/2 cup hot milk and the cheeses. The slow cooker keeps it warm without scorching, and adding cheese fresh prevents that reheated cheese texture. Bring extra shredded cheese and chopped parsley for garnish at the potluck. This method works perfectly for teacher appreciation luncheons or sports team dinners.
A 12-inch heavy-bottomed skillet works best. Cast iron retains heat beautifully and prevents hot spots that burn rice, but requires careful temperature monitoring. Enameled cast iron (like Le Creuset) is ideal—non-reactive, excellent heat distribution, and pretty enough for table service. Stainless steel works but requires more oil to prevent sticking. Avoid non-stick skillets; they don't develop the fond (browned bits) that adds depth to the dish. Whatever you use, ensure it has a tight-fitting lid and is oven-safe for versatility.
Kid-Friendly Cheesy Chicken and Rice One Skillet
Ingredients
Instructions
- Season chicken: Toss chicken pieces with 1 teaspoon salt, pepper, and garlic powder. Let stand while prepping other ingredients.
- Brown chicken: Heat olive oil in a large skillet over medium-high heat. Add chicken in a single layer, cook 3-4 minutes per side until golden. Remove to a plate.
- Sauté aromatics: Reduce heat to medium. Add onion to the same skillet and cook 2-3 minutes until softened. Add garlic and cook 30 seconds.
- Toast rice: Add rice to the skillet and stir constantly for 1-2 minutes until lightly toasted and coated with oil.
- Add liquid: Pour in chicken broth, thyme, and remaining salt. Bring to a gentle boil, stirring once to distribute rice.
- Simmer: Reduce heat to low, cover tightly, and simmer 15 minutes without lifting the lid.
- Add vegetables: Scatter frozen vegetables over the surface, cover, and cook 3 minutes more.
- Finish and cheese: Stir in the partially-cooked chicken and milk. Turn off heat, sprinkle both cheeses over the top, cover, and let stand 3-4 minutes until melted.
- Serve: Gently fold everything together and let stand 5 minutes before serving.
Recipe Notes
For creamier texture, use 3/4 cup milk instead of 1/2 cup. If your kids are sensitive to pepper, reduce to 1/4 teaspoon. This recipe doubles beautifully in a Dutch oven for potlucks.