Love this? Pin it for later! 📌
I discovered this recipe during a sweltering July when turning on the oven felt like inviting the sun into my kitchen. My daughter had begged for cheesecake, but the thought of baking in that heat? No thank you. As I stared at my slow cooker—the unsung hero of my countertop—a wild idea sparked. What if I could create that same creamy, dreamy cheesecake texture using gentle, even slow-cooker heat?
After three attempts (and exactly zero complaints from my very willing taste-testers), I landed on something magical: a chocolate cheesecake so rich and velvety it could make a chocolate truffle jealous, yet so easy it practically makes itself. The slow cooker creates this incredible steam-bath environment that prevents cracks, eliminates the need for a water bath, and produces the most luxurious texture you've ever experienced.
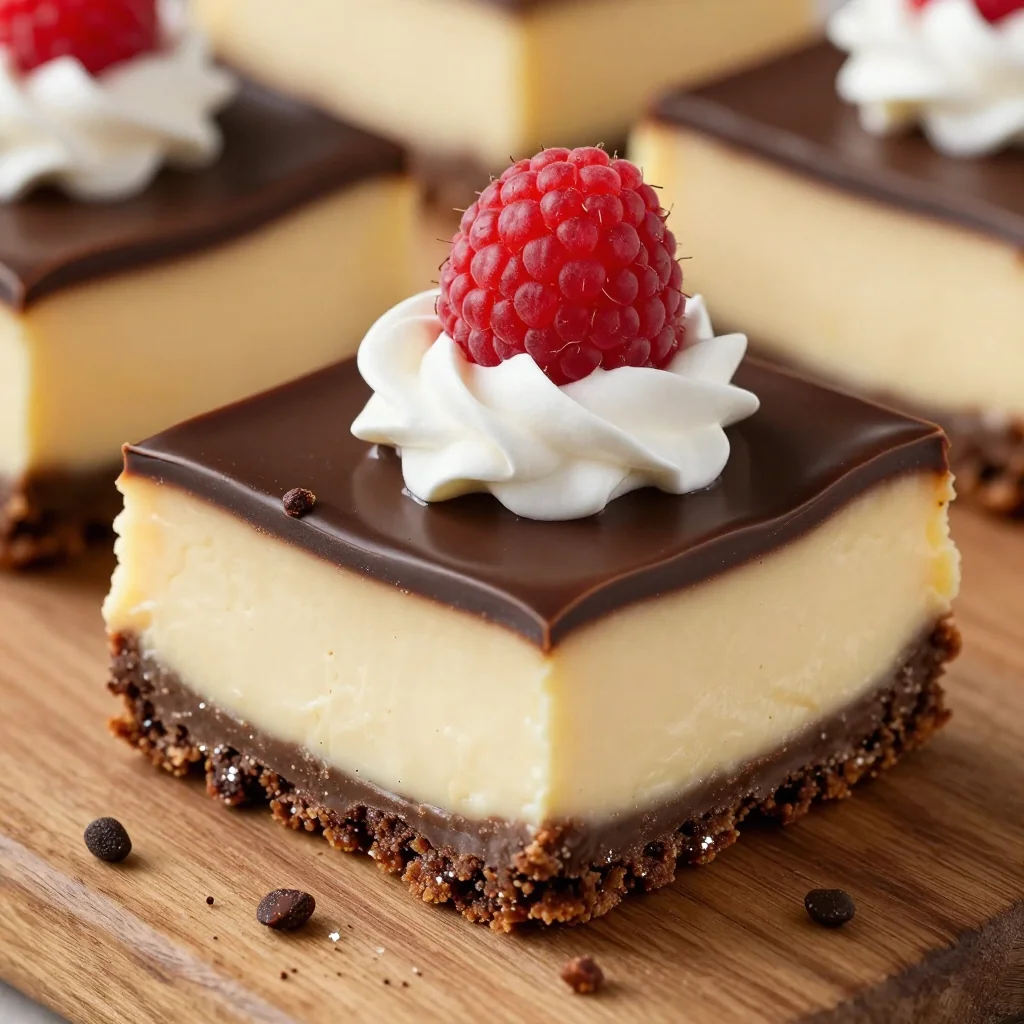
But here's the real kicker—these bars are even better the next day, making them perfect for entertaining. Slice them into petite squares for an elegant dessert platter, or cut generous portions for those "it's been a week" moments. Either way, prepare for people to demand this recipe. I've seen grown adults close their eyes and sigh after the first bite. Don't say I didn't warn you.
Why This Recipe Works
- No Water Bath Needed: The slow cooker creates its own steam environment, eliminating the need for fussy water baths that always seem to leak.
- Crack-Free Guarantee: Gentle, even heat prevents the dreaded cheesecake crack, giving you bakery-perfect results every time.
- Make-Ahead Marvel: These bars actually improve in flavor and texture after 24 hours, making entertaining stress-free.
- Oven-Free Baking: Perfect for summer entertaining or when your oven is occupied with dinner preparations.
- Feed a Crowd: One batch makes 24 petite bars or 16 generous squares—ideal for potlucks and parties.
- Freezer-Friendly: These bars freeze beautifully for up to 2 months, meaning you're always 30 minutes away from dessert.
Ingredients You'll Need
Before we dive into the magic, let's talk ingredients. Quality matters here—not because we're snobs, but because with only a handful of components, each one gets its moment to shine. Think of it as casting for a play where every actor must deliver an Oscar-worthy performance.
For the Chocolate Cookie Crust:
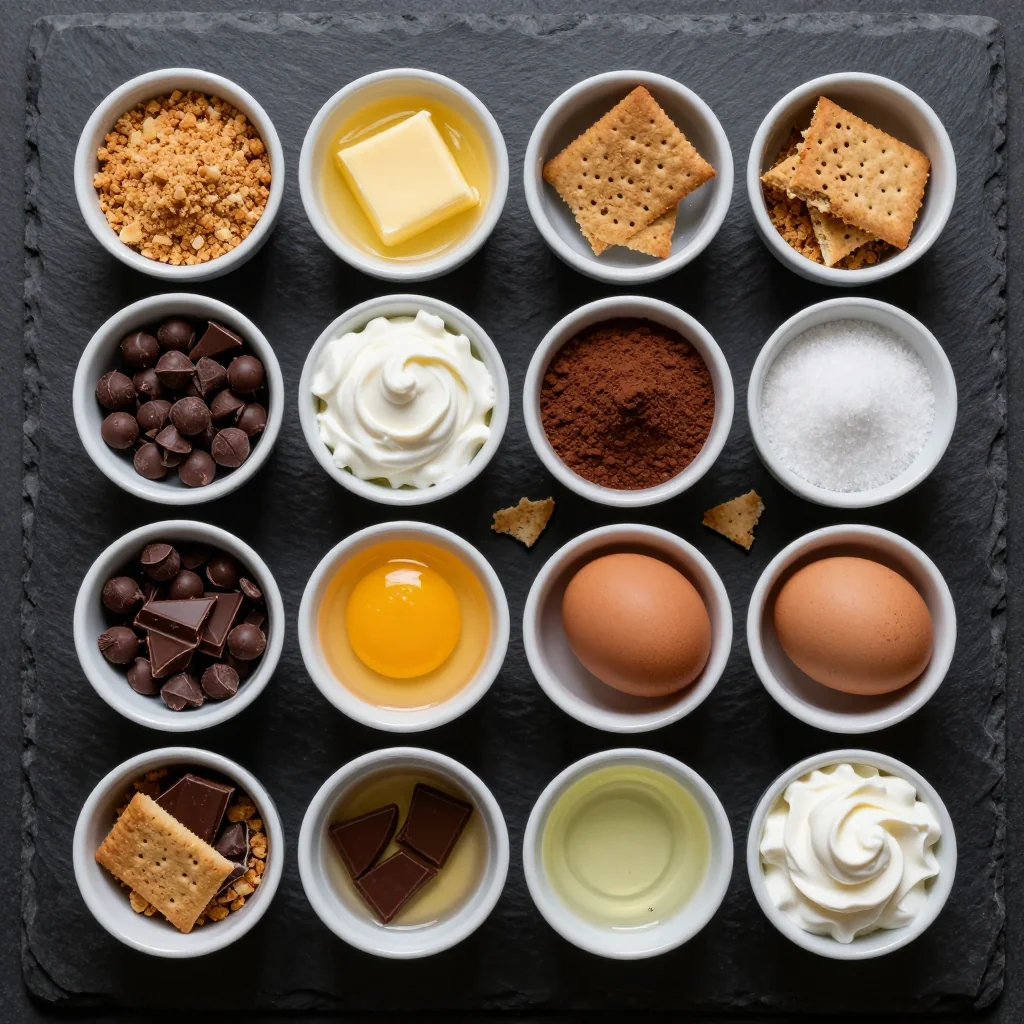
Chocolate sandwich cookies (like Oreos) – 24 cookies, filling and all. Don't even think about removing that creamy center; it acts as built-in binding magic. If you're feeling fancy, try the mint or peanut butter varieties for a fun twist. For gluten-free friends, any chocolate sandwich cookie works—just check the label.
Unsalted butter – 6 tablespoons, melted and slightly cooled. I always use European-style butter here for its higher fat content and richer flavor. If all you have is salted, omit the pinch of salt later.
Pinch of salt – Just a whisper to balance the sweetness and make the chocolate sing. Fleur de sel if you're feeling Parisian, kosher salt works perfectly too.
For the Chocolate Cheesecake Filling:
Cream cheese – 24 ounces (3 packages), full-fat please. This is no time for diet food. Make sure it's room temperature—cold cream cheese is the enemy of smooth texture. I've had success with whipped cream cheese too, just reduce the mixing time.
Granulated sugar – 3/4 cup. Regular white sugar dissolves perfectly, but if you're out, superfine or even caster sugar works in a pinch. Just avoid brown sugar, which would muddy our chocolate flavor.
Dutch-processed cocoa powder – 1/4 cup. This is where the chocolate magic happens. Dutch-processed gives that deep, sophisticated chocolate flavor, but natural cocoa works too—your bars will just be slightly lighter in color and more tangy.
Semi-sweet chocolate – 6 ounces, melted and cooled. Reach for something you'd happily eat out of hand. I'm partial to Ghirardelli 60% chips, but any good-quality chocolate works. Dark chocolate (70%) creates a more sophisticated bar, while milk chocolate makes them more kid-friendly.
Eggs – 2 large, room temperature. Cold eggs can cause your chocolate to seize, so plan ahead. Forgot to take them out? Place them in warm (not hot) water for 10 minutes.
Heavy cream – 1/4 cup. This adds insurance against a dry cheesecake. In a desperate moment, I've used half-and-half, but the texture suffers slightly.
Vanilla extract – 2 teaspoons. Real vanilla, not the imitation stuff. Vanilla bean paste creates gorgeous flecks if you want to show off.
Instant espresso powder – 1 teaspoon, optional but highly recommended. It doesn't make the bars taste like coffee—it just intensifies the chocolate flavor like a secret weapon. No espresso? A strong cup of cooled coffee works too, just reduce the cream by 2 tablespoons.
How to Make Indulgent Slow Cooker Chocolate Cheesecake Bars
Prep Your Slow Cooker Setup
Line your slow cooker with a large piece of parchment paper, pressing it into the bottom and up the sides with some overhang. This creates a sling for easy removal later. If your slow cooker has hot spots (you know who you are), place a folded kitchen towel under the insert to distribute heat evenly. Trust me, future you will thank present you for this step.
Create the Chocolate Cookie Foundation
In a food processor, blitz those chocolate cookies into fine crumbs—the texture should resemble damp sand. Add the melted butter and pulse until the mixture looks like chocolate cookie dough. Press this mixture firmly into the bottom of your prepared slow cooker, creating an even layer. Use the bottom of a measuring cup to really pack it down. This isn't the time for gentle pressing—we want a solid foundation that won't crumble when sliced.
Whip Up the Chocolate Cheesecake Base
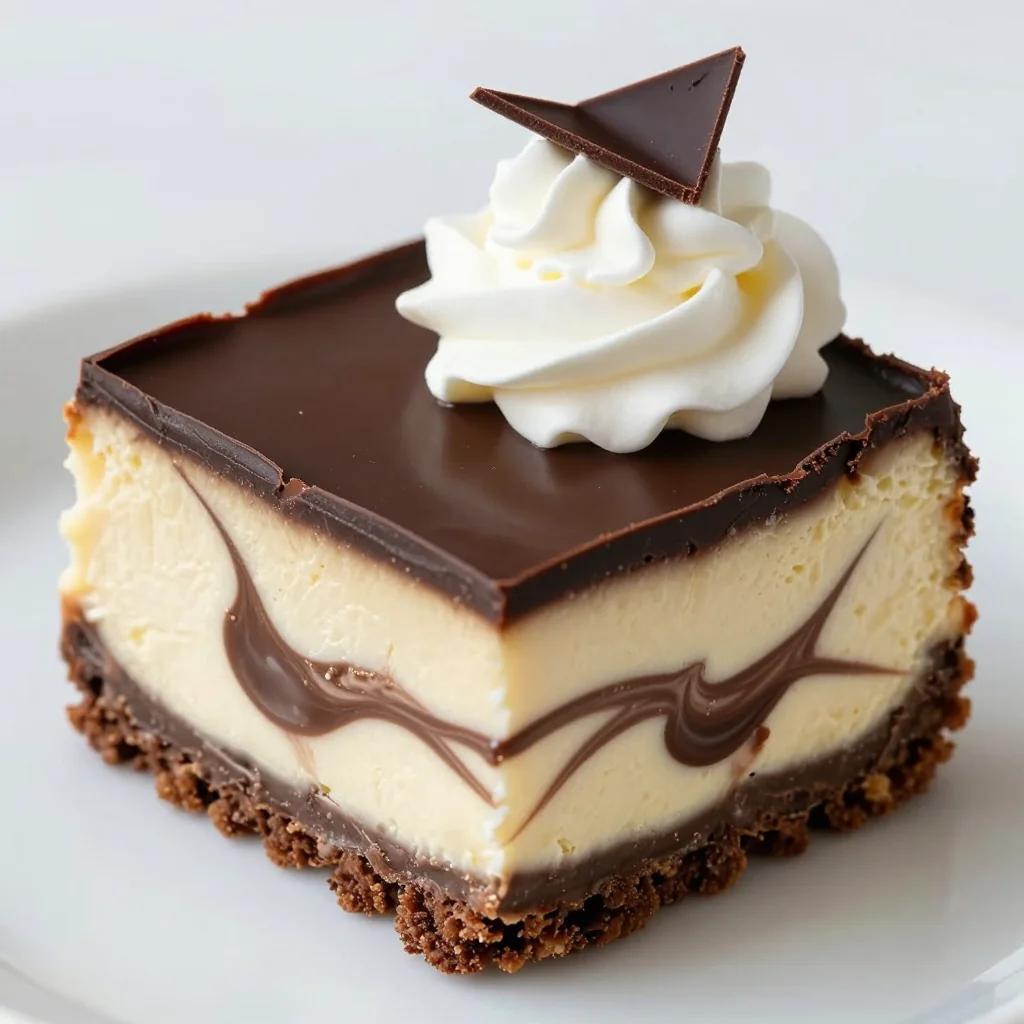
In your stand mixer (or with a hand mixer), beat the cream cheese on medium speed for 2 full minutes. This isn't a suggestion—it's mandatory for that cloud-like texture. Scrape down the bowl religiously. Add sugar and beat another minute. Add cocoa powder and mix until combined, then pour in melted chocolate. The mixture should look like chocolate mousse at this point. Add eggs one at a time, mixing just until each disappears—overmixing incorporates air that causes cracks. Stir in cream, vanilla, and espresso powder until just combined.
Assemble and Smooth
Pour the chocolate cheesecake mixture over your crust, tapping the slow cooker gently on the counter to release any air bubbles. Use an offset spatula to create a perfectly smooth top. This isn't just for looks—an even surface ensures uniform cooking. If you spot any stubborn bubbles, pop them with a toothpick. Your future self will appreciate this attention to detail.
The Slow Cooker Steam Bath
Place a clean kitchen towel under the slow cooker lid—this prevents condensation from dripping onto your cheesecake. Cook on LOW for 2.5 to 3.5 hours. Resist the urge to peek for the first 2 hours; the gentle heat needs to build gradually. When done, the edges should look set but the center should still jiggle slightly when you gently shake the slow cooker. It will continue cooking from residual heat.
Cool Down Protocol
Turn off the slow cooker and let the cheesecake cool inside for 1 hour with the lid slightly ajar. This gentle cooling prevents the dreaded sinkhole in the center. Remove the insert (if removable) and cool completely on a wire rack. Once room temperature, refrigerate at least 4 hours or preferably overnight. This step is non-negotiable—the cheesecake needs time to set properly.
The Big Reveal
Lift the cheesecake out using the parchment sling and place on a cutting board. For clean cuts, use a sharp knife dipped in hot water, wiping between each slice. Cut into 24 petite bars (perfect for a dessert platter) or 16 generous squares for serious dessert lovers. If the cheesecake seems too soft, freeze for 30 minutes before cutting—it firms up beautifully.
Gild the Lily (Optional but Recommended)
Before serving, let the bars sit at room temperature for 15 minutes—this allows the chocolate flavor to bloom. Dust with cocoa powder, drizzle with melted chocolate, or top with a dollop of whipped cream and fresh berries. For extra glamour, add gold leaf or edible flowers. These bars don't need much adornment, but a little sparkle never hurt anyone.
Expert Tips
Temperature is Everything
Room temperature ingredients blend seamlessly, creating that ultra-smooth texture we're after. Set everything out 2 hours before baking, or speed things up: place cold ingredients in a bowl of warm water for 10-15 minutes.
Don't Overmix
Mix just until each ingredient disappears. Overmixing incorporates air that causes cracks and creates a porous texture. Think of it like folding clouds, not whipping cream.
The Towel Trick
That kitchen towel under the lid isn't optional—it absorbs condensation that would otherwise drip onto your perfect surface. Use a thin, clean towel and replace if it becomes saturated.
Patience Pays Off
The overnight chill isn't just for setting—it's when flavors meld and deepen. If you can wait 24 hours, you'll be rewarded with complexity that tastes like it came from a Parisian patisserie.
Fix Those Cracks
If despite your best efforts, a crack appears, don't panic. Make a quick ganache (equal parts chocolate and cream) and pour over the top. Instant camouflage that tastes incredible.
Freeze for Clean Cuts
For Instagram-worthy slices, freeze the cheesecake for 30-45 minutes before cutting. Use a hot knife (dip in hot water, wipe dry) and clean between each cut for bakery-perfect presentation.
Variations to Try
Mint Chocolate
Replace espresso powder with 1/2 teaspoon peppermint extract. Use mint chocolate cookies for the crust and top with crushed candy canes for a festive touch.
Salted Caramel
Swirl 1/2 cup caramel sauce into the batter before cooking. Sprinkle flaky salt on top before serving. Use Biscoff cookies for the crust to complement the caramel.
Raspberry Swirl
Drop spoonfuls of raspberry jam on top and swirl with a toothpick. The tart berries cut through the rich chocolate beautifully. Fresh raspberries on top add elegance.
Mocha Madness
Increase espresso powder to 1 tablespoon and add 2 tablespoons coffee liqueur. Use chocolate-covered espresso beans as garnish for extra coffee punch.
White Chocolate Raspberry
Replace semi-sweet chocolate with white chocolate and add freeze-dried raspberry powder. The pretty pink flecks make this perfect for bridal showers.
Mexican Hot Chocolate
Add 1/2 teaspoon cinnamon and a pinch of cayenne to the batter. Use Mexican chocolate (like Abuelita) for authentic flavor. Serve with cinnamon whipped cream.
Storage Tips
Refrigerator Storage
Store bars in an airtight container with parchment between layers for up to 5 days. They actually improve in flavor after 24 hours, making them perfect for entertaining. Let come to room temperature for 15 minutes before serving for best texture.
Freezer Instructions
Freeze individual bars on a parchment-lined sheet pan until solid, then wrap in plastic wrap and aluminum foil. Store up to 2 months. Thaw overnight in the refrigerator or 2 hours at room temperature. For best texture, don't microwave to thaw.
Make-Ahead Magic
These bars are the ultimate entertaining secret—they're actually better made 24-48 hours ahead. The flavors meld and deepen, creating complexity that tastes like it came from a professional bakery. Make on Sunday, serve on Tuesday, accept the compliments.
Frequently Asked Questions
Absolutely! Use a 9-inch springform pan in a water bath at 325°F for 45-55 minutes. Place a pan of water on the rack below to create steam. The texture will be slightly different—less dense, more traditional cheesecake—but equally delicious.
Cracks happen when the cheesecake cools too quickly or is overmixed. Make sure ingredients are room temperature, don't overmix after adding eggs, and cool gradually in the turned-off slow cooker. If all else fails, cover with ganache—problem solved!
You can, but expect a different texture—slightly grainier and less rich. If you must, use 2/3 regular and 1/3 low-fat. Avoid fat-free entirely; it contains stabilizers that prevent proper setting. Remember, these are called "indulgent" for a reason!
The edges should look set and slightly puffed, while the center should still jiggle when you gently shake the slow cooker. It will continue cooking from residual heat. If the center looks liquid, cook 15-30 minutes more. Better slightly underdone than overbaked.
Yes, but you'll need two slow cookers or to cook in batches. The cooking time remains the same. For parties, I often make two flavors simultaneously—classic chocolate and raspberry swirl. Your guests will think you have a pastry chef hidden in your kitchen!
Keep them cold! Transport in a cooler with ice packs. Cut just before serving for best appearance. For potlucks, I freeze them solid, transport frozen, and they thaw perfectly by dessert time. Bring a small cutting board and hot water for slicing on-site.
Indulgent Slow Cooker Chocolate Cheesecake Bars
Ingredients
For the crust:
For the chocolate cheesecake:
Instructions
- Prep the slow cooker: Line with parchment paper, creating a sling for easy removal.
- Make the crust: Process cookies into fine crumbs, mix with melted butter and salt. Press firmly into bottom of slow cooker.
- Mix the cheesecake: Beat cream cheese until smooth, 2 minutes. Add sugar, beat 1 minute. Mix in cocoa powder and melted chocolate. Add eggs one at a time. Stir in cream, vanilla, and espresso powder.
- Assemble: Pour mixture over crust, smooth top with offset spatula.
- Cook: Place towel under slow cooker lid. Cook on LOW 2.5-3.5 hours until edges are set but center jiggles.
- Cool: Cool in slow cooker 1 hour, then refrigerate 4 hours or overnight. Lift out using parchment sling, cut into bars with hot knife.
Recipe Notes
Room temperature ingredients are crucial for smooth texture. Don't skip the overnight chill—these bars improve dramatically after 24 hours. For clean cuts, freeze 30 minutes before slicing with a hot knife.