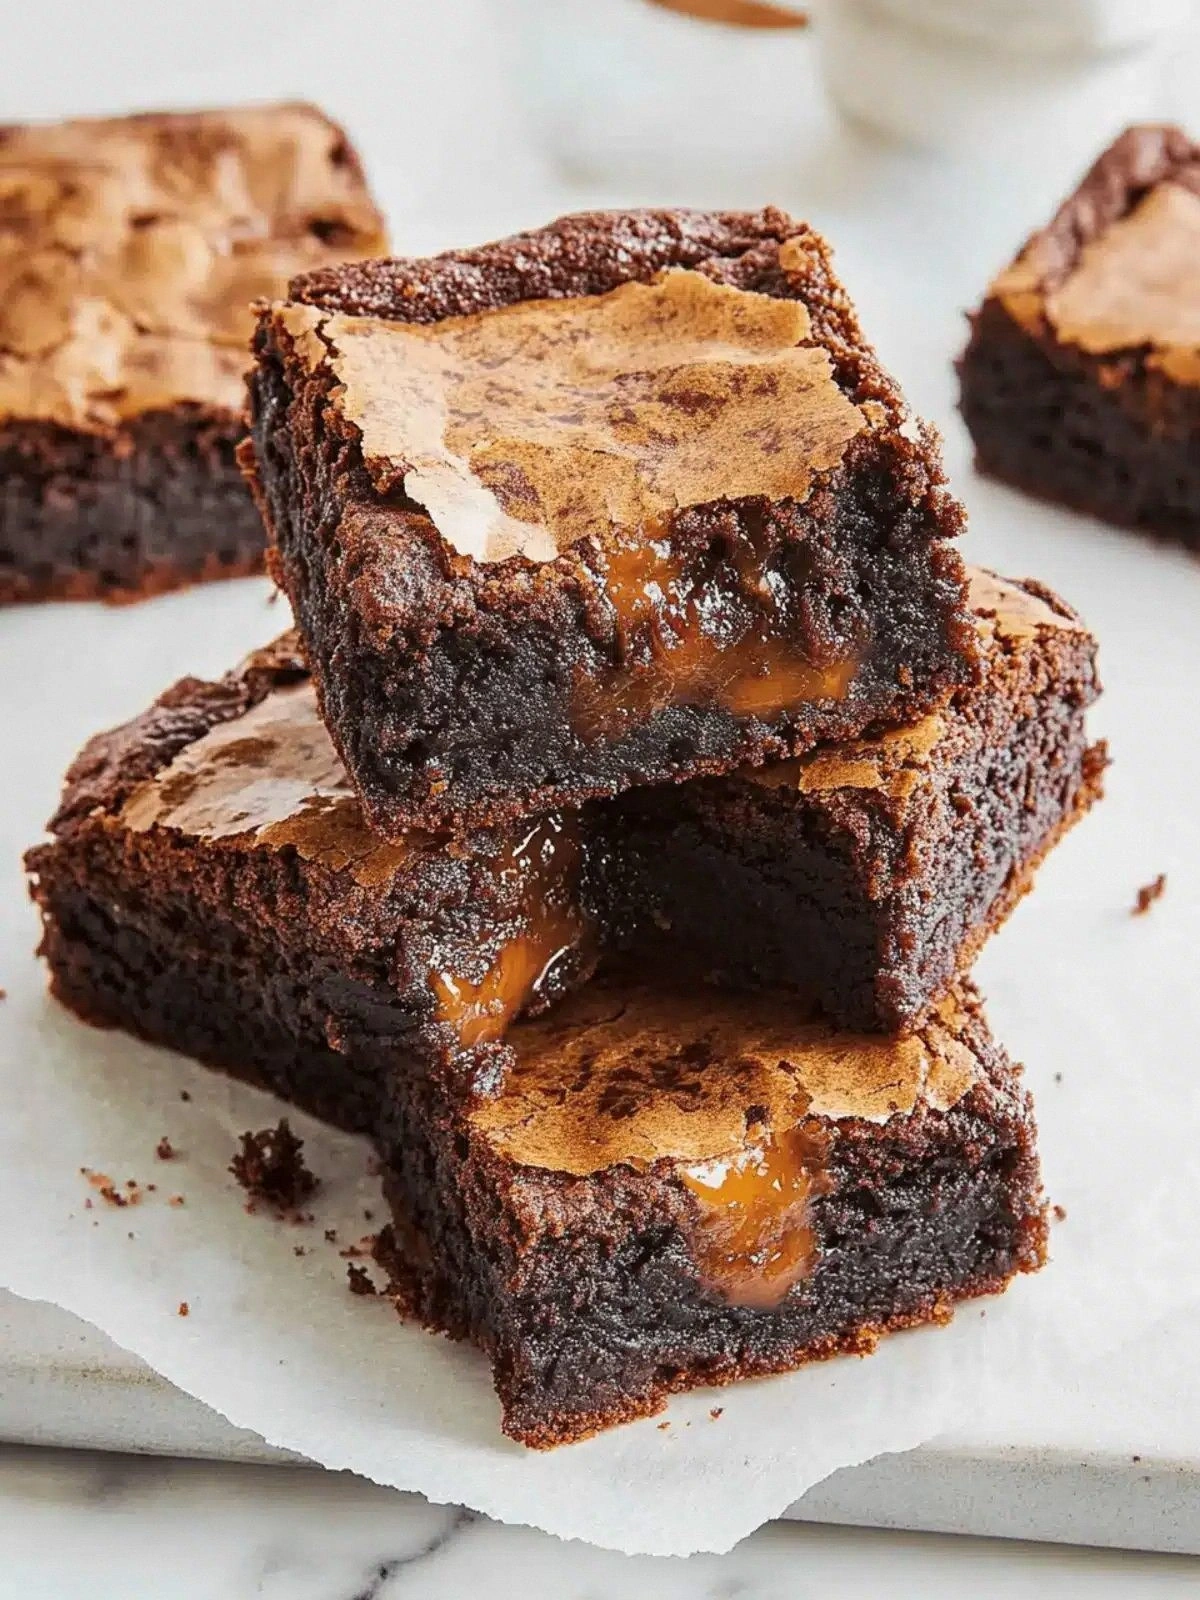
Picture this: I’m in the middle of a midnight baking spree, the oven preheated to 350°F, and a catastrophic chocolate mishap erupts when I accidentally drop a whole jar of caramel into my batter. The kitchen smells like a failed experiment, and I’m staring at a sticky, gooey mess that looks more like a chocolate disaster than a dessert. I’ve survived the worst brownies, but this one was a recipe for ruin—until I discovered a secret trick that turns that sticky mess into the most luscious, buttery, caramel‑laden brownies you’ll ever taste. I dare you to taste this and not go back for seconds.
The moment the batter hits the pan, the air fills with a rich, deep chocolate aroma that feels like velvet on your tongue. The sound is a soft, satisfying sizzle that signals the batter’s transformation from liquid to golden batter. As it bakes, the edges darken to a glossy, almost caramelized crust, while the center remains moist, almost molten. When I cut into one, the chocolate oozes out like liquid silk, and the caramel ribbon runs through the crumb, creating a sweet, salty swirl that’s impossible to ignore. I’ve never seen a dessert that could make my taste buds sing so loudly.
What makes this version stand out is that it marries the classic fudgy brownie with an unexpected caramel glaze that coats the entire surface. The result is a multi‑textured delight—crisp edges, gooey center, and a silky caramel finish that melts in your mouth. It’s hands down the best version you’ll ever make at home because every bite is a revelation of flavor and texture. Most recipes get this completely wrong by adding caramel after baking or using a thin drizzle; here, the caramel is baked in, creating an even distribution that’s impossible to achieve otherwise. I’ll be honest—after tasting the first batch, I ate half before anyone else got to try it.
I’ll give you a sneak peek of the game‑changer: a simple trick that lets you fold the caramel into the batter without ruining the texture. By carefully melting the caramel with condensed milk and then incorporating it into the batter at the right moment, you lock in that buttery sweetness that’s both rich and silky. Picture yourself pulling this out of the oven, the whole kitchen smelling incredible, and knowing you’ve just created a show‑stopping dessert that will leave everyone begging for the recipe. Let me walk you through every single step—by the end, you’ll wonder how you ever made it any other way.
What Makes This Version Stand Out
- Taste: The caramel infuses the brownies with a deep, buttery sweetness that balances the chocolate’s bitterness, creating a flavor profile that lingers on the palate.
- Texture: The result is a fudgy core that melts in your mouth, paired with a crisp, caramelized edge that adds delightful contrast.
- Simplicity: Despite the decadent outcome, the method is straightforward—no fancy equipment or elaborate steps.
- Uniqueness: The caramel is baked into the batter, a technique rarely used in traditional brownie recipes, giving this version a signature twist.
- Crowd Reaction: At parties, these brownies become the highlight of the dessert table, with guests lining up for seconds.
- Ingredient Quality: Using high‑quality dark chocolate chips and premium caramel candies elevates the overall flavor.
- Cooking Method: The slow, low‑temperature bake ensures even caramelization without burning.
- Make‑ahead Potential: Once baked, the brownies keep well in the fridge and can be reheated for a fresh, warm treat.
Alright, let's break down exactly what goes into this masterpiece…
Inside the Ingredient List
The Flavor Base
Unsalted Butter: The butter provides the richness and moisture that keeps the brownies tender. If you skip it, the texture becomes dry and crumbly. For a dairy‑free version, swap with an equal amount of coconut oil, which adds a subtle coconut flavor.
The Texture Crew
Unsweetened Cocoa Powder: The cocoa gives depth and intensity to the chocolate flavor. Using a high‑quality Dutch‑process cocoa ensures a smoother finish. If you prefer a lighter chocolate taste, reduce the amount slightly and increase the brown sugar.
Light Brown Sugar: Brown sugar adds caramel notes and helps with browning. If you don’t have light brown sugar, dark brown sugar can be used but will make the brownies slightly sweeter.
The Unexpected Star
Sweetened Condensed Milk: This ingredient is the key to the caramel infusion. It thickens the caramel and gives the brownies a luscious, custard‑like center. If you’re avoiding dairy, try a non‑dairy condensed milk alternative.
Caramel Candies: The caramel candies are the heart of the glaze. They provide a chewy texture and a buttery sweetness that complements the chocolate. If you can’t find them, homemade caramel squares work just as well.
Flaky Sea Salt (Optional): A pinch of flaky sea salt on top of the brownies adds a burst of contrast and enhances the caramel’s sweetness. It’s a simple but powerful finishing touch.
Everything’s prepped? Good. Let’s get into the real action…
The Method — Step by Step
- Preheat your oven to 350°F (175°C) and line a 9x9-inch pan with parchment paper. This ensures even baking and easy removal. The oven temperature is critical—too hot, and the caramel will burn; too low, and the brownies won’t set properly.
- In a medium saucepan, melt the butter over medium heat. Add the unsweetened cocoa powder, light brown sugar, and granulated sugar, stirring constantly until the mixture is smooth and glossy. The mixture should look like a thick, dark sauce that coats the back of a spoon.
- Remove the pan from heat and let it cool slightly—about 5 minutes—so that the eggs won’t scramble when added. This is the moment of truth; patience pays off.
- Whisk the eggs one at a time, ensuring each is fully incorporated before adding the next. The batter will thicken slightly with each addition, creating a rich, glossy consistency.
- Stir in the vanilla extract, salt, all‑purpose flour, and semi‑sweet chocolate chips. Mix until just combined; over‑mixing will develop gluten and make the brownies tough.
- Pour the batter into the prepared pan, smoothing the top with a spatula. The batter should spread evenly; if it’s too thick, a quick stir can help.
- Bake for 25–30 minutes, or until a toothpick inserted into the center comes out with a few moist crumbs. The edges should pull away from the pan, indicating doneness.
- While the brownies bake, melt the caramel candies with the sweetened condensed milk in a saucepan over low heat, stirring constantly until smooth. The mixture should be silky and glossy, not thick or grainy.
- Remove the brownies from the oven and immediately pour the caramel glaze over the hot surface. The glaze will seep into the batter, creating a molten center. Let the brownies cool completely before slicing.
That's it — you did it. But hold on, I've got a few more tricks that'll take this to another level. Keep reading for insider tips that will elevate even the most seasoned baker.
Insider Tricks for Flawless Results
The Temperature Rule Nobody Follows
Many bakers think a higher temperature yields a crisper top, but for brownies, a steady 350°F ensures a perfect, even bake. If you’re using a convection oven, reduce the temperature by 25°F to avoid over‑browning the caramel glaze. I once tried a 400°F bake and ended up with a burnt edge that ruined the whole batch.
Why Your Nose Knows Best
Before you pull the brownies out, listen for the subtle scent of caramel mingling with chocolate. That aroma is your cue that the glaze has set just right. If you wait too long, the caramel will harden into a brittle shell; if you rush, it will stay runny.
The 5-Minute Rest That Changes Everything
Let the brownies rest for 5 minutes on the baking sheet before transferring them to a wire rack. This brief pause allows the caramel to firm up slightly, making slicing easier and preventing the brownies from sticking to the pan. I’ve seen people slice directly from the pan and end up with a mess of gooey bits.
A Pinch of Salt for Balance
Adding a dash of flaky sea salt on top of the caramel before it sets creates a sweet‑salty explosion that elevates the flavor profile. The contrast is immediate and delightful, turning a simple brownie into a gourmet treat. If you’re watching calories, a light sprinkle is enough.
The Swirl Technique
After pouring the caramel glaze, use a toothpick or a thin skewer to create a swirled pattern in the center. This not only looks Instagram‑worthy but also helps the caramel distribute evenly. It’s a quick move that adds a professional touch.
Creative Twists and Variations
This recipe is a playground. Here are some of my favorite ways to switch things up:
Nutty Caramel Crunch
Fold in ½ cup of toasted pecans or walnuts before baking. The crunch adds texture, and the nuts pair beautifully with caramel.
Espresso Infusion
Add 1 tablespoon of instant espresso powder to the batter. The coffee enhances the chocolate flavor and gives a subtle depth.
Minty Surprise
Stir in a few drops of peppermint extract after the caramel is poured. The minty finish offers a refreshing contrast to the sweetness.
Sea Salt Caramel Caramel
Replace the optional flaky sea salt with a generous sprinkle of sea salt on top of the caramel glaze before it sets. The salt crystals create a delightful crunch.
Dark Chocolate Swirl
Swap the semi‑sweet chocolate chips for dark chocolate chunks. The bitterness balances the caramel’s sweetness, creating a sophisticated flavor.
Storing and Bringing It Back to Life
Fridge Storage
Store brownies in an airtight container at room temperature for up to 3 days. For longer freshness, keep them in the fridge; they’ll stay moist and flavorful for up to a week.
Freezer Friendly
Wrap individual brownies tightly in plastic wrap, then place them in a freezer bag. They can be frozen for up to 3 months. Thaw at room temperature before serving.
Best Reheating Method
Reheat frozen brownies in a microwave on medium power for 20–30 seconds, or warm in a 350°F oven for 5 minutes. Add a tiny splash of water before reheating to steam back to perfection, restoring the fudgy center.