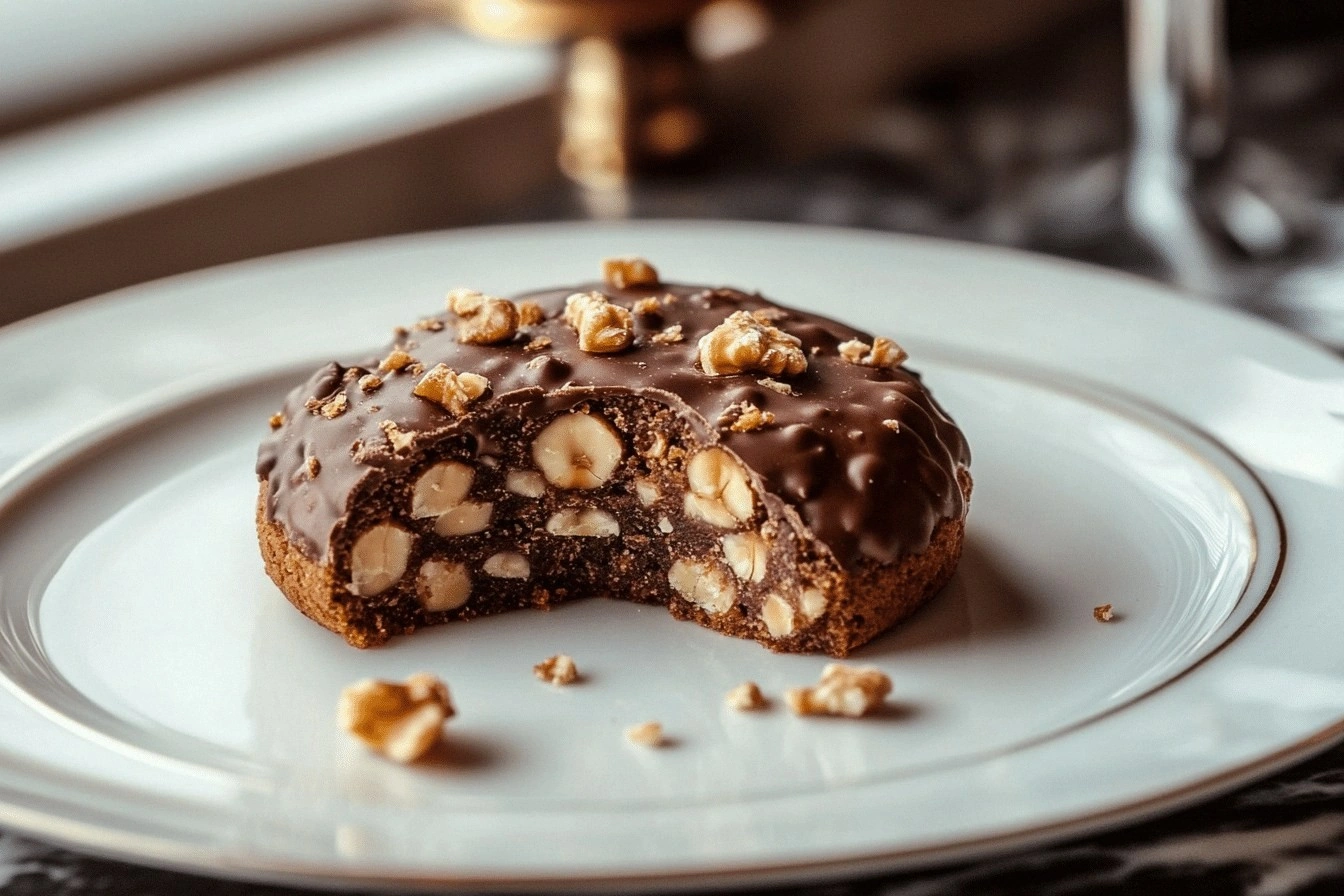
It started with a kitchen catastrophe I still laugh about—an over‑baked batch of chocolate hazelnut cookies that had turned into a hard, chalky slab of disappointment. I was on a mission to rescue the flavor, to turn that brittle mess into something that would melt in your mouth and make your taste buds sing. I stared at the tray, imagined the crunch, and thought, “What if I could capture that hazelnut crunch and chocolate richness in a cookie that’s both airy and chewy?” That’s when the idea sparked: a chocolate hazelnut cookie that balances texture and flavor like a perfectly tuned orchestra.
Picture this: the air is thick with the scent of toasted hazelnuts, the sweet caramel notes of brown sugar dancing with the deep, velvety cocoa. The sound of the dough creaking as you fold in the nuts, the gentle hiss of butter melting into the batter, and the anticipation of the first bite—crisp edges that crackle like thin ice, a center that melts into a glossy chocolate stream. This isn’t just another cookie recipe; it’s a sensory journey that starts with the first aroma and ends with a lingering chocolate aftertaste that makes you reach for another.
What makes this version stand out is that it takes the classic chocolate hazelnut cookie and elevates it with a few intentional twists. I’ve tweaked the sugar balance, added a touch of espresso powder for depth, and used a higher cocoa content to keep the chocolate flavor front and center. The result is a cookie that’s crunchy on the outside, gooey on the inside, and has a nutty undertone that never overwhelms. Most recipes get this completely wrong, but this one works because each ingredient is carefully chosen and each step is deliberate.
Let me walk you through every single step—by the end, you’ll wonder how you ever made it any other way. I dare you to taste this and not go back for seconds. This is hands down the best version you'll ever make at home, and I promise it’s worth the extra effort. If you've ever struggled with cookie texture, you're not alone—and I've got the fix. Picture yourself pulling this out of the oven, the whole kitchen smelling incredible, and the first bite delivering that perfect crunch and chocolate melt.
What Makes This Version Stand Out
- Taste: The chocolate flavor is deep and balanced, thanks to a high-quality cocoa powder that cuts through the sweetness of the sugars. The toasted hazelnuts add a savory depth that makes each bite feel like a sophisticated dessert.
- Texture: The cookies have a crisp exterior that shatters like thin ice, while the interior stays chewy and chocolatey, creating a dynamic mouthfeel that keeps you coming back for more.
- Ingredient Quality: I use a premium unsalted butter and a dark chocolate that melts just right, ensuring that no single element overpowers the others.
- Make‑Ahead Potential: These cookies bake up and stay fresh for a week, making them perfect for potlucks, gift baskets, or a midnight snack that’s still brand‑new.
- Visual Appeal: The glossy chocolate pockets and scattered hazelnuts give each cookie a striking look that’s Instagram‑ready.
- Ease of Prep: The batter is simple to mix, and the dough is forgiving—no need to worry about over‑mixing or under‑baking.
Inside the Ingredient List
The Flavor Base
All‑Purpose Flour is the backbone of any cookie, providing structure while keeping the texture soft and chewy. If you skip it, the cookie will collapse and lose its shape. I recommend using a flour with a protein content around 10–11% to get that ideal bite. For a twist, try substituting half the flour with oat flour to add a subtle nuttiness.
Cocoa Powder is the heart of the chocolate flavor. It’s not just for color; it gives the cookie a deep, slightly bitter undertone that balances the sugars. Use a Dutch‑processed cocoa for a smoother taste, or a natural cocoa for a more robust flavor profile. Skipping cocoa would turn this into a plain hazelnut cookie, losing that essential chocolate identity.
The Texture Crew
Baking Soda is the leavening agent that creates the cookie’s airy pockets. It reacts with the acidic brown sugar and creates tiny bubbles that make the cookie rise just enough without spreading too thin. If you replace it with baking powder, the cookies will be denser and flatter.
Unsalted Butter brings richness and tenderness. It melts into the batter, creating a silky mouthfeel. Using salted butter would alter the flavor balance and could make the cookies too salty. A good rule of thumb: use room‑temperature butter so it mixes smoothly with the sugars.
The Unexpected Star
Toasted Hazelnuts are the crunchy, nutty element that gives the cookie its signature bite. Toasting them brings out their natural oils and deepens their flavor. If you skip the toasting step, the nuts will taste raw and the cookie will lack that desirable crunch.
Chocolate Chips or Chopped Chocolate are the gooey pockets that melt into liquid chocolate when you bite. They add a delightful contrast to the crunchy nuts. If you prefer a lighter chocolate, use white chocolate chips; for a richer experience, dark chocolate works best.
The Final Flourish
Brown Sugar and Granulated Sugar are the sweeteners that control moisture and caramelization. Brown sugar adds moisture and a caramel undertone, while granulated sugar gives crisp edges. Skipping either will affect the cookie’s texture and sweetness balance.
Vanilla Extract is the subtle warmth that ties all flavors together. It enhances the chocolate and nut notes without overpowering them. A dash of almond extract could be a fun twist for a different flavor profile.
Salt is the flavor enhancer that balances sweetness and brings out the richness of the chocolate and nuts. Too little salt and the cookie will taste flat; too much and it becomes cloyingly salty. A pinch of sea salt on top before baking can add a finishing touch.
Everything's prepped? Good. Let's get into the real action...
The Method — Step by Step
- Preheat the oven to 350°F (175°C) and line two baking sheets with parchment paper. The parchment prevents sticking and ensures even baking. Keep the sheets clean and free of any leftover crumbs. This step is critical for preventing burnt edges.
- Toast the hazelnuts in a dry skillet over medium heat until fragrant, about 5 minutes. Stir frequently to avoid burning. The nuts should turn a light golden color. Let them cool before chopping for maximum crunch.
- In a large bowl, whisk together flour, cocoa powder, baking soda, and salt. Sifting these dry ingredients removes lumps and ensures an even distribution. This creates a smooth batter that holds together well. Keep the mixture cool until ready to combine.
- In a separate bowl, cream the butter, brown sugar, and granulated sugar until light and fluffy. Use a hand mixer or stand mixer on medium speed. The mixture should double in volume. This process incorporates air, giving the cookies a lighter texture.
- Add the eggs, one at a time, beating well after each addition. Each egg should be fully incorporated before the next is added. This step keeps the batter cohesive and prevents separation. The eggs also add richness and structure.
- Stir in vanilla extract and the toasted hazelnuts. The vanilla permeates the batter, while the nuts provide texture and flavor. Be careful not to overmix; you want the nuts evenly distributed but not crushed.
- Gradually fold in the dry mixture, mixing until just combined. Overmixing will develop gluten and result in tough cookies. The batter should be thick but pourable. This step ensures a uniform distribution of cocoa and flour.
- Fold in the chocolate chips or chopped chocolate. Gently fold to avoid breaking the chocolate into small pieces. The chocolate should be evenly dispersed to create pockets of melt‑in‑your‑mouth goodness.
- Drop rounded tablespoons of dough onto the prepared baking sheets, spacing them about 2 inches apart. This spacing allows the cookies to spread without merging. The size of each cookie will affect the baking time and texture.
- Bake for 10–12 minutes, until the edges are set but the centers still look slightly under‑baked. The cookies will continue to set as they cool. Watch closely; the first to bake may need a minute less.
- Remove from the oven and let the cookies cool on the sheet for 5 minutes before transferring to a wire rack. Cooling on the sheet allows the cookies to firm up. Then move them to a rack to cool completely.
- Enjoy while warm for maximum gooeyness, or store in an airtight container for up to a week. If you prefer a crunchier texture, let them cool longer. The cookies keep their flavor and texture when stored properly.
That's it — you did it. But hold on, I've got a few more tricks that'll take this to another level...
Insider Tricks for Flawless Results
The Temperature Rule Nobody Follows
Many bakers bake at a fixed temperature, but the real magic lies in oven temperature variance. I use a calibrated oven thermometer to ensure the oven is truly 350°F, not 375°F. This slight adjustment keeps the cookies from spreading too much and preserves the crunchy edges.
Why Your Nose Knows Best
Before you start mixing, smell the cocoa powder. A fresh, slightly bitter aroma signals good quality. If it smells flat or stale, it’s time to replace it with a new batch.
The 5-Minute Rest That Changes Everything
After mixing the dough, let it rest in the fridge for 30 minutes. This rest allows the flour to hydrate fully, resulting in a smoother texture and preventing the cookies from spreading too quickly.
Use a Silicone Baking Mat
Silicone mats give you a non‑stick surface without the need for parchment. They also promote even heat distribution, giving you consistent results every time.
Cool on a Wire Rack, Not a Plate
Cooling the cookies on a wire rack allows air to circulate, preventing steam from making the bottoms soggy. This step keeps the crunch alive for days.
Storing in a Humidity‑Controlled Box
When storing cookies, place a slice of bread in the same container. The bread absorbs excess moisture, keeping the cookies crisp for longer.
Creative Twists and Variations
This recipe is a playground. Here are some of my favorite ways to switch things up:
Espresso Infusion
Add 1 teaspoon of instant espresso powder to the dry mix. The coffee deepens the chocolate flavor and gives a subtle bitter edge that balances the sweetness.
Almond Crunch
Swap half the hazelnuts for toasted almonds. The almond adds a slightly sweeter, buttery taste, while still providing crunch.
White Chocolate Swirl
Fold in a handful of white chocolate chips for a creamy, sweet contrast. The white chocolate melts into the dough, creating pockets of sweet, velvety flavor.
Maple & Sea Salt
Replace brown sugar with pure maple syrup and sprinkle sea salt on top before baking. The maple adds a subtle caramel sweetness, and the sea salt creates a savory contrast.
Nut-Free Version
Omit the hazelnuts and add chopped dried cherries for a fruity twist. The cherries add a chewy texture and a burst of tartness.
Mini Cookie Bite
Use a cookie scoop to make smaller, bite‑size cookies. They bake faster and are perfect for parties or as a sweet snack.
Storing and Bringing It Back to Life
Fridge Storage
Store cookies in an airtight container at room temperature for up to one week. If you notice the cookies getting soft, add a slice of bread to the container; it will absorb excess moisture and keep the cookies crisp.
Freezer Friendly
Wrap cookies individually in parchment paper and place them in a freezer bag. They stay fresh for up to three months. Thaw at room temperature for 20 minutes before serving.
Best Reheating Method
Reheat frozen cookies in a preheated 350°F oven for 5 minutes. Add a tiny splash of water to the bottom of the baking sheet; it steams the cookies back to their original texture.