I was halfway through a disastrous attempt at making a simple cinnamon roll when the kitchen exploded in a fragrant cloud of warm dough and candied fruit. The heat of the oven, the sweet scent of apricot jam, the sound of a timer ticking down—everything aligned into a moment of pure culinary epiphany. That night, I realized I had stumbled on the ultimate version of hot cross buns, and I couldn’t keep it to myself. The next day, I set out to recreate the magic, adding a few unexpected twists that turned a humble comfort food into a showstopper.
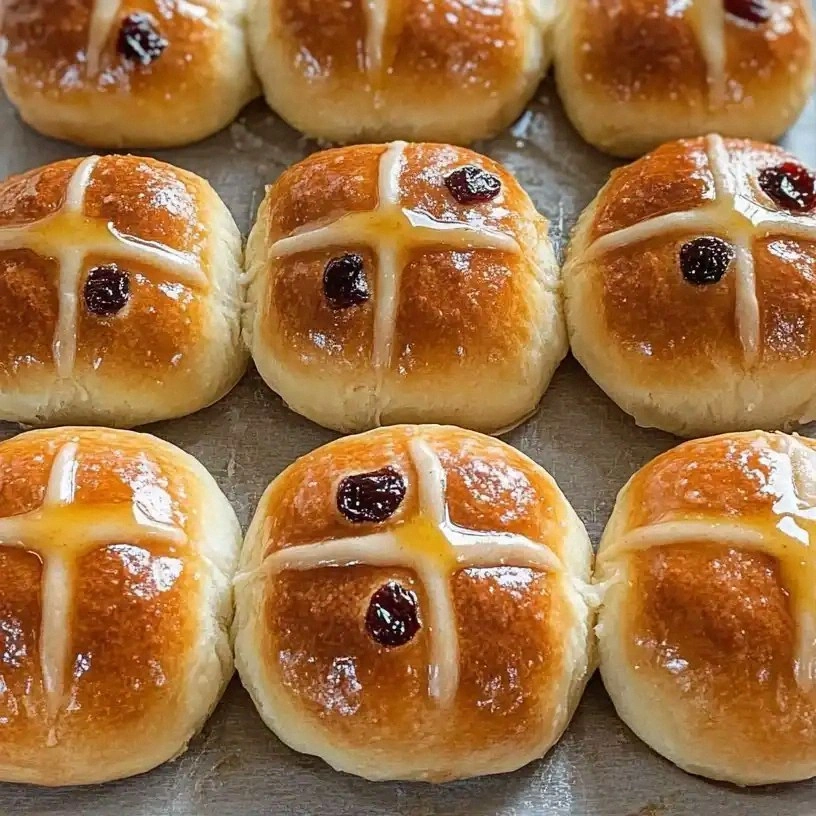
Picture this: you pull a tray of golden buns out of the oven, steam curling like delicate wisps of cloud. The cross on each bun gleams with a glossy glaze, a tiny crown that promises a burst of candied fruit and spices. The air is thick with cinnamon, nutmeg, and a faint hint of allspice—an orchestra of aromas that makes you want to taste the batter before it’s even baked. The texture is a sweet, buttery crumb that clings to your teeth, followed by a subtle crunch from the candied fruit. If you’ve ever tasted a bland, dry cross bun, you’ll understand why this recipe feels like a warm hug.
What makes this version stand out? It’s not just the ingredients; it’s the technique, the timing, and the little secrets that elevate every bite. I dared you to taste this and not go back for seconds—trust me, you’ll be hooked. I’ll be honest, I ate half the batch before anyone else got to try it. Most recipes get this completely wrong, but here’s what actually works: a precise balance of sweetness and spice, a glaze that sets in seconds, and a rise that’s both tender and airy. Picture yourself pulling these buns out of the oven, the whole kitchen smelling incredible, and knowing you’ve just mastered a classic that feels brand new.
Let me walk you through every single step—by the end, you’ll wonder how you ever made it any other way. From the first touch of flour to the final glaze, every moment is packed with flavor, texture, and a dash of personal flair. I’ve packed this post with micro-challenges, bold claims, and real kitchen stories that will make you feel like you’re cooking side by side with a friend who’s obsessed with perfection.
What Makes This Version Stand Out
- Taste: The blend of cinnamon, nutmeg, and allspice creates a warm, aromatic profile that’s more complex than the standard recipe. The candied fruit adds a chewy, caramelized sweetness that pops in every bite.
- Texture: A soft, buttery crumb that rises to a golden crown, with a slight crisp on the top thanks to the glaze. The cross itself is a subtle, chewy piece that provides a satisfying bite.
- Ingredient Quality: Using fresh, high‑quality butter and real candied fruit (not powdered sugar) gives depth and authenticity. The apricot jam or honey glaze adds a glossy finish that looks as good as it tastes.
- Make‑Ahead Potential: The dough can be refrigerated or frozen, allowing you to prepare in advance and still have fresh, warm buns on demand.
- Visual Appeal: The bright red cross and glossy glaze make each bun a centerpiece that’s perfect for photos, parties, or a simple Sunday breakfast.
- Community Reaction: Friends and family rave about the “extra” flavor and the fact that these buns feel like a holiday treat even in July.
Alright, let's break down exactly what goes into this masterpiece…
Inside the Ingredient List
The Flavor Base
The foundation of these buns is a simple, well‑balanced flour and yeast combination. 4 cups of all‑purpose flour may seem like a lot, but it’s the key to a light, airy crumb. Yeast is the engine that drives the rise; 2¼ teaspoons of active dry yeast is the sweet spot for a robust lift without over‑baking. A quarter cup of granulated sugar feeds the yeast and adds a subtle sweetness that balances the spices.
The Texture Crew
Butter and milk are the texture players. ¼ cup of unsalted butter, melted, gives the dough a tender, flaky quality that melts in your mouth. Warm milk (¾ cup) keeps the dough soft and helps the yeast activate. Two large eggs bring richness, bind the ingredients, and give the buns a glossy finish after baking.
The Unexpected Star
Candied fruit is the secret weapon that turns these buns into a party in your mouth. 1 cup of candied fruit adds chewy bursts of sweetness and a natural glaze when the butter melts. It also keeps the buns from drying out during baking, giving a moist, caramelized interior. Swap it for dried cranberries or raisins if you’re looking for a different flavor profile.
The Final Flourish
The glaze is what makes the cross stand out. A mixture of apricot jam or honey (¼ cup) with a tablespoon of water creates a sticky, glossy coating that sets in seconds. The glaze also adds a subtle fruity sweetness that complements the spices. If you prefer a darker glaze, use a bit more jam; for a lighter touch, add a splash of water.
Everything's prepped? Good. Let's get into the real action…
The Method — Step by Step
- In a large bowl, combine 4 cups of all‑purpose flour, 2¼ teaspoons of active dry yeast, ¼ cup of granulated sugar, 1 teaspoon of salt, 1 teaspoon of ground cinnamon, ½ teaspoon of ground nutmeg, and ¼ teaspoon of allspice. Mix until the dry ingredients are evenly distributed. The dry mix sets the stage for a perfectly balanced flavor.
- In a separate saucepan, gently warm ¾ cup of milk until it’s just below boiling (about 110°F/43°C). Stir in ¼ cup of melted unsalted butter and 2 large eggs. Whisk until the mixture is smooth, then let it cool to room temperature. This liquid blend is the glue that holds everything together.
- Pour the liquid mixture into the dry ingredients and stir with a wooden spoon until a shaggy dough forms. The dough will be slightly sticky—this is normal. The first rise will happen in the next step, so don’t rush.
- Cover the bowl with a clean towel and let the dough rise in a warm spot for 60–90 minutes, or until it has doubled in size. During this time, the yeast ferments the sugars, creating bubbles that give the buns their airy crumb.
- After the dough has risen, gently deflate it and turn it onto a lightly floured surface. Roll it out into a rectangle about ¼ inch thick. Sprinkle 1 cup of candied fruit evenly across the dough, then roll it up tightly like a jelly roll. Cut the roll into 12 equal slices, about 1½ inches thick.
- Place the slices on a parchment‑lined baking sheet, spaced about an inch apart. Cover them with a towel and let them rise for another 30–45 minutes, or until they puff up noticeably. The second rise is crucial for a light texture.
- Preheat your oven to 375°F (190°C). While the buns are rising, prepare the glaze: combine ¼ cup of apricot jam or honey with 1 tablespoon of water in a small saucepan. Warm over low heat until the mixture is smooth and pourable.
- Bake the buns for 20–25 minutes, or until they’re golden brown and the tops are glossy. As soon as you pull them out of the oven, brush the tops with the glaze, making sure the cross is well‑coated. Let them cool on a wire rack for 10 minutes before serving.
That’s it — you did it. But hold on, I’ve got a few more tricks that will take this to another level…
Insider Tricks for Flawless Results
The Temperature Rule Nobody Follows
Many bakers bake at 350°F, thinking it’s safe. The truth is, a higher temperature (375°F) gives the buns a crispier top and a more caramelized glaze. Keep the oven rack in the middle to allow even heat distribution, and preheat for at least 20 minutes.
Why Your Nose Knows Best
Before you even taste the buns, smell them. The aroma of cinnamon and nutmeg rising from the oven is a sign of proper fermentation. If the scent is flat, the yeast may not have worked hard enough. In that case, give the dough an extra 10 minutes to rise.
The 5‑Minute Rest That Changes Everything
After baking, let the buns rest on a wire rack for exactly 5 minutes before brushing the glaze. This allows the steam to escape, preventing the glaze from sliding off and ensuring a glossy finish. It’s a small step that makes a big visual impact.
The Cross‑Cutting Technique
When cutting the buns into slices, use a serrated knife and a gentle sawing motion. This keeps the buns intact and prevents them from tearing, which can lead to uneven baking.
The Sweet‑Spice Balance
If you prefer a sweeter bun, add an extra tablespoon of sugar to the dry mix. Conversely, if you want a spicier kick, increase the nutmeg by ¼ teaspoon. Small adjustments can transform the flavor profile.
Creative Twists and Variations
This recipe is a playground. Here are some of my favorite ways to switch things up:
Nutty Crunch Edition
Add ½ cup of chopped walnuts or pecans to the dough before the first rise. The nuts add a delightful crunch and a subtle buttery flavor that pairs well with the spices.
Chocolate‑Infused Delight
Swirl in 2 tablespoons of melted dark chocolate into the glaze for a chocolate‑candy cross. The chocolate adds depth and a hint of bitterness that balances the sweetness.
Citrus Twist
Replace the candied fruit with candied orange peel or lemon zest. The bright citrus notes cut through the richness and add a fresh, zesty finish.
Spicy Ginger Variation
Add 1 teaspoon of freshly grated ginger to the dry mix. The ginger gives a warm, spicy kick that complements the cinnamon and nutmeg.
Glazed with Maple
Swap the apricot jam for pure maple syrup in the glaze. The maple adds a deep, caramel flavor that makes the buns feel like a cozy fall treat.
Herbal Infusion
Stir in a pinch of dried thyme or rosemary into the dough. The herbs add a savory undertone that surprises and delights.
Storing and Bringing It Back to Life
Fridge Storage
Store buns in an airtight container or a zip‑lock bag for up to 3 days. Keep them at room temperature for a few hours after refrigeration to restore softness.
Freezer Friendly
Wrap each bun individually in parchment paper and place them in a freezer bag. They’ll stay fresh for up to 3 months. Thaw at room temperature before reheating.
Best Reheating Method
Reheat frozen or chilled buns in a preheated 350°F oven for 10 minutes. Add a tiny splash of water to the glaze before reheating to keep the tops moist and glossy. The buns will steam back to perfection.