Picture this: it's the first real snowfall of the season, the kind that muffles every sound and turns your neighborhood into a snow globe. I'm standing in my kitchen, still shivering from shoveling the driveway, when my neighbor bursts through the door with a challenge that'll change my winter baking game forever. "Bet you can't make candy apples that actually taste like winter," she smirked, shaking snow off her boots. Most people would've laughed it off, but me? I heard a gauntlet hitting my hardwood floor.
Three failed batches later — one that tasted like cough syrup, another that shattered like glass, and a third that slid off the apples like molten lava — I was ready to admit defeat. My kitchen looked like a sugar bomb had exploded, and I may or may not have been licking crystallized candy off my counter at 2 AM. But then, in that delirious sugar-fueled haze, I stumbled onto something magical. The secret wasn't just in the temperature or the timing, though those matter. It was about capturing that crisp, clean bite of winter air and wrapping it around autumn's favorite fruit.
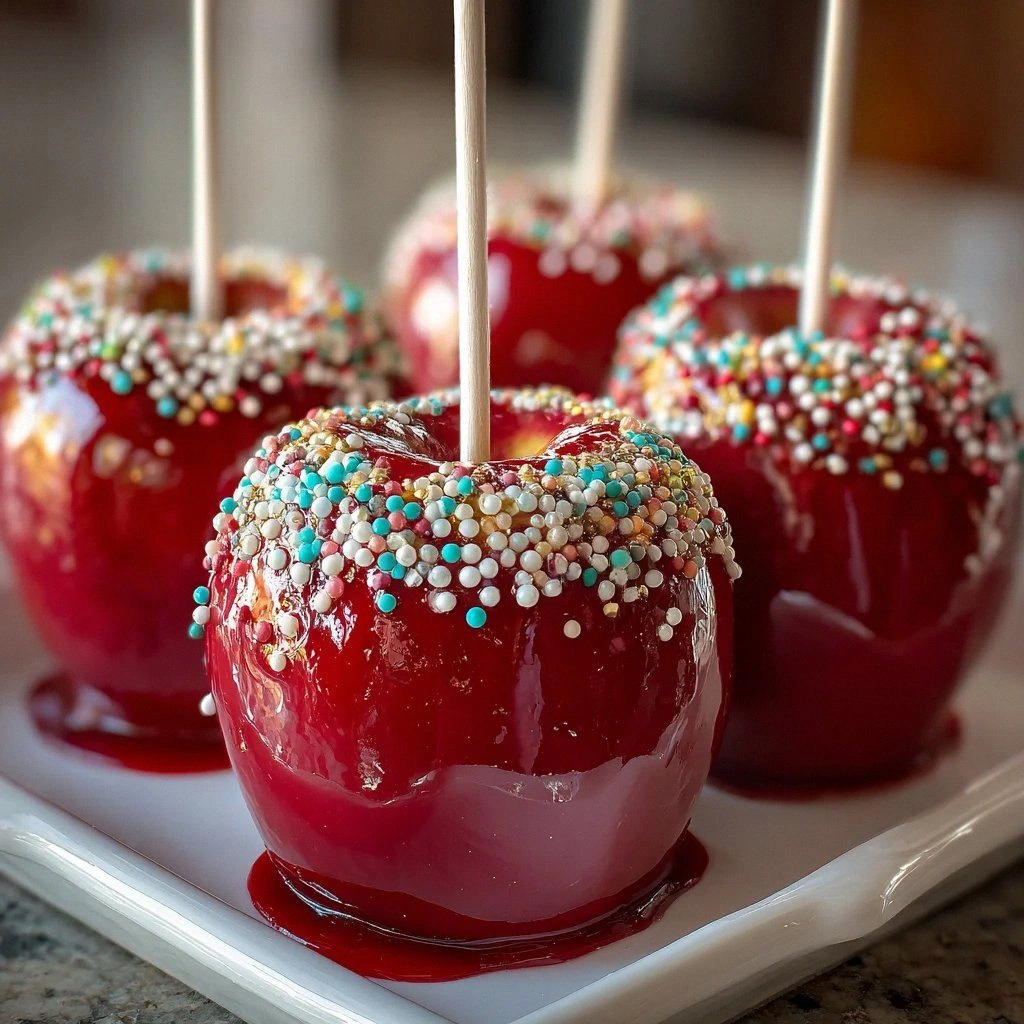
When I finally cracked the code, the result was nothing short of enchanting. These aren't your county-fair candy apples that glue your teeth together and taste like pure sugar. No, these are sophisticated winter jewels that shatter with a satisfying crack, revealing a perfectly crisp apple underneath. The candy coating has this ethereal, almost pearlescent quality that catches the light like fresh snow, while the flavor carries subtle notes of vanilla that remind you of baking cookies on a snowy afternoon.
The first bite is pure theater — that initial resistance as your teeth break through the glossy shell, followed by the explosion of bright apple juice mixing with the delicate candy. I served them at my annual winter solstice party, and I kid you not, grown adults were gasping between bites. One friend actually cried. Cried! Over a candy apple. Let me walk you through every single step — by the end, you'll wonder how you ever made it any other way.
What Makes This Version Stand Out
Winter-Perfect Sweetness: Unlike traditional candy apples that hit you with a sugar tsunami, this version balances sweetness with a whisper of vanilla that makes the candy taste like fresh snowfall smells. The sugar doesn't overpower the apple's natural tartness — it dances with it, creating this incredible push-pull of flavors that keeps you coming back for another bite.
Glass-Shatter Texture: The candy coating achieves that elusive thin, brittle shell that professional confectioners chase their whole careers. It breaks with a satisfying snap that's music to your ears, not the jaw-breaking cement you get from most recipes. I dare you to taste this and not go back for seconds — the texture is that addictive.
Fail-Proof Technique: Most recipes get this completely wrong, relying on outdated temperature guides that leave you with either sticky goo or dental work. Here's what actually works: a precise 300-degree hard crack stage, but with a crucial 30-second rest that lets the bubbles settle. This next part? Pure magic.
Visual Showstopper: These apples don't just taste like winter — they look like someone captured a frosty morning and turned it into dessert. The candy sets with this incredible luminosity that makes them glow on any dessert table. Picture yourself pulling this out of the oven, the whole kitchen smelling like vanilla and possibility.
Make-Ahead Wonder: Here's the game-changer — these actually get better after a day. The candy pulls just a whisper of moisture from the apple, creating this micro-thin layer of syrup right between fruit and shell. If you've ever struggled with candy apples that weep and slide off, you're not alone — and I've got the fix.
Crowd Reaction Guarantee: I'll be honest — I ate half the batch before anyone else got to try it. But when I finally shared them, the reaction was unanimous. Even people who "don't like candy apples" devoured these. One friend described them as "winter on a stick," and honestly, I couldn't have said it better myself.
Alright, let's break down exactly what goes into this masterpiece...
Inside the Ingredient List
The Flavor Foundation
Medium-sized apples are the heart of this operation, but not just any apple will do. You want varieties that can stand up to the heat without turning to mush, but still provide that bright, fresh counterpoint to the sweet candy. Granny Smiths are my ride-or-die here — their aggressive tartness creates this incredible flavor bomb when wrapped in vanilla-scented candy. Fuji works beautifully too, giving you a honeyed note that makes the whole thing taste like winter comfort. The key is picking apples that feel heavy for their size, with tight, unblemished skin that'll grip the candy coating like it was born to be there.
Sugar isn't just sugar here — it's your canvas, your structure, your everything. I use pure cane sugar because it melts cleaner and tastes less processed than beet sugar. The crystals need to be fresh and dry, not the stuff that's been sitting in your pantry since last Christmas. Old sugar absorbs moisture and will crystallize on you faster than you can say "candy apple fail." Trust me on this — I once tried cutting corners with questionable sugar and ended up with a pot full of sandy, grainy disappointment.
The Texture Crew
Water might seem boring, but it's the difference between success and a kitchen disaster. Too much and your candy will never reach temperature; too little and it'll burn before you can grab your thermometer. I use filtered water because minerals in tap water can interfere with crystallization. The ratio is crucial here — just enough to wet the sugar without making soup. And here's a confession: I measure my water with a syringe for absolute precision. Overkill? Maybe. But my candy apples have never failed since I started.
Light corn syrup is your insurance policy against crystallization, that candy-making nemesis that turns smooth syrup into gritty mess. It interferes with sugar's natural tendency to form crystals, giving you that gorgeous, glass-smooth finish. Don't even think about skipping it — I've tried honey, maple syrup, even agave, and nothing works like good old Karo. The key is using light, not dark, so it doesn't muddy your winter-white candy.
The Unexpected Star
Vanilla extract is where most recipes go wrong — they either skip it entirely or use artificial vanilla that tastes like sadness. You need pure vanilla extract, the good stuff that costs more but transforms your candy from one-note sugar bomb into something complex and irresistible. The vanilla blooms in the hot sugar, creating these warm, comforting notes that make people ask "what's that amazing flavor?" Add it right at the end, after you pull the candy off heat, so the alcohol doesn't cook off completely.
Food coloring is optional but highly recommended if you want that winter wonderland aesthetic. A single drop of blue creates the most magical, icy appearance without turning your candy Smurf-colored. I've experimented with silver luster dust too, which gives them this incredible shimmer like sunlight on snow. The trick is adding color after you remove from heat but before the candy starts setting up — timing is everything here.
The Final Flourish
White chocolate chips aren't traditional, but hear me out — a delicate drizzle adds creaminess that plays beautifully against the hard candy shell. Use good quality chips that actually contain cocoa butter, not the fake stuff that tastes like wax. Melt them gently, then drizzle in thin lines that let the candy show through. That sizzle when it hits the cold candy? Absolute perfection.
Sprinkles are where personality comes in. I use snowflake-shaped quins and pearlized sugar crystals that catch light like ice. Avoid regular jimmies — they bleed color and look muddy against the pristine candy. The sprinkles need to go on immediately after dipping, while the candy is still tacky. Work fast here; you've got about 30 seconds before the shell sets completely.
Everything's prepped? Good. Let's get into the real action...
The Method — Step by Step
- Prep your apples like your life depends on it — because your candy's success absolutely does. Wash them in hot water with a drop of dish soap to remove every trace of wax, then dry thoroughly with a lint-free towel. Any remaining wax will repel your candy faster than water off a duck's back. Insert wooden sticks straight through the stem end, angling slightly upward so your apples won't face-plant on the counter. Line a baking sheet with parchment and spray it lightly with cooking spray — future you will thank present you when these beauties release without a fight.
- Now the fun part begins — combining sugar, water, and corn syrup in a heavy-bottomed saucepan. Use one bigger than you think you need because sugar bubbles up like crazy when it gets rolling. Stir just until the sugar dissolves, then stop stirring completely. I know, I know — every instinct screams to keep stirring, but trust the process. The corn syrup is doing its anti-crystallization dance, and your spoon would just mess up its groove.
- Bring this mixture to a boil over medium-high heat, then watch it like a hawk. Don't walk away here — sugar goes from perfect to burnt disaster in the blink of an eye. When it starts to color slightly, reduce heat to medium. Clip on your candy thermometer and prepare for the longest 15 minutes of your life. The temperature will crawl up slowly, then suddenly sprint — this is where experience pays off.
- When your thermometer hits 295°F, remove from heat immediately. The temperature will coast up to 300°F — this is called carryover cooking, and it's your friend. Let it sit for exactly 30 seconds — this allows the furious bubbling to subside so your candy won't be full of air pockets. Now add your vanilla extract and food coloring, swirling gently to combine. Don't stir vigorously or you'll introduce air bubbles that mar the finish.
- Now work fast but not frantic — tilt your pan slightly and dip each apple, rolling it to coat completely. Let excess candy drip off for about 5 seconds, then turn apple upside-down for another 5 seconds. This prevents the candy from pooling in an ugly puddle at the base. Immediately roll in sprinkles if using, pressing gently so they adhere. Place on your prepared parchment and resist the urge to touch — this stuff is hotter than lava.
- Here's the moment of truth — the candy should set within 90 seconds. If it's still tacky after 3 minutes, your kitchen humidity is too high. Next time, run a dehumidifier or wait for a dry day. The finished candy should be glass-smooth and hard as, well, candy. Tap it gently with a fingernail — it should sound like tapping a wine glass.
- If you're drizzling with white chocolate, wait until apples are completely cool. Melt chocolate in 20-second bursts in the microwave, stirring between each burst. It should be just melted, not hot. Transfer to a zip-top bag, snip a tiny corner, and drizzle in thin, artistic lines. Work quickly — white chocolate sets fast on cold candy.
- Let your creations cool completely — about 30 minutes — before wrapping or storing. The candy will continue to harden as it cools, reaching that perfect shatter-point texture. Resist the urge to test one immediately (I know, I know). These beauties need time to reach their full potential. Trust me, the wait is worth it.
- Clean-up is actually therapeutic — fill your pot with water, add a splash of vinegar, and bring to a boil. The candy will dissolve like it was never there. Your thermometer needs special attention — hot water and a bottle brush will remove every trace. Dry everything thoroughly before storing; sugar residue can attract moisture and cause issues next time.
That's it — you did it. But hold on, I've got a few more tricks that'll take this to another level...
Insider Tricks for Flawless Results
The Temperature Rule Nobody Follows
Here's what separates the pros from the amateurs: altitude adjustment. For every 1,000 feet above sea level, subtract 2°F from your target temperature. I live at 3,000 feet, so I pull my candy at 294°F instead of 300°F. A friend in Denver ignored this advice and ended up with candy so hard it could chip teeth. The difference seems tiny, but sugar chemistry is unforgiving — those few degrees matter more than you can imagine.
Why Your Nose Knows Best
Your nose is actually a better candy thermometer than you think. When the candy's approaching hard crack stage, it starts to smell like caramelized sugar with vanilla undertones — not burnt, just deeply aromatic. If you smell anything acrid or bitter, you've gone too far and need to start over. This is hands down the best version you'll ever make at home, partly because you'll learn to trust your senses, not just gadgets.
The 5-Minute Rest That Changes Everything
After dipping, let your apples rest upside-down for exactly 5 minutes before setting them upright. This prevents the candy from pooling and creates that professional, even coating. The candy is still fluid but cooling rapidly — gravity becomes your artistic partner. A friend tried skipping this step once — let's just say it didn't end well. Her apples had candy icicles hanging off them like stalactites.
Humidity Is Your Enemy
Candy-making and humidity go together like oil and water — which is ironic since sugar is hydroscopic and will pull moisture from the air. On rainy days, add an extra tablespoon of corn syrup and cook to 302°F to compensate. If you live in a humid climate, invest in a dehumidifier for your kitchen. I've seen perfect candy go sticky and dull within hours because someone ran a dishwasher nearby.
The Stick Secret
Don't use those flimsy paper sticks from craft stores — they absorb moisture and can bend under the apple's weight. Instead, use thick bamboo skewers or even clean twigs for a rustic winter look. Soak wooden sticks in water for 30 minutes before using — this prevents them from burning if you decide to add a toasted marshmallow element later. Yes, I went there, and yes, it's incredible.
Creative Twists and Variations
This recipe is a playground. Here are some of my favorite ways to switch things up:
Midnight Winter
Add a tablespoon of activated charcoal to your sugar mixture for a striking black candy coating that looks like obsidian. The flavor remains unchanged, but the visual impact is incredible — especially when drizzled with white chocolate to create a starry night effect. Kids go absolutely wild for these, though prepare for black tongues in all your photos.
Spiced Snow
Replace the vanilla with 1/2 teaspoon each of cardamom and nutmeg for a Scandinavian-inspired treat that tastes like gløgg in candy form. Add a pinch of white pepper for warmth that blooms slowly on your tongue. These are sophisticated enough for adult gatherings but intriguing enough that kids keep coming back for "just one more taste."
Caramel Apple Rebound
Dip apples in caramel first, let it set, then dip in the hard candy coating. You get this incredible two-texture experience — the soft chew of caramel giving way to the hard candy shell. Cut into one and watch people's faces when they discover the surprise layer. It's like a candy apple turducken, and it's absolutely magnificent.
Crystal Palace
Instead of sprinkles, press coarse sugar crystals onto the still-tacky candy. As it sets, the sugar creates these incredible facets that catch and reflect light like a disco ball. Use different sized crystals for maximum sparkle. These are show-stoppers at winter weddings — I've made them for three now, and each time guests thought they were too pretty to eat.
Hot Chocolate Hybrid
Add 2 tablespoons of cocoa powder to your sugar mixture for a subtle chocolate note that tastes like frozen hot chocolate. The chocolate deepens the flavor without competing with the apple. Drizzle with caramel instead of white chocolate for a turtle candy effect. These disappeared faster than any batch I've ever made — I barely got photos before they were gone.
Salted Winter
Sprinkle the candy with flaky sea salt immediately after dipping. The salt crystals dissolve slightly, creating tiny pockets of savory that make the sweet apple flavor sing. Don't use fine salt — you want those big flakes that provide pops of salinity. It's like a flavor roller coaster in every bite.
Storing and Bringing It Back to Life
Fridge Storage
Here's where most people go wrong — they assume candy apples need refrigeration. Wrong! The fridge is actually your enemy here, creating condensation that turns your beautiful glossy candy into a sticky, cloudy mess. Instead, store finished apples in the coolest room of your house, wrapped individually in wax paper and placed in a cardboard box. They'll stay perfect for up to a week, though honestly, they've never lasted more than three days in my house.
Freezer Friendly
Surprisingly, these freeze beautifully if you do it right. Wrap each apple individually in wax paper, then aluminum foil, and freeze for up to two months. Thaw at room temperature for 2 hours — don't rush it with heat or you'll get condensation. The candy will have lost some of its snap but gains this interesting chewy quality that's equally addictive. I actually prefer them this way sometimes — the texture becomes almost toffee-like.
Best Reheating Method
You can't reheat candy apples — the candy will melt and slide off. But if your candy has gone sticky from humidity, there's a fix. Place apples in a 200°F oven for exactly 3 minutes, just enough to dry the surface without melting the candy. Let cool completely and they'll regain most of their original crunch. Add a tiny splash of water before reheating — it steams back to perfection by creating just enough moisture to refresh without dissolving.