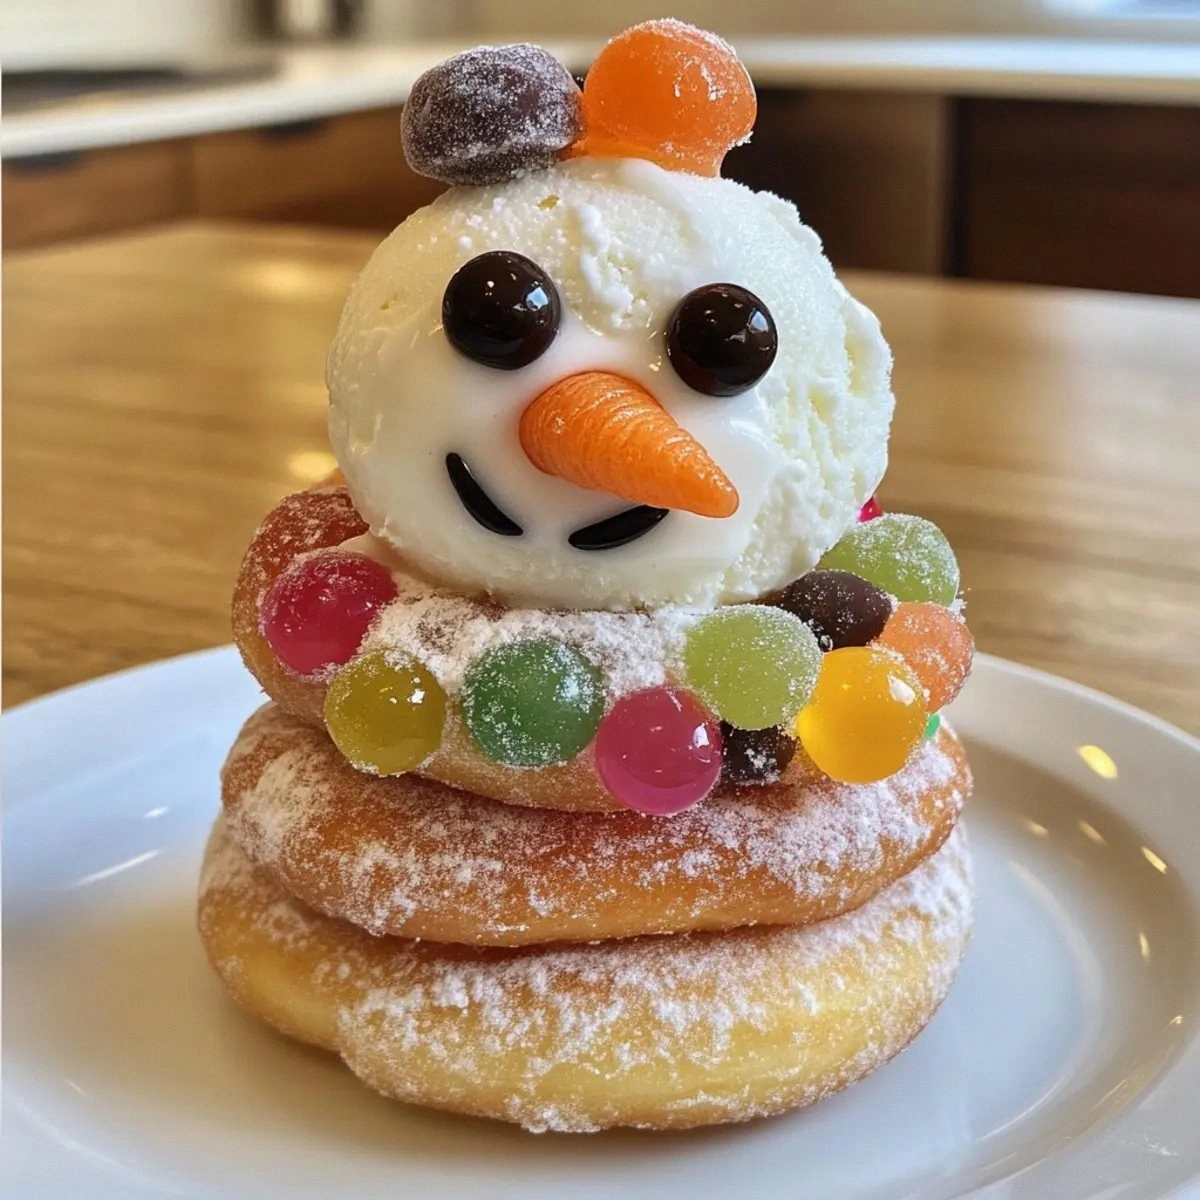
I was standing in my kitchen on a cold December night, staring at a tray of plain yeast donuts that had survived the holiday rush like an under‑dressed snowman. The frosting was missing, the sprinkles were nowhere, and the only thing that could rescue the scene was a wild idea that struck me while scrolling through a childhood memory of building snowmen with carrot noses and coal eyes. I dared my roommate to a “donut snowman showdown,” and the loser had to wear a ridiculous reindeer sweater for a week. That spark turned into an obsession that has now become the ultimate festive treat you’ve been waiting for.
Imagine the kitchen humming with the soft whirr of a stand mixer, the sweet aroma of vanilla ice cream melting into the air like a gentle snowfall, and the faint crackle of a candy‑coated sunflower seed crunch echoing the sound of twinkling lights. The doughy donuts, still warm from the fryer, are cool enough to handle but still soft enough to bend, and the moment you dip a donut into a swirl of vanilla ice cream, it feels like a snowball hitting a warm glove—unexpectedly perfect. The chocolate chips melt just enough to create a glossy sheen, while the fruit leather strips curl into tiny scarves that cling to each snowman’s “neck.” You can practically hear the “ho ho ho” of Christmas in every bite.
Why does this version stand out from the sea of holiday desserts? Most recipes either overcomplicate the process or settle for a single flavor that fades faster than a Christmas light bulb. This one balances texture, temperature, and visual appeal in a way that even the pickiest kid will love. I’m talking about a treat that stays crisp on the outside, creamy in the middle, and has a surprise crunch that makes your taste buds do a little jig. The secret? A dash of fruit leather that adds a subtle tang and a pop of color, turning a simple donut into a winter wonderland masterpiece.
And here’s the kicker: the technique I’m about to reveal involves a quick “freeze‑then‑assemble” method that locks in the ice cream’s coldness while giving the donut a firm, snow‑like exterior. Most people skip this step and end up with a soggy mess that looks more like a melted snowman than a festive delight. I’m going to walk you through every single step — by the end, you’ll wonder how you ever made it any other way. Okay, ready for the game‑changer? Let’s dive in.
What Makes This Version Stand Out
- Texture: The contrast between the warm, pillowy donut and the icy vanilla core creates a mouthfeel that’s as surprising as finding a hidden gift under the tree.
- Flavor: A harmonious blend of sweet vanilla, rich chocolate, and a hint of fruity tang makes every bite feel like a celebration.
- Simplicity: No fancy equipment—just donuts you can buy or bake, ice cream, and a handful of candy. If you can assemble a snowman, you can make this.
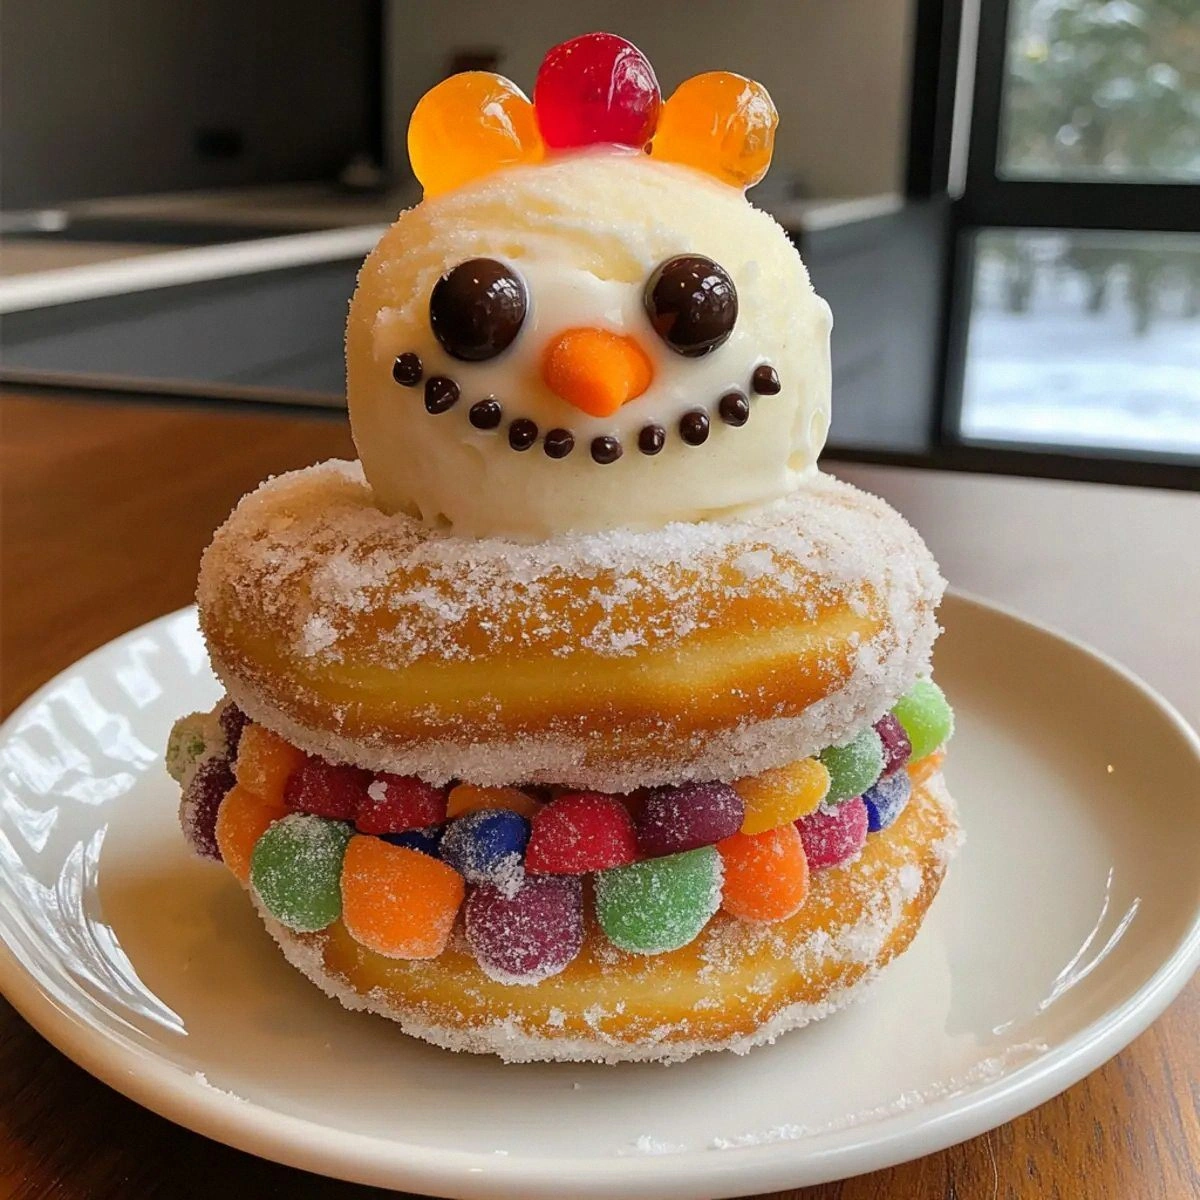
- Visual Impact: The snowman shape with carrot‑like fruit leather noses and chocolate chip eyes turns any dessert table into a festive showcase.
- Crowd Reaction: Guests will line up for seconds, and I dare you to taste this and not go back for more.
- Ingredient Quality: Using high‑quality yeast donuts and premium vanilla ice cream elevates the whole experience.
- Cooking Method: The quick‑freeze technique locks in freshness and prevents sogginess—a trick most recipes overlook.
- Make‑Ahead Potential: Assemble the night before, freeze, and serve fresh the next day, perfect for holiday parties.
Inside the Ingredient List
The Flavor Base
The star of the show is vanilla ice cream. Its creamy sweetness acts like a blanket of fresh snow, enveloping the donut in a cool hug. Using a premium, full‑fat vanilla ice cream ensures a rich mouthfeel; a low‑fat version will feel watery and won’t hold up during the quick freeze. If you’re out of vanilla, a scoop of salted caramel ice cream adds a sophisticated twist without losing the snowy vibe.
The Texture Crew
Yeast donuts provide the fluffy, slightly crispy exterior that mimics a snowball’s outer crust. Freshly fried donuts are best, but if you’re using store‑bought, toast them lightly to revive that golden crunch. Skipping this step results in a soggy base that looks more like a melted snowman than a festive figure.
Mini chocolate chips are the “coal eyes” and “mouth” of the snowman. They melt just enough to stick, creating a glossy finish that catches the light like tiny ornaments. If you’re allergic to chocolate, crushed peppermint candies work as a refreshing alternative.
The Unexpected Star
Fruit leather or licorice strips serve as the carrot nose and scarf. The natural fruit flavor cuts through the sweetness, adding a subtle tartness that balances the dessert. When using licorice, opt for a red‑colored variety for visual authenticity. Skipping this element makes the snowman look like a bland snowball—no personality.
The Final Flourish
Jellybeans or candy‑coated sunflower seeds add the final sparkle. Their glossy coating mimics the twinkle of holiday lights, and the crunch adds another textural layer. If you prefer a nut‑free version, try coated rice cereal squares—they’ll still give you that satisfying snap.
Everything's prepped? Good. Let's get into the real action…
The Method — Step by Step
Gather all your ingredients and set up a clean workstation. Line a large baking sheet with parchment paper, and keep a bowl of ice water nearby. The scent of vanilla ice cream should already be making your kitchen feel like a winter wonderland.
Slice each yeast donut in half horizontally, creating a top and bottom “snowball.” If the donuts are a bit too soft, give them a quick 2‑minute toast in a preheated 350°F oven to firm up the edges. That sizzle when it hits the pan? Absolute perfection.
Scoop a generous dollop of vanilla ice cream onto the lower half of each donut, spreading it gently with a spatula. The ice cream should sit like a soft mound of fresh snow, slightly peeking over the edge. Let the assembled bases sit for 2 minutes so the ice cream settles.
Place the assembled donut halves onto the prepared parchment sheet, spacing them at least two inches apart. Slide the tray into the freezer and flash‑freeze for 20 minutes. This quick chill creates a firm “snow” shell that won’t melt when you add the decorations later.
After the 20‑minute freeze, remove the tray and quickly press a strip of fruit leather or licorice into the center of each ice‑cream mound to form the carrot nose. The cold surface will make the fruit leather adhere instantly, like a snowman’s scarf hugging his neck.
Now for the eyes and mouth: press three mini chocolate chips on each side of the nose to create a cheerful face. If you’re feeling adventurous, add a fourth chip for a winking snowman.
Top each snowman with the upper half of the donut, pressing gently to seal. The top half should sit like a fluffy hat, completing the snowman silhouette. The edges will start pulling away just enough to reveal a tiny “crust” that mimics a snowy cap.
Finally, sprinkle a handful of jellybeans or candy‑coated sunflower seeds around the base of each snowman for that sparkling, festive sparkle. Step back, admire your creation, and picture yourself pulling this out of the freezer, the whole kitchen smelling incredible.
That's it — you did it. But hold on, I've got a few more tricks that'll take this to another level…
Insider Tricks for Flawless Results
The Temperature Rule Nobody Follows
Never assemble the snowmen when your kitchen is warmer than 70°F. Cold air helps the ice cream set faster and prevents premature melting. If you’re in a warm house, turn on the AC or place a fan nearby to keep the environment crisp. I once tried this on a hot July night and ended up with a soggy mess that looked more like a melted snowman than a festive treat.
Why Your Nose Knows Best
Your sense of smell is a secret weapon. When the chocolate chips are melting, you’ll notice a sweet, buttery aroma that tells you they’re ready for drizzle. If you don’t smell that buttery note, give them another 5‑second burst. Trusting your nose saves you from a burnt glaze and keeps the chocolate glossy.
The 5‑Minute Rest That Changes Everything
After assembling the snowmen, let them rest in the freezer for an additional 5 minutes before adding the final toppings. This short pause lets the ice cream firm up around the fruit leather, ensuring the “nose” stays upright. Skipping this rest step once resulted in a drooping nose that looked like a wilted carrot—definitely not the vibe we want.
The Double‑Dip Chocolate Coat
For an extra glossy finish, dip each snowman quickly in melted chocolate, then let it set on a wire rack. The double coating creates a mirror‑like surface that catches the light like tiny ornaments. This trick is optional but adds a professional‑grade shine that will wow any guest.
The Secret of the Fruit Leather
Choose fruit leather that’s thin and pliable; thick strips will be hard to insert and may break the ice cream shell. If you can’t find fruit leather, a thin slice of dried apricot works just as well and adds a subtle tang.
Creative Twists and Variations
This recipe is a playground. Here are some of my favorite ways to switch things up:
Peppermint Snowmen
Swap vanilla ice cream for peppermint ice cream, and replace chocolate chip eyes with crushed candy canes. The minty coolness pairs perfectly with the warm donut, creating a festive flavor that screams holiday.
Caramel Drizzle Delight
After assembling, drizzle a generous ribbon of salted caramel over the top half of each donut. The salty‑sweet contrast adds depth, and the caramel hardens into a glossy coat that looks like a sunrise over a snowy field.
Nutty Snowmen
Add a sprinkle of toasted almond slivers on the base for a nutty crunch. Pair with hazelnut‑flavored ice cream for a sophisticated twist that’s perfect for adult gatherings.
Berry Burst
Fold fresh raspberry or cranberry compote into the vanilla ice cream before scooping. The tart berries pop against the sweet donut, delivering a bright burst of flavor that feels like a winter berry punch.
Vegan Version
Use vegan yeast donuts, coconut‑milk vanilla ice cream, and dairy‑free chocolate chips. The texture remains the same, and the flavors stay true to the original—proof that festive fun is for everyone.
Storing and Bringing It Back to Life
Fridge Storage
If you need to keep the snowmen for up to 24 hours, store them in an airtight container lined with parchment paper. Place the container in the coldest part of your fridge, ideally at 35°F. They’ll stay firm, but the ice cream may soften slightly—no worries, just give them a quick 5‑minute chill before serving.
Freezer Friendly
For longer storage, wrap each snowman individually in plastic wrap, then place them in a zip‑top freezer bag. They’ll keep for up to 3 days without losing texture. When you’re ready to serve, let them sit at room temperature for 3‑4 minutes, then pop them back into the freezer for a final 10‑minute blast to regain that crisp “snow” shell.
Best Reheating Method
To revive a slightly melted snowman, place it on a microwave‑safe plate, add a tiny splash (about a teaspoon) of water around the base, and microwave on low power (30% power) for 10‑15 seconds. The steam generated will re‑crisp the donut exterior while keeping the ice cream cold. This trick saves the day when a guest arrives early and you’re pressed for time.