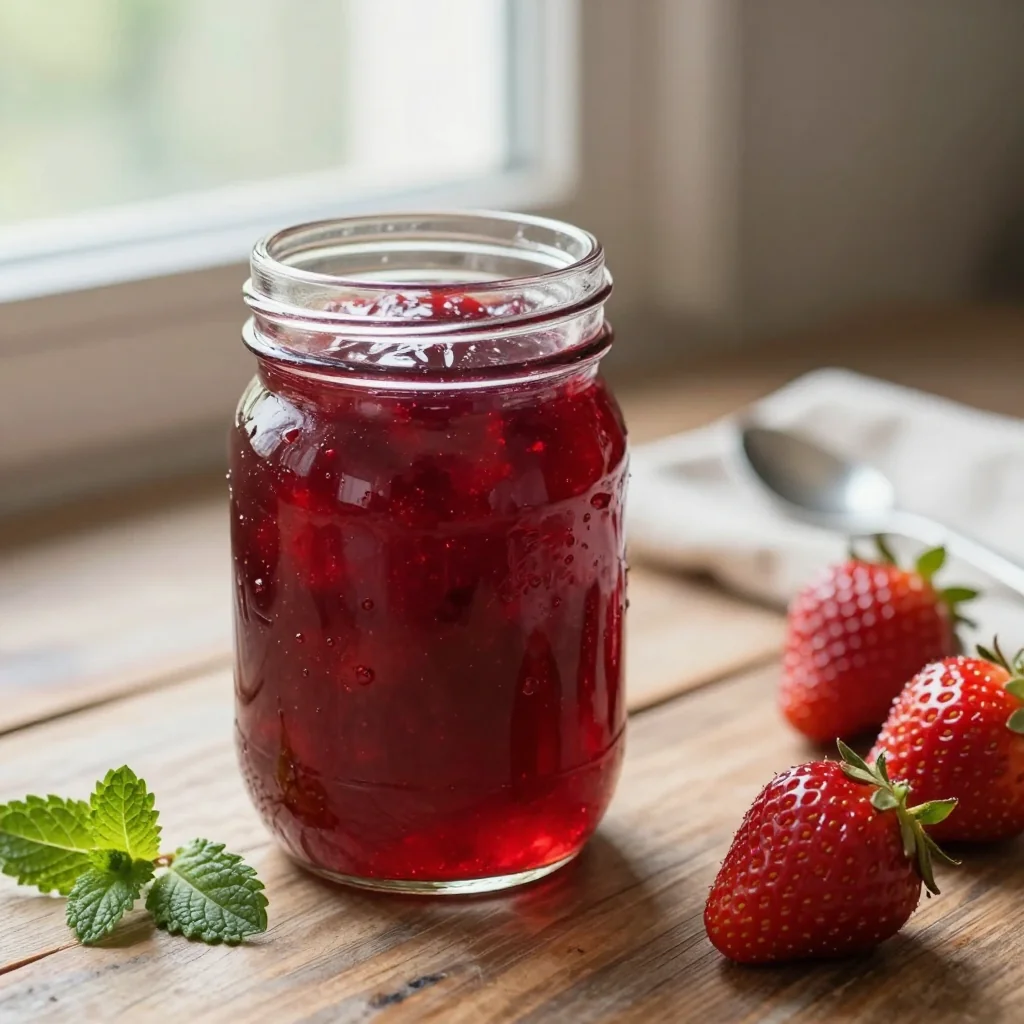
A vibrant, sun‑kissed jam that captures the essence of fresh strawberries while staying perfectly set thanks to a pinch of pectin.
When I was ten, my grandmother would pull a massive basket of strawberries from her garden each June, and the whole house would fill with a sweet, tangy perfume that seemed to promise summer forever. I remember sitting at the kitchen table, watching her carefully stir the bubbling pot, the ruby‑red liquid thickening into a glossy jam that we would spoon onto warm toast the next morning.
This jam is rooted in that simple, nostalgic ritual, but it has been refined for modern kitchens: the addition of fruit pectin guarantees a reliable set, while the balance of sugar and fresh lemon juice lets the natural strawberry flavor shine without becoming cloyingly sweet.
In this guide you’ll learn how to select the best strawberries, how to control the cooking temperature for a perfect gel, and how to sterilize jars so your jam stays fresh for months. By the end, you’ll have a pantry‑ready spread that can be used on everything from biscuits to glazes for roasted meats.
Let’s dive in and turn those fresh berries into a jar of sunshine you can enjoy year‑round.
🌟 Why This Recipe Will Captivate You
Strawberry jam is a classic comfort, but this version adds a scientific edge and a burst of fresh flavor that makes it stand out on any breakfast table.
- ✨ Perfect Set Every Time: The measured amount of pectin ensures a firm yet spreadable texture without the guesswork of traditional jam methods.
- ✨ Bright, Natural Flavor: Using only fresh strawberries and a splash of lemon preserves the fruit’s natural sweetness and acidity.
- ✨ No Preservatives Needed: The high sugar content combined with proper jar sterilization creates a safe, shelf‑stable product without artificial additives.
- ✨ Versatile Culinary Companion: This jam pairs beautifully with cheeses, grilled meats, desserts, and even cocktails, expanding its usefulness beyond breakfast.
- ✨ Easy Scaling: The portion‑adjuster in the recipe card lets you quickly increase or decrease the batch size without recalculating each ingredient manually.
- ✨ Health‑Friendly Adjustments: You can swap part of the sugar for natural sweeteners or reduce the total sugar while maintaining a safe preservation level.
🥗 Ingredients
📝 Complete Ingredient List
For the Jam Base:
For Sterilizing Jars:
Optional Serving Garnish:

🔍 Focus on Key Ingredients
Fresh Strawberries
Strawberries provide the vibrant color and natural sweetness that define this jam. Look for berries that are fully red, glossy, and emit a sweet fragrance. Ripe strawberries contain higher levels of natural pectin, which helps the jam set even before adding commercial pectin. If you’re using frozen strawberries, thaw them completely and drain excess liquid to avoid a watery jam.
Granulated Sugar
Sugar not only sweetens but also acts as a preservative by binding water, reducing microbial growth. In this recipe the ratio of sugar to fruit is 3:4, which is ideal for a classic jam texture while still allowing the fruit’s flavor to dominate. For a less sweet version, you can replace up to 25% of the sugar with a natural alternative like coconut sugar, but be aware that the jam may set slightly softer.
Fruit Pectin
Pectin is a soluble fiber found in fruit cell walls that gels when heated with sugar and acid. Commercial powdered pectin provides a reliable set, especially when working with low‑pectin fruits like strawberries. Dissolve the pectin in a small amount of water before adding to the boiling fruit mixture to avoid clumping.
🔄 Quick Substitutions
| If you don’t have... | Use instead... |
|---|---|
| Fresh strawberries | Frozen strawberries (thawed and drained) |
| Granulated sugar | Coconut sugar or raw honey (adjust quantity) |
| Fruit pectin | Commercial jam‑setting pectin or increase cooking time for natural set |
👨🍳 Step‑by‑Step Instructions
Follow these detailed steps to transform fresh strawberries into a glossy, shelf‑stable jam that will brighten any breakfast.
📋 Phase 1: Preparation and Mise en Place
Gather your tools and prep the fruit before you start cooking.
Wash and Hull the Strawberries
Rinse the strawberries under cool running water, then gently pat them dry with a clean kitchen towel. Using a small paring knife, remove the green leafy caps and any blemished spots. Slice the berries into quarters; this size ensures even cooking and helps release juices quickly.
Measure Sugar, Lemon Juice, and Pectin
Using a kitchen scale, weigh out 1500 g of granulated sugar and set aside. Measure 80 ml of freshly squeezed lemon juice; the acidity balances sweetness and activates pectin. In a small bowl, whisk the 10 g of powdered pectin with a tablespoon of the measured water to create a smooth slurry.
🔥 Phase 2: Cooking the Jam
This is where the flavors meld and the jam thickens.
Combine Fruit and Sugar
Place the sliced strawberries and 1500 g of sugar into a large, heavy‑bottomed saucepan. Stir gently to coat the fruit evenly. Let the mixture sit for 15 minutes; this maceration draws out the natural juices, creating a syrupy base before heating.
Bring to a Rolling Boil
Place the saucepan over medium‑high heat. As the mixture heats, you’ll notice it turning a deep ruby color. Once it reaches a rolling boil (large bubbles constantly breaking the surface), insert a candy thermometer. The temperature should reach 105 °C (221 °F). This is the critical point where pectin will begin to set.
Add Lemon Juice and Pectin Slurry
Quickly stir in the 80 ml of lemon juice, then gradually whisk in the pectin slurry. The mixture may foam briefly; this is normal. Continue to boil for an additional 2 minutes, maintaining the temperature between 104 °C and 108 °C. The jam should achieve a glossy sheen.
✨ Phase 3: Finishing and Jar‑ing
Seal in the flavor and ensure long‑term storage.
Test the Set
To check if the jam is ready, place a small spoonful on a chilled plate and let it sit for 1 minute. If the surface wrinkles when you push it with your finger, the jam has set. If it’s still runny, return the pot to the heat for another 30 seconds.
Prepare Sterilized Jars
While the jam is cooking, sterilize your glass jars and lids by boiling them in the water‑vinegar solution for 10 minutes. Use a jar lifter to remove them and place on a clean towel. Ensure the jars are completely dry before filling.
Fill and Seal
Using a wide‑mouth funnel, ladle the hot jam into each sterilized jar, leaving a 0.5 cm headspace at the top. Wipe the rims clean, place the lids on, and screw the bands until fingertip tight. Process the filled jars in a boiling water bath for 10 minutes if you plan to store them long‑term.
Cool and Label
Allow the jars to cool completely on a wire rack. As they cool, you’ll hear the satisfying “pop” of the lids sealing. Once cooled, label each jar with the production date. Store in a cool, dark pantry for up to 6 months.
Serve and Enjoy
Spread the jam on toasted baguette slices, swirl into yogurt, or use as a glaze for pork tenderloin. The bright strawberry flavor pairs beautifully with both sweet and savory dishes.
💡 Expert Tips and Tricks
🛒 Choosing the Best Ingredients
Pick strawberries that are fully red, plump, and emit a fragrant aroma. Avoid any that are white‑tipped or overly soft, as they may introduce excess water and dilute flavor. When possible, source organic berries to reduce pesticide residue, which can affect taste. For sugar, use fine granulated sugar that dissolves quickly; if you substitute with raw or coconut sugar, expect a slightly caramelized flavor.
🔪 Preparation Techniques
After hulling, slice the strawberries uniformly to ensure even cooking. A quick tip is to use a food processor for a rough chop, then hand‑slice for larger pieces. Keep a bowl of ice water nearby to halt cooking if you need to test the jam’s set early. Also, pre‑measure all dry ingredients before heating to avoid any last‑minute scrambling.
🌡️ Mastering the Cooking Process
Temperature control is crucial. A candy thermometer is your best friend; aim for 105 °C (221 °F) for a classic jam set. If you overshoot 110 °C, the jam may become overly firm and lose its glossy finish. Stir gently after the boil starts to prevent scorching, and use a heavy‑bottomed pot to distribute heat evenly.
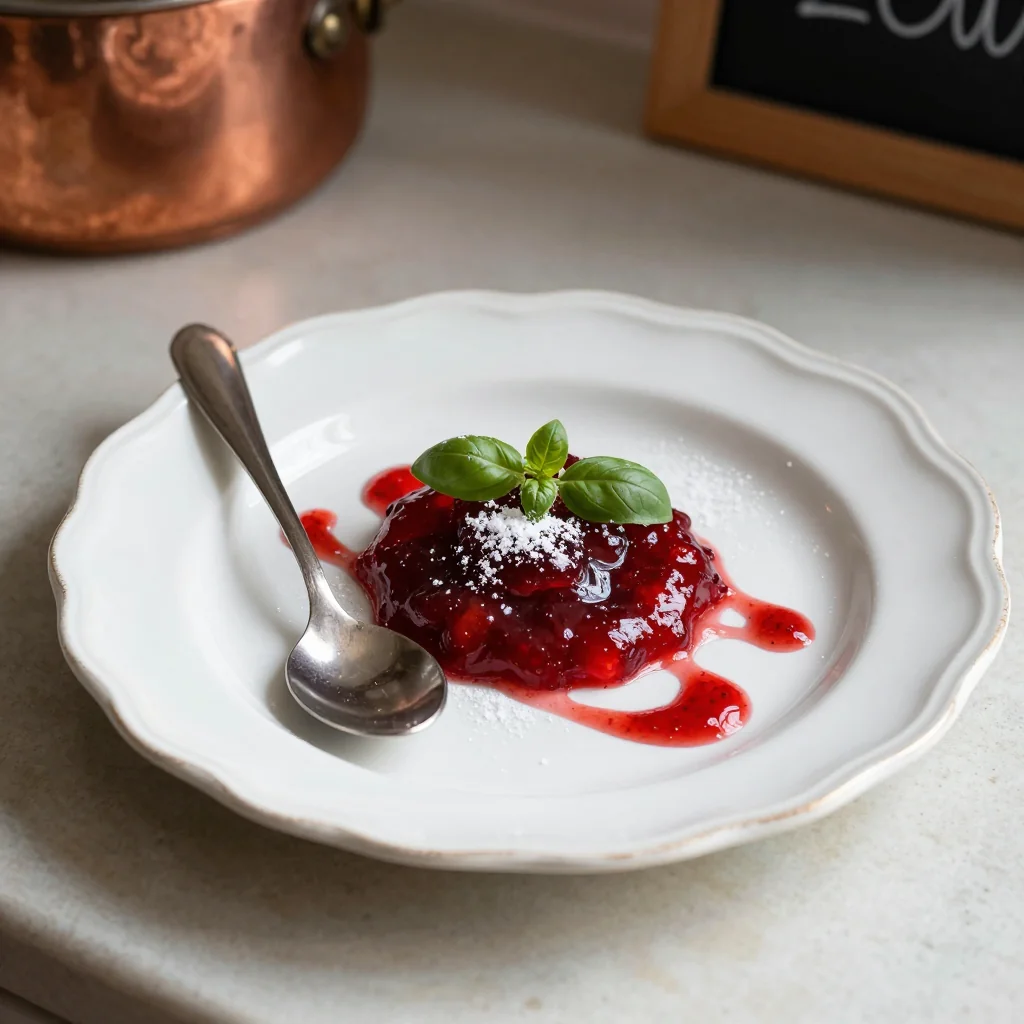
🍽️ Presentation and Service
For a restaurant‑style presentation, drizzle the jam in a thin line on a white plate and garnish with a fresh strawberry half. Pair with a dollop of whipped mascarpone for a decadent breakfast. When serving to guests, provide small tasting spoons so they can appreciate the aroma before tasting.
🏆 Pro Tips
The difference between a good jam and a professional‑grade jam lies in precision, consistency, and a few scientific shortcuts.
- 🎯 Control Moisture Content: Measure the exact weight of the fruit after maceration. Too much water will prevent proper gel formation. By weighing, you can adjust the sugar‑to‑fruit ratio precisely for a consistent set.
- 🎯 Use a Vacuum Sealer for Jars: After filling, run a brief vacuum cycle to remove trapped air. This reduces the risk of oxidation and extends shelf life beyond the typical six months.
- 🎯 Opt for Low‑Methoxyl Pectin: Low‑methoxyl pectin gels with calcium ions rather than high sugar, allowing you to create a reduced‑sugar jam without sacrificing texture. Replace the powdered pectin with an equal weight of low‑methoxyl pectin and add 1 g calcium chloride per kilogram of fruit.
- 🎯 Layer Flavors with Infusions: Add a vanilla bean pod or a few sprigs of fresh mint to the jam during the last minute of cooking. Strain before bottling for a subtle aromatic lift.
- 🎯 Prevent Sugar Crystallization: Add a pinch of corn syrup or invert sugar; this interferes with crystal formation, keeping the jam smooth.
- 🎯 Test pH for Food Safety: A pH below 3.5 ensures safe preservation. Use pH strips after adding lemon juice; if the jam reads higher, add a few more milliliters of lemon juice to lower the pH.
“The secret to a perfect jam is patience, precision, and a love for the fruit’s natural sweetness.” — Thomas Keller
🔄 Variations and Adaptations
Strawberry jam is a versatile canvas. Below are several ways to customize the recipe for dietary needs, flavor experiments, and family-friendly twists.
🥬 Vegetarian/Vegan Version
This jam is naturally vegetarian. To make it fully vegan, replace the granulated sugar with organic cane sugar (which is not processed with bone char) or a blend of coconut sugar and agave syrup. The pectin remains plant‑based, so no animal products are introduced.
- Swap granulated sugar for 1.5 kg of organic cane sugar.
- Use a vegan‑friendly pectin (most commercial pectins are already plant‑derived).
🌶️ Flavor Variations
Play with complementary flavors to create unique jam profiles that suit different cuisines.
Spicy Version:
Add ½ tsp of finely minced fresh jalapeño or a pinch of cayenne pepper during the boiling stage for a subtle heat that balances the fruit’s sweetness.
Mediterranean Version:
Incorporate 1 tsp of finely chopped fresh rosemary and a splash of extra‑virgin olive oil after cooking. This creates a jam that pairs beautifully with grilled lamb or cheese boards.
Asian Inspired Version:
Stir in 1 tsp of grated ginger and 1 tbsp of toasted sesame oil after removing the pot from heat. The result is a jam with warm, nutty undertones perfect for glazing salmon.
⚠️ Dietary Adaptations
Gluten‑Free:
All ingredients are naturally gluten‑free. Ensure that any packaged sugar or pectin is certified gluten‑free to avoid cross‑contamination.
Lactose‑Free:
The jam contains no dairy. If serving with cream cheese, replace it with a lactose‑free alternative or coconut cream.
Low‑Calorie:
Reduce sugar to 1 kg and increase the lemon juice to 100 ml. This yields a lighter jam with a tangier profile while still providing a safe pH for preservation.
👶 Kid‑Friendly Version
Kids often love jam but may be sensitive to large amounts of sugar. Use 1 kg of sugar and add a splash of pureed applesauce (100 ml) for natural sweetness. Serve on whole‑grain crackers with a thin spread to keep portions modest.
📦 Storage and Reheating
🧊 Conservation
Refrigerator:
- Duration: Up to 2 weeks after opening.
- Recommended container: Glass jars with airtight lids.
- Tip: Place a small piece of parchment paper on the surface before sealing to prevent skin formation.
Freezer:
- Duration: Up to 12 months.
- Method: Transfer jam into freezer‑safe containers, leaving 1 cm headspace.
- Defrosting: Thaw in the refrigerator overnight; stir gently before use.
💡 For maximum flavor retention, store jars in a dark cupboard away from direct sunlight, as UV light can degrade the natural pigments.
♨️ Reheating
🔥 Oven (Recommended):
- Preheat to 150 °C (300 °F).
- Cover the jam jar with aluminum foil.
- Heat for 8 minutes.
- Remove the foil and continue heating for another 2 minutes to develop a glossy finish.
⚡ Microwave (Quick):
- Place the jam in a microwave‑safe bowl.
- Cover with a microwave‑safe lid.
- Heat on medium power for 45 seconds, stir, then repeat until desired warmth.
🍳 Stovetop:
Warm the jam in a small saucepan over low heat, stirring constantly to prevent sticking. This method is ideal for creating a warm glaze for meats.
🍷 Perfect Pairings
🥗 Accompaniments
- Fresh Goat Cheese: The tangy creaminess balances the jam’s sweetness, creating a classic toast topping.
- Grilled Chicken Breast: Brush a thin layer of jam during the last minutes of grilling for a glossy, fruity glaze.
- Ricotta Pancakes: Swirl the jam into fluffy ricotta‑infused pancakes for a brunch treat.
🍷 Wine & Beverage Pairings
- Riesling (Off‑dry): The wine’s acidity mirrors the jam’s lemon notes, while its subtle sweetness complements the fruit.
- Rosé Champagne: Bubbles cleanse the palate between bites, enhancing the jam’s bright flavor.
- Non‑Alcoholic: Sparkling water with a splash of orange juice and a spoonful of jam creates a refreshing mocktail.
🍰 To Complete the Meal
Start with a light arugula salad tossed in a citrus vinaigrette, then serve the jam alongside a cheese platter featuring aged cheddar and brie. Finish with a vanilla panna cotta drizzled with a thin layer of leftover jam for a harmonious sweet finish.
❓ Frequently Asked Questions
Q: Can I use frozen strawberries instead of fresh?
A: Yes, you can. Thaw the frozen berries completely and drain any excess liquid before measuring. Frozen fruit may contain more water, so you might need to increase the cooking time by 5‑10 minutes to achieve the desired thickness.
Q: How do I know if the jam is set without a thermometer?
A: Perform the “plate test.” Place a small spoonful of hot jam on a chilled plate, let it sit for a minute, then push it with your fingertip. If the surface wrinkles, the jam has set. If it’s still fluid, continue boiling and test again.
Q: Is it safe to store the jam at room temperature after opening?
A: Once opened, keep the jam refrigerated. The sugar and acidity help preserve it, but exposure to air and contaminants can lead to spoilage after a few weeks.
Q: What can I do if the jam turns out too runny?
A: Return the jam to a boil and add an extra ½ tsp of pectin dissolved in a tablespoon of water. Continue cooking for another 2‑3 minutes, then test the set again.
Q: Can I add other fruits to this jam?
A: Absolutely. Mix in raspberries, blueberries, or blackberries in a 1:1 ratio with strawberries. Adjust the sugar slightly if the added fruit is more tart.
Q: How far in advance can I prepare the jam?
A: The jam can be made up to a month ahead if sealed properly in sterilized jars. For the best flavor, consume within 3‑4 months, as the fresh strawberry aroma diminishes over time.
🎉 To Your Kitchen!
Making strawberry jam at home is a rewarding blend of science and tradition. This recipe gives you control over flavor, texture, and preservation, letting you enjoy the taste of sun‑ripe berries all year long. Remember the key points: choose the best fruit, respect the temperature, and use pectin for a reliable set. Whether you’re spreading it on toast, glazing a roast, or gifting beautifully sealed jars, this jam will impress.
If you try the recipe, please share your photos, variations, and any questions in the comments below. Your feedback helps the community grow, and your creativity might inspire the next flavor twist!
Have you tried this recipe?
Leave a comment and rating below! Share your photos on Instagram with #StrawberryJamMagic to be featured.
Strawberry Jam Homemade with Pectin
A bright, spreadable jam that captures the essence of fresh strawberries.
📝 Ingredients
Jam Base
Jar Sterilization
👨🍳 Instructions
- Wash, hull, and quarter the strawberries.
- Combine strawberries and sugar in a heavy pot; let sit 15 minutes.
- Bring the mixture to a rolling boil, reaching 105 °C.
- Add lemon juice and dissolved pectin; boil 2 minutes.
- Test the set with the plate method; adjust time if needed.
- While jam cooks, sterilize jars in boiling water‑vinegar solution.
- Fill hot jars, leaving 0.5 cm headspace; wipe rims.
- Seal lids, process in a boiling water bath for 10 minutes.
- Cool, label, and store in a cool dark place.
- Serve on toast, with cheese, or as a glaze; enjoy!
🥗 Nutritional Information (per serving)
*Values are estimates based on standard ingredient data.
📚 You Might Also Like
Blueberry Jam with Lemon
Rhubarb Compote
Peach Preserves


💬 Comments & Reviews
Leave a Comment
No comments yet. Be the first to share your thoughts!