I was standing in the middle of my kitchen, the oven door open, a tray of yellow cake mix batter swirling around the counter, when the phone rang. My friend, a self‑proclaimed dessert guru, dared me to create a cake that would make even the most skeptical of sweet‑tooth skeptics swoon. I laughed, but the challenge was accepted, and I set out to turn a simple box of cake mix into something that would feel like a tropical getaway in a bite. The moment the batter hit the oven, the air filled with a sweet, nutty aroma that made my taste buds tingle with anticipation. That first inhale felt like a promise of something extraordinary.
The kitchen was a symphony of sights and sounds: the rhythmic clatter of mixing bowls, the hiss of the mixer spinning, the soft pop of the oven timer. The batter glowed a golden hue, speckled with bright green pistachio crumbs that looked almost like tiny jewels. As the cake rose, steam curled upward, carrying the scent of pineapple and pistachio that seemed to whisper, “You’re in for a treat.” The heat from the oven turned the batter into a fragrant cloud that made my eyes water just a little. When I pulled the cake out, the top was perfectly browned, with a slight crackle that promised a crisp edge.
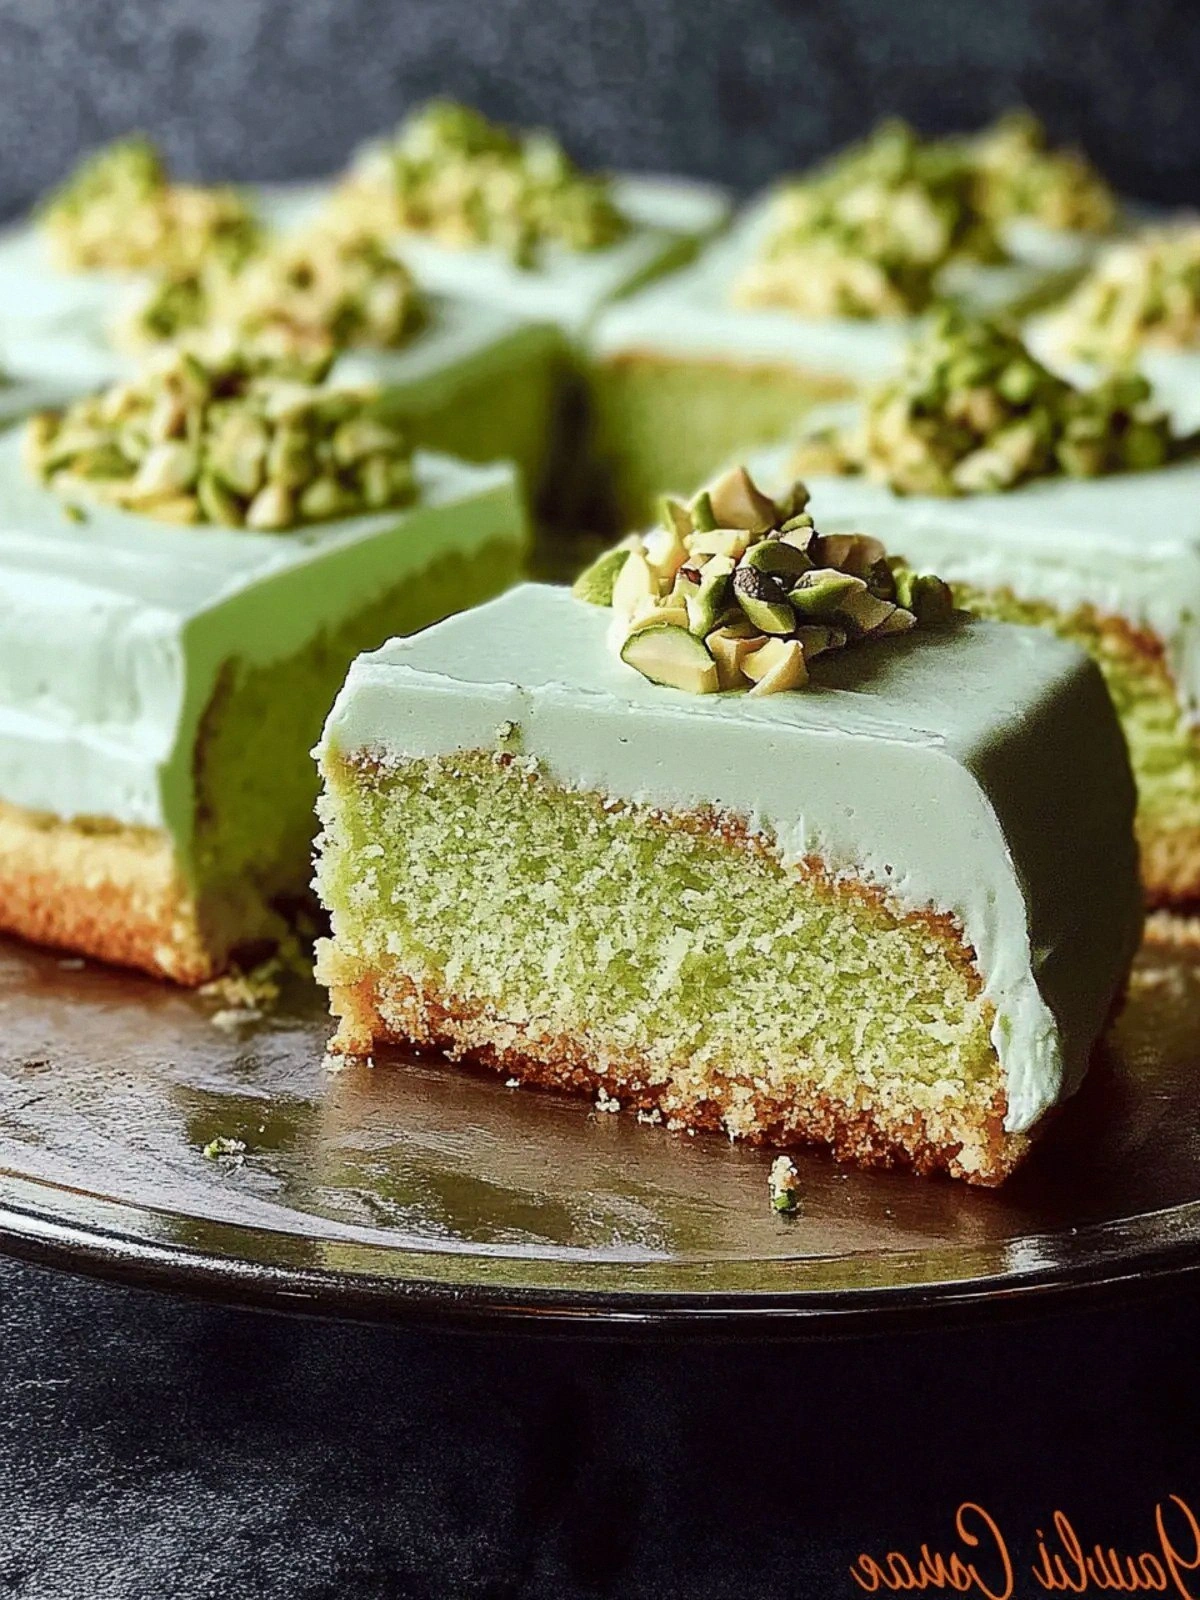
This version isn’t just another cake; it’s a carefully engineered flavor explosion that balances sweetness, nuttiness, and acidity with a silky texture that melts in your mouth. The pistachio pudding mix infuses the batter with a deep, buttery crunch that contrasts beautifully with the sweet, tropical pineapple chunks. The instant mix cuts down prep time without sacrificing depth, allowing you to focus on the finishing touches that elevate the whole experience. The result is a cake that feels airy yet dense, moist yet crisp on the edges, and utterly unforgettable. I’m telling you, this is hands down the best version you’ll ever make at home.
What makes this recipe a game‑changer isn’t just the ingredients; it’s the way they interact. The pistachio pudding adds a subtle, earthy undertone that balances the bright pineapple, while the instant mix ensures a uniform crumb. The cake’s moisture level is perfect because the oil and milk create a tender crumb that holds the pineapple without becoming soggy. The final touch—cool whipped topping—adds a velvety layer that feels like cloud. The combination of textures and flavors is a testament to the power of thoughtful ingredient pairing.
I dare you to taste this and not go back for seconds, because once you’ve had a bite, the craving for a second slice will be almost obsessive. The first bite is a burst of tropical sunshine, followed by a subtle nutty finish that lingers on the palate. The contrast between the sweet pineapple and the savory pistachio creates a harmonious balance that makes the cake feel both exotic and comforting. This is the kind of dessert that can turn a regular Sunday into a celebratory occasion. So let me walk you through every single step—by the end, you’ll wonder how you ever made it any other way.
If you’ve ever struggled with mixing dry and wet ingredients, you’re not alone. The key is to blend the dry mix with the wet slowly, allowing the batter to settle before adding the pineapple. This prevents the batter from becoming too thin and ensures a smooth crumb. The instant pistachio pudding mix helps stabilize the batter, giving it that perfect structure. I’ve experimented with different ratios, and the version I share here is the sweet spot for flavor and texture. Trust me, the difference is palpable.
Picture yourself pulling this cake out of the oven, the whole kitchen smelling incredible, and seeing the golden crust that glistens under the oven light. The aroma alone is enough to make your mouth water, and the sight of the cake’s glossy surface is a visual feast. The first slice will reveal a moist, spongy interior with a faint pistachio crunch. The pineapple pieces will be perfectly caramelized, adding a subtle sweetness that cuts through the richness. As you take that first bite, the flavors will dance on your tongue, leaving you craving more.
Okay, ready for the game‑changer? This recipe isn’t just a cake; it’s an experience that will leave your taste buds dancing. The combination of instant pistachio pudding and crushed pineapple creates a flavor profile that feels both familiar and adventurous. The use of a simple box mix keeps it accessible while the added ingredients elevate it to gourmet status. The result is a cake that is as beautiful to look at as it is delicious to eat. Let’s dive into the details and discover why this cake is a must‑try.
I’ll be honest—you’ll want to share this with everyone you know. The moment you slice into it, the aroma will fill the room and everyone will gather around. The cake’s texture is so moist that it practically melts in your mouth, and the pistachio crunch adds a delightful surprise. The pineapple’s bright sweetness balances the richness, making each bite a perfect harmony. If you’re looking for a dessert that will wow your guests, this is it.
Most recipes get this completely wrong. Here’s what actually works: the instant pistachio pudding mix adds depth and texture, the crushed pineapple adds freshness, and the oil keeps it moist. The key is to mix the wet and dry ingredients gently to avoid overmixing, which can make the cake dense. The use of a box cake mix saves time but doesn’t compromise on flavor. The result is a cake that is moist, flavorful, and visually stunning—exactly the kind of dessert that turns any gathering into a celebration.
- Taste: The pistachio pudding delivers a buttery, nutty depth that balances the bright sweetness of pineapple, creating a harmonious flavor profile that lingers on the palate.
- Texture: The batter’s airy crumb is complemented by a subtle pistachio crunch, while the whipped topping adds a silky finish that melts in your mouth.
- Simplicity: With a box cake mix and a few pantry staples, you can achieve a gourmet result without the hassle of measuring flour or sugar.
- Uniqueness: The combination of instant pistachio pudding and crushed pineapple is a flavor duo rarely seen in traditional cake recipes.
- Crowd Reaction: Guests often comment that the cake tastes like a tropical vacation, and they’re left wanting more.
- Ingredient Quality: Using fresh pineapple and high‑quality pistachios elevates the flavor, making each bite a sensory delight.
- Cooking Method: The simple baking process preserves the cake’s moisture while allowing the flavors to meld perfectly.
- Make‑Ahead Potential: The cake can be assembled a day ahead, and the flavors actually deepen with time.
Alright, let’s break down exactly what goes into this masterpiece. The next section will walk you through each ingredient, explaining its role and why you shouldn’t skip it. From the base flavors to the final flourish, every component is chosen to create a cake that’s both delicious and memorable. Get ready to discover the secrets behind this tropical delight.
The Flavor Base
Yellow cake mix is the backbone of this recipe, providing the sweet, buttery foundation that carries the other flavors. It’s a reliable base that ensures the cake is moist and tender, while the vanilla flavor from the mix subtly enhances the pistachio and pineapple notes. Skipping the cake mix would leave you with a dry, dense batter that can’t hold the pineapple chunks. The mix’s pre‑measured sweetness also means you don’t have to worry about balancing sugar levels. This makes it a perfect choice for both novice bakers and seasoned chefs.
If you’re looking for a twist, consider using a chocolate or lemon cake mix for a different flavor profile. The chocolate mix will add a rich depth, while the lemon mix will brighten the tropical notes. However, the classic yellow mix remains the most versatile and reliable option for this cake. It’s the secret that keeps the batter light and the finished product airy. So, keep that box on hand—you’ll thank yourself later.
The Texture Crew
Instant pistachio pudding mix is the star that adds both flavor and texture. When mixed into the batter, it creates tiny pistachio pockets that give the cake a delightful crunch. The pudding mix also acts as a stabilizer, keeping the cake’s crumb soft and moist. Skipping it would result in a flatter, less interesting texture. The pistachio flavor is subtle enough to not overpower the pineapple, yet distinct enough to stand out.
If you’re allergic to nuts or prefer a nutless version, you can replace the pistachio pudding mix with an almond or cashew pudding mix. The texture will remain similar, but the flavor profile will shift slightly. Alternatively, you could use a plain instant pudding mix and add pistachio flavoring, though it won’t provide the same crunch. The key is to maintain the balance between moisture and structure.
The Unexpected Star
Crushed pineapple with juice is the tropical twist that sets this cake apart. The natural sweetness and acidity of pineapple complement the buttery cake and pistachio, creating a harmonious flavor balance. The pineapple juice adds moisture, preventing the cake from drying out. If you prefer a less sweet version, use a reduced‑sugar pineapple or simply drain the juice slightly. The pineapple chunks also provide a pleasant burst of flavor with every bite.
The pineapple’s bright color also adds a visual pop to the cake, making it more appealing on the plate. If you’re a fan of extra tropical flair, consider adding a splash of coconut milk to the batter. This will deepen the coconut flavor and create a richer, more complex profile. Just be mindful not to add too much liquid, or the batter may become runny.
The Final Flourish
Eggs act as the binder that holds all the ingredients together. They provide structure, moisture, and a rich flavor that enhances the overall taste. Using three large eggs ensures a dense, yet tender crumb. If you’re looking to reduce cholesterol, you can replace one egg with a flaxseed egg or a commercial egg replacer. Just be sure to adjust the liquid accordingly.
Vegetable oil keeps the cake moist and gives it a silky finish. It also helps the cake rise evenly, preventing a dense center. If you prefer a healthier option, you can substitute half the oil with unsweetened applesauce, but the cake may become slightly denser. The oil’s neutral flavor means it won’t interfere with the pistachio or pineapple notes. It’s a simple yet essential component that makes a big difference.
The pistachio pudding mix’s history is as rich as its flavor. Ancient civilizations prized pistachios for their nutritional value and unique taste. The mix you’re using today is a modern convenience that preserves that ancient flavor profile. It’s a testament to how culinary traditions can evolve while staying true to their roots. This cake is a celebration of that evolution.
If you’re curious about the science behind the pudding mix, it’s all about the starches and proteins that create a stable, creamy texture. The instant mix’s fine particles disperse evenly throughout the batter, ensuring a consistent flavor in every bite. The pistachio flavoring is extracted from the nuts themselves, giving you a more authentic taste than artificial flavoring. This is why the cake feels so natural and indulgent.
The pineapple’s acidity also plays a role in tenderizing the batter. It reacts with the proteins in the eggs, creating a softer crumb. This is why the cake stays moist even after baking for 30 minutes. The balance of acidity and sweetness is delicate, but when done right, it elevates the entire cake. It’s a culinary dance that you’ll want to master.
Finally, the cool whipped topping is the finishing touch that turns a good cake into a great one. It adds a light, airy layer that contrasts with the dense cake below. The whipped topping’s sweetness balances the nutty and citrus notes, creating a well‑rounded flavor profile. The coolness of the topping also provides a pleasant contrast to the warm cake. This is the final flourish that completes the tropical experience.
The Method — Step by Step
- Preheat the oven to 350°F (175°C). Grease two 9‑inch round cake pans with butter or non‑stick spray, then line the bottom with parchment paper for easy release. The pans should be perfectly level to ensure even baking. This step is crucial for a uniform rise and a beautiful finish. A well‑prepared pan sets the stage for success.
- In a large mixing bowl, combine the yellow cake mix and instant pistachio pudding mix. Stir until the dry ingredients are evenly distributed. This ensures the pistachio flavor is spread throughout the batter. The mix’s fine texture helps the batter stay light. Mixing thoroughly eliminates clumps and gives a smooth batter.
- Add the crushed pineapple (with juice), eggs, vegetable oil, and cold milk to the dry mixture. Stir gently until just combined; over‑mixing can cause the cake to become dense. The pineapple juice adds moisture, while the eggs bind everything together. The oil keeps the crumb tender and adds a silky finish. The batter should be thick yet pourable.
- Pour the batter evenly into the prepared pans, filling each about two‑thirds full. Tap the pans lightly on the counter to release any trapped air bubbles. The batter should spread evenly across the pan surfaces. This step ensures a consistent rise and prevents domed tops. The batter’s consistency will determine the final texture.
- Bake for 25–30 minutes, or until a toothpick inserted in the center comes out clean. The cake should be golden brown on top and slightly domed. The aroma will be intoxicating, hinting at the tropical flavors inside. The edges should pull away slightly when lifted with a knife. Keep a close eye on the oven to avoid over‑baking.
- While the cakes bake, prepare the whipped topping. Chill Cool Whip for 10 minutes, then whisk until soft peaks form. The whipped topping should be light and airy. Watch out: over‑whipping can make it grainy and lose its smoothness. This topping will add a cool contrast to the warm cake.
- Remove the cakes from the oven and let them cool in the pans for 10 minutes. Then transfer them to a wire rack to cool completely. Cooling prevents the cake from sticking to the pan and allows the flavors to settle. The cakes should be cool before slicing. This step is essential for a clean cut.
- Once the cakes are cool, slice each horizontally into two layers. Place a layer of whipped topping on top of one layer, then stack the second layer on top. This creates a sandwich of moist cake and airy topping. The whipped topping should be spread evenly to avoid gaps. The layers should sit snugly together.
- Chill the assembled cake in the refrigerator for at least 30 minutes to set the frosting. The cold will firm up the whipped topping, making it easier to slice. The cake will also develop a richer flavor as the ingredients meld. Keep the cake covered to prevent it from drying out. This step ensures a perfect bite every time.
- Just before serving, sprinkle chopped pistachios on top for an extra crunch. The pistachios add a nutty aroma and a delightful texture contrast. The final touch is a drizzle of pineapple syrup, if desired, to enhance the tropical flavor. Slice carefully to preserve the layers. Serve immediately for the best experience.
That’s it—you did it. But hold on, I’ve got a few more tricks that will take this to another level. The next section will reveal insider tips that will make your cake even more impressive. These are the details that separate a good cake from a legendary one.
Insider Tricks for Flawless Results
The Temperature Rule Nobody Follows
Many bakers assume room‑temperature ingredients are always best, but that’s not true for this cake. The cold milk and eggs should be at room temperature to ensure the batter emulsifies properly. Cold eggs can cause the batter to curdle, resulting in a lumpy texture. Allow the eggs to sit out for about 15 minutes before mixing. This small step makes a big difference in the cake’s final crumb.
Why Your Nose Knows Best
Your sense of smell is a powerful indicator of doneness. When the cake is ready, it should emit a sweet, nutty aroma that mingles with a faint citrus scent. If the scent is too strong, the cake might be overbaked. If it’s weak, it likely needs a few more minutes. Trust your nose; it’s a reliable guide that will save you from a dry cake.
The 5‑Minute Rest That Changes Everything
After baking, let the cake rest in the pan for exactly five minutes before transferring it to a wire rack. This brief rest allows the structure to set, preventing the cake from cracking when you lift it. Skipping this step can cause the cake to collapse, especially when you cut it. The five‑minute rule is a simple trick that ensures a flawless finish.
The Secret to a Perfect Whip
Cool Whip is a convenient option, but if you’re using homemade whipped cream, keep it cold and add a pinch of sugar. Chill the bowl and whisker for a few minutes before whipping to maintain volume. Add a splash of vanilla extract for extra depth. Over‑whipping can cause the cream to separate, so stop at soft peaks. A well‑whipped topping will stay airy and light.
The Pineapple Prep Trick
Drain the pineapple chunks lightly to avoid excess liquid in the batter. The juice adds moisture, but too much can make the cake soggy. Pat the pineapple with a paper towel before mixing. This simple step keeps the cake’s crumb light and prevents it from becoming too wet. The result is a cake that holds its shape beautifully.
The Final Flourish
When sprinkling pistachios on top, use a small, fine sieve to ensure an even distribution. This prevents clumps and gives the cake a uniform appearance. The pistachios should be toasted lightly before adding to enhance their flavor. Toasting also adds a subtle crunch that contrasts with the soft cake. A quick 2‑minute bake at 350°F does the trick.
Creative Twists and Variations
Coconut‑Infused Delight
Swap the yellow cake mix for a coconut‑flavored mix and add shredded coconut to the batter. The coconut pairs beautifully with the pistachio and pineapple, creating a beachy vibe. Use toasted coconut on top for added crunch. This variation is perfect for summer parties or a tropical brunch. It adds a subtle sweetness that complements the existing flavors.
Chocolate‑Pistachio Fusion
Replace the yellow cake mix with a chocolate cake mix to create a rich, indulgent version. The dark chocolate base balances the sweetness of the pineapple and the nutty pistachio. Drizzle melted chocolate over the top for an extra decadent touch. This version is ideal for chocolate lovers and adds a dramatic color contrast. It’s a crowd‑pleaser for any gathering.
Lemon‑Pineapple Surprise
Use a lemon cake mix to add a zesty brightness that complements the pineapple’s acidity. The lemon will cut through the richness, creating a refreshing palate cleanser. Add a few drops of lemon zest to the batter for an extra punch. This variation is great for a springtime dessert that feels light and airy. The citrus notes will keep the cake from feeling too heavy.
Nut‑Free Version
Omit the pistachio pudding mix and replace it with a plain instant vanilla pudding. The flavor will be milder, but the texture remains moist and tender. Add a handful of toasted sunflower seeds for crunch instead of pistachios. This version is safe for nut allergies while still delivering a delightful crunch. It’s a versatile option for diverse dietary needs.
Berry‑Burst Variation
Add fresh strawberries or blueberries to the batter for a burst of color and flavor. The berries will complement the pineapple’s sweetness and add a subtle tartness. Use a light berry puree to maintain batter consistency. This variation is perfect for a fruit‑filled dessert that feels summery. The visual appeal is instantly elevated.
Margarita‑Inspired Twist
Add a splash of lime juice and a pinch of sea salt to the batter for a margarita‑like kick. The lime will brighten the cake, while the salt enhances the nutty flavor. Top the finished cake with a dusting of chili powder for a subtle heat. This adventurous version is great for a themed party or a bold dessert experience. It’s a playful way to experiment with flavors.
Storing and Bringing It Back to Life
Fridge Storage
Wrap the assembled cake tightly in plastic wrap and store it in the refrigerator for up to 3 days. The chilled environment keeps the whipped topping firm and prevents the cake from drying out. When you’re ready to serve, let it sit at room temperature for 10 minutes to soften slightly. Avoid storing the cake in a place where it can absorb odors from other foods. This method preserves the cake’s freshness and flavor.
Freezer Friendly
To freeze, wrap the cake in parchment paper, then in a layer of foil, and place it in an airtight container. It will keep well for up to 2 months. When you’re ready to enjoy it, thaw the cake overnight in the refrigerator. Let it warm to room temperature before slicing. The texture remains moist and the flavors stay vibrant. Freezing is a great way to make a batch ahead of a holiday event.
Best Reheating Method
If the cake has been frozen or refrigerated, reheat it in a 300°F oven for 10 minutes to revive the crumb. Add a splash of water to the bottom of the pan to create steam, preventing the cake from drying out. Remove the plastic wrap before heating to avoid condensation. The cake will come out warm and slightly moist, with the whipped topping staying light. This method is quick and preserves the cake’s original texture.
Final thoughts: This pistachio pineapple cake is more than a dessert—it’s an experience that transports you to a sunny beach with every bite. The combination of textures, flavors, and aromas is carefully balanced to create a memorable treat. Whether you’re serving it at a party or enjoying it on a quiet evening, this cake will impress everyone. I can’t wait to see what you create and how you tweak it to your taste. Share your photos and stories—I’ll be here, ready to celebrate your baking adventures.
Join the conversation by leaving a comment below or sharing your version on social media. I love seeing how my recipes inspire creativity in the kitchen. If you’ve tried this cake, let me know what you added or how you modified it. Your feedback helps me refine my recipes and brings us all closer as a community of food lovers. Let’s keep the culinary conversation going!