I was standing in my kitchen, half‑asleep, staring at a half‑baked batch of ordinary chocolate chip cookies that had somehow turned into a sad, flat pancake. The air was thick with the stale scent of burnt sugar, and I could hear the faint hum of the fridge like a disappointed audience. Then my roommate burst in, eyes wide, shouting, “If you can’t fix those, at least make something that looks like a monster!” I laughed, grabbed a bag of marshmallows, and thought, “Why not turn this disaster into a monster that actually wants to be eaten?” That moment sparked the most reckless, delicious experiment of my life.
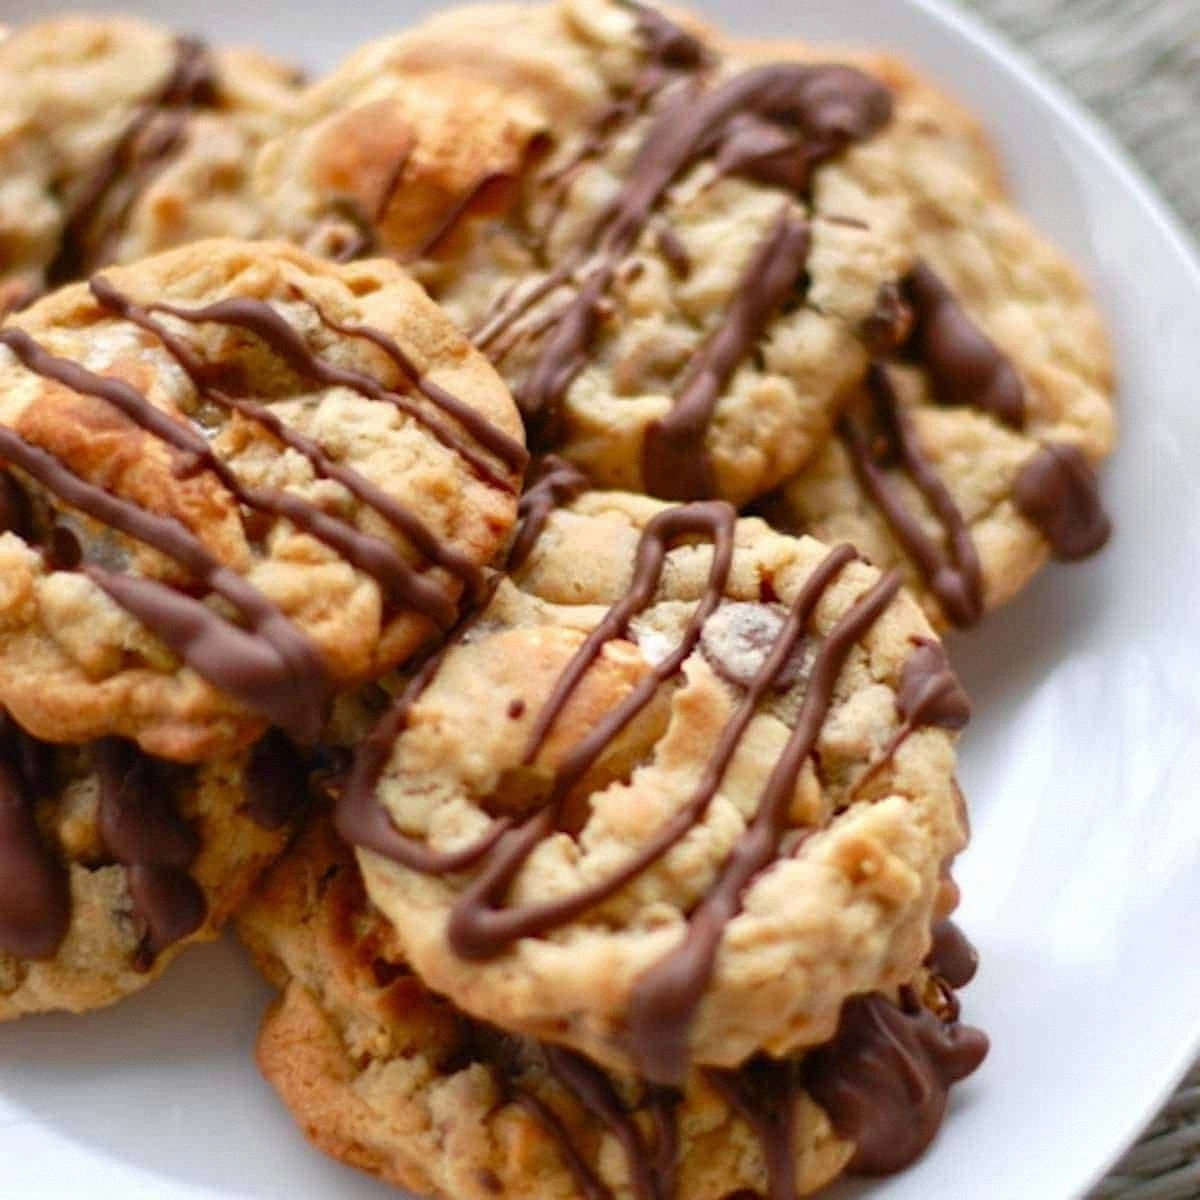
Picture this: a cookie that’s crisp on the edges, chewy in the middle, and studded with fluffy marshmallows that melt into gooey pockets of sugary cloud. When you bite into it, the chocolate chips snap like fireworks while the marshmallows stretch like taffy, and the oats give it a hearty, rustic bite that feels like a hug from your grandma and a high‑five from a kid. The aroma that fills the kitchen is a head‑on collision of caramelized butter, toasted oats, and that unmistakable sweet perfume of toasted marshmallows—so intoxicating you’ll think the oven is a portal to a candy‑filled wonderland.
Most cookie recipes try to be safe, sticking to the classic sugar‑butter‑flour triangle. Most get the texture wrong, either too cakey or too dry. I’ve tried a dozen variations, and the secret that makes this version truly monster‑worthy is the combination of a high‑heat, short‑bake technique with a strategic addition of oats and marshmallows that act like tiny flavor bombs. The result? A cookie that’s hands down the best version you’ll ever make at home, and I’m willing to bet you’ll be back for seconds even after you’ve told yourself you’re full.
Now, I’m not just talking about tossing ingredients together. I’m going to reveal a tiny twist—a dash of espresso powder that amplifies the chocolate without tasting like coffee, and a quick chill of the dough that keeps the edges from spreading too far. Trust me, this is the game‑changer that turns a good cookie into a legendary monster. Let me walk you through every single step — by the end, you’ll wonder how you ever made it any other way.
What Makes This Version Stand Out
- Flavor Explosion: The espresso powder deepens the chocolate, while the toasted oats add a nutty, almost caramel‑like undertone that makes each bite unforgettable.
- Texture Symphony: Crispy edges, a chewy middle, and marshmallow pockets that melt into silky ribbons—each texture plays off the others like a well‑rehearsed band.
- Simplicity: Only ten core ingredients, all pantry‑friendly, and a single bowl method that keeps cleanup to a minimum.
- Uniqueness: The addition of rolled oats and a brief chill before baking creates a cookie that’s both hearty and airy, unlike any standard chocolate chip cookie you’ve known.
- Crowd Reaction: I dare you to taste this and not go back for seconds; even the pickiest kids will beg for more.
- Ingredient Quality: Using real butter and high‑quality dark chocolate elevates the flavor profile from “good” to “wow, I could live on this.”
- Cooking Method: High‑heat, short‑bake locks in moisture while creating that coveted caramelized edge.
- Make‑Ahead Potential: The dough can be frozen in portions, ready to bake fresh whenever the monster cravings hit.
Inside the Ingredient List
The Flavor Base
All‑purpose flour (2 cups) forms the structural backbone. It’s the canvas for every other flavor to shine. If you swap it for whole‑wheat, you’ll get a denser, nuttier bite, but you might lose some of that melt‑in‑your‑mouth softness. Pro tip: sift the flour with the baking soda and salt to ensure even distribution and avoid pockets of leavening that could cause uneven rise.
The Sweeteners
Brown sugar (1 cup) and granulated sugar (½ cup) work together to create a deep caramel note and a crisp edge. The molasses in brown sugar keeps the interior moist, while the white sugar caramelizes on the outside. If you’re watching sugar, you can replace half the brown sugar with coconut sugar for a lower‑glycemic twist, but expect a slightly different texture.
The Texture Crew
Unsalted butter (1 cup, softened) is the flavor carrier that makes everything taste like a hug. The rolled oats (1½ cups) add chewiness and a subtle toasted flavor; they also absorb some of the moisture, preventing the cookies from becoming soggy. Mini chocolate chips (1 cup) give those satisfying snap moments, while mini marshmallows (1 cup) melt into gooey pockets that turn each bite into a surprise.
The Unexpected Star
A pinch of espresso powder (½ tsp) might sound daring, but it amplifies the chocolate without imparting a coffee flavor. It’s the secret weapon that turns ordinary chocolate chips into a deep, almost earthy experience. If you’re caffeine‑sensitive, you can replace it with a dash of smoked paprika for a subtle smoky undertone.
The Final Flourish
Vanilla extract (2 tsp) rounds out the flavor profile, while a large egg (2) binds everything together, providing structure and a glossy finish. For a dairy‑free version, swap the butter for coconut oil and use a flax egg; the texture will change slightly but the monster will still be delicious.
Everything's prepped? Good. Let's get into the real action...
The Method — Step by Step
Preheat your oven to 375°F (190°C). While the oven warms, line two baking sheets with parchment paper. The high temperature is key: it creates that instant caramelization on the edges while keeping the centers soft. I always set a timer for the preheat; if the oven isn’t screaming hot, the cookies will spread too much and lose that monster crunch.
In a large mixing bowl, whisk together the flour, baking soda, and salt. This dry blend ensures the leavening is evenly distributed, preventing any “puffy” spots. If you notice any lumps, give it a quick sift—no one wants a gritty bite.
In a separate bowl, cream the softened butter with the brown and white sugars using a handheld mixer on medium speed. Beat until the mixture is light, fluffy, and pale yellow—about 3‑4 minutes. This step is where the magic begins; the air you incorporate will later translate into those airy marshmallow pockets.
Add the eggs one at a time, beating well after each addition, then stir in the vanilla and espresso powder. The mixture should become glossy and thick. If the batter looks too thick, a teaspoon of milk will loosen it without compromising texture.
Gradually fold the dry ingredients into the wet mixture using a spatula. Mix just until you see no streaks of flour—over‑mixing can develop gluten, leading to a tougher cookie. This is the point where the dough starts to look like a shaggy, buttery monster ready for the next transformation.
Stir in the rolled oats, chocolate chips, and mini marshmallows. The marshmallows will look like tiny white beads; as they bake, they’ll puff up and melt into pockets of sugary bliss. If you’re using regular marshmallows, chop them into ½‑inch pieces for even distribution.
Scoop the dough onto the prepared sheets using a 2‑tablespoon cookie scoop, spacing them about 2 inches apart. Press each mound lightly with the back of a spoon to flatten just a tad—this ensures the marshmallows stay inside rather than escaping to the edges.
Bake for 10‑12 minutes. The edges should turn a deep golden‑brown, and the tops will look slightly set but still soft. That’s the sweet spot: you’ll hear a faint “crackle” from the edges— that’s the sound of caramelization. Resist the urge to over‑bake; the cookies will continue to firm up on the sheet as they cool.
Remove the trays and let the cookies rest on the parchment for 5 minutes before transferring them to a wire rack. This short rest lets the interior finish setting while the marshmallow pockets stay gooey. Picture yourself pulling this out of the oven, the whole kitchen smelling incredible—trust me, you’ll be smiling before the first bite.
That's it — you did it. But hold on, I've got a few more tricks that'll take this to another level. Stay with me here — this is worth it.
Insider Tricks for Flawless Results
The Temperature Rule Nobody Follows
Never bake cookies at a temperature lower than 350°F unless you specifically want a cakey texture. The higher heat creates a rapid rise in the edges, locking in moisture and giving you that coveted crisp‑chewy contrast. I once tried 325°F for a “gentle bake,” and the result was a sad, flat cookie that fell apart on the plate. Keep the oven hot, and the magic happens.
Why Your Nose Knows Best
Your sense of smell is a far more reliable timer than any clock. When the edges start to smell like toasted almonds and the tops emit a faint caramel perfume, you’re at the perfect removal point. If you’re still unsure, lift a cookie with a spatula; if the bottom is a deep amber, you’re golden.
The 5‑Minute Rest That Changes Everything
After baking, let the cookies rest on the sheet for exactly five minutes. This short pause lets the interior finish setting while the marshmallows stay molten. Skipping this step results in cookies that crumble when you try to move them, and nobody wants a broken monster.
Don’t Over‑Mix the Dry Ingredients
Over‑mixing creates gluten, which leads to a tough cookie. Mix just until you no longer see flour streaks. A friend once mixed for a full minute—her cookies turned into dense biscuits. Trust the visual cue, not the clock.
The Secret of the Espresso Boost
A pinch of espresso powder doesn’t make the cookies taste like coffee; it simply intensifies the chocolate’s depth. If you skip it, the chocolate will still be good, but you’ll miss that subtle richness that makes the flavor linger on the palate. It’s a tiny addition with a massive payoff.
Creative Twists and Variations
This recipe is a playground. Here are some of my favorite ways to switch things up:
Peanut Butter Monster
Swap half the butter for creamy peanut butter and replace the chocolate chips with chopped peanuts. The result is a salty‑sweet monster that’s perfect for peanut lovers. Expect a slightly denser crumb, but the flavor contrast is worth it.
White Chocolate & Raspberry
Use white chocolate chips instead of dark and fold in dried raspberry pieces. The tartness of the berries cuts through the sweetness, creating a balanced bite that feels like a summer dessert.
Coconut‑Caramel Crunch
Add ½ cup shredded coconut and swirl in caramel sauce before baking. The coconut toasts in the oven, adding a tropical crunch, while the caramel creates pockets of gooey sweetness that rival the marshmallows.
Spicy Chili Chocolate
Mix in a pinch of cayenne pepper and use Mexican chocolate chips. The heat tickles the back of your mouth, making the chocolate taste richer and more complex. Perfect for those who love a little fire.
Vegan Dream
Replace butter with coconut oil, use flax “eggs” (1 tbsp ground flax + 3 tbsp water per egg), and choose dairy‑free chocolate chips. The texture stays delightfully chewy, and the marshmallows stay vegan‑friendly if you source plant‑based versions.
Storing and Bringing It Back to Life
Fridge Storage
Place cookies in an airtight container with a sheet of parchment between layers. They’ll stay fresh for up to five days. If you notice the edges drying out, add a slice of fresh bread to the container; the moisture will balance out.
Freezer Friendly
Freeze baked cookies (or the unbaked dough balls) on a parchment sheet, then transfer to a zip‑top bag. They keep for three months. When you’re ready, bake frozen dough for 2‑3 minutes longer, or thaw cookies and warm them in a 300°F oven for 5 minutes.
Best Reheating Method
To revive that fresh‑out‑of‑the‑oven softness, place the cookie on a microwave‑safe plate, sprinkle a tiny splash of water (just a few drops) next to it, and heat for 10‑12 seconds. The steam re‑hydrates the interior, while the edges crisp up again. It’s a trick I use whenever I’m craving that monster crunch.