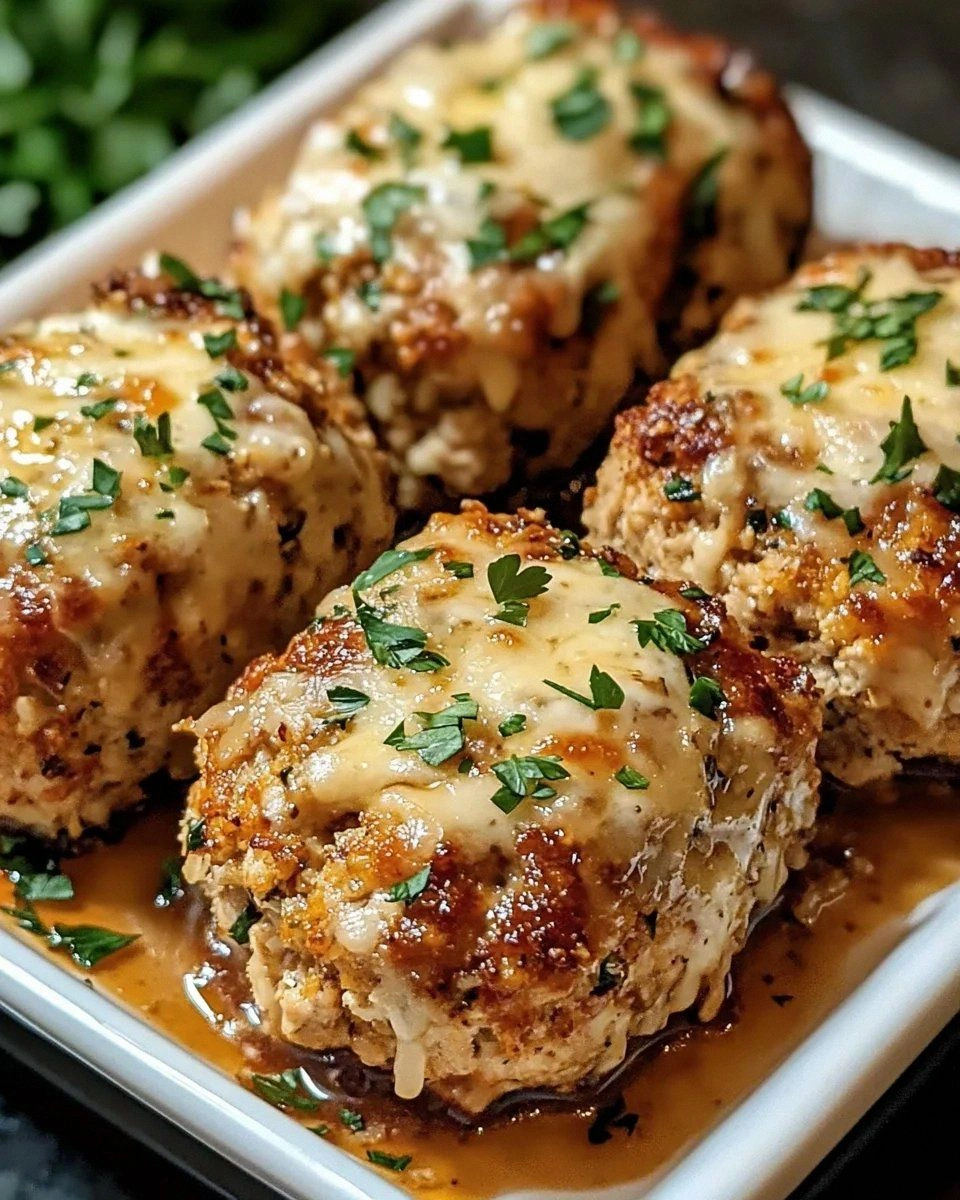
Picture this: it’s a rainy Tuesday, the kind where you stare at the kitchen clock and wonder if the universe is conspiring against your dinner plans. I had just burned a batch of store‑bought meatballs, and the smoke alarm decided to join the party. That moment of culinary chaos sparked a dare from my roommate—“Make something that actually tastes like a hug and doesn’t set off the alarm.” I accepted, and the result is what I now proclaim the ultimate comfort‑food triumph: Garlic Parmesan Chicken Meatloaves. This isn’t just another meatloaf; it’s a symphony of flavors that hits every note from savory depth to cheesy decadence, all while staying light enough to keep you from feeling like you ate a brick.
The kitchen quickly transformed into a fragrant laboratory. The aroma of sizzling garlic in olive oil hit the air like a warm blanket, while the bright green parsley added a pop of color that made the countertop look like a fresh garden. I could hear the gentle sizzle of the meat mixture hitting the hot pan, a sound that promised a crisp, caramelized crust. My fingertips tingled as the mixture came together—soft, pliable, and just a little sticky, the perfect texture for shaping into loaves that would hold their form and release a burst of flavor with every bite. The anticipation built as the oven preheated, the heat humming like a low‑frequency bass line in a favorite song.
What makes this version truly stand out is a few secret weapons I’ve refined over countless trials. First, the blend of grated Parmesan into the meat itself creates a nutty, umami‑rich backbone that most chicken meatloaf recipes completely miss. Second, a buttery garlic‑Parmesan glaze on top turns the crust into a golden, crackly masterpiece that shatters like thin ice when you slice into it. And finally, a splash of milk and a touch of breadcrumbs keep the loaves moist without turning them into a soggy mess. Most recipes get this completely wrong—either they’re dry, bland, or they fall apart the moment you try to serve them. Not this one.
Now, I’m about to hand you the exact roadmap that will take you from a raw pile of ingredients to a plate that practically sings “Encore!” I dare you to taste this and not go back for seconds. Let me walk you through every single step — by the end, you’ll wonder how you ever made it any other way.
What Makes This Version Stand Out
- Umami Boost: Parmesan cheese is folded directly into the meat, delivering a deep, savory flavor that makes each bite unforgettable.
- Moisture Magic: Milk and breadcrumbs create a tender crumb that keeps the chicken from drying out, even after a 30‑minute bake.
- Crispy Crown: The butter‑garlic‑Parmesan glaze forms a crackly crust that adds texture contrast and a glossy finish.
- Simplicity Wins: Only ten core ingredients, all pantry‑friendly, mean you can whip this up on a weeknight without a grocery run.
- Crowd‑Pleaser Factor: The combination of garlic, cheese, and herbs appeals to both kids and adults—no more “I don’t like meatloaf” complaints.
- Make‑Ahead Friendly: Shape, glaze, and refrigerate the loaves ahead of time; just pop them in the oven when you’re ready to eat.
- Versatile Base: Swap ground chicken for turkey, pork, or even a plant‑based blend without losing the core flavor profile.
- Visual Wow: The golden glaze and specks of fresh parsley make these loaves look as good as they taste, perfect for Instagram‑ready plating.
Alright, let's break down exactly what goes into this masterpiece...
Inside the Ingredient List
The Flavor Base
Ground Chicken (1.5 lbs): This is the canvas of our masterpiece. It’s lean, so it won’t overpower the delicate cheese, yet it provides enough protein to keep the loaves hearty. If you skimp on quality, you’ll notice a watery texture. Look for freshly ground chicken at the butcher or grind it yourself for the best bite.
Garlic (4 cloves, minced): Garlic is the aromatic heart of this dish, delivering a pungent, slightly sweet kick that awakens the palate. Skipping it would be like playing a song without its bass line—something crucial would be missing. For a milder flavor, roast the cloves first, but the raw mincing gives that sharp edge we love.
Fresh Parsley (¼ cup, chopped): Parsley adds a bright, herbaceous lift that balances the richness of the cheese. It also contributes a splash of color that makes the meatloaf look inviting. If you’re out of parsley, cilantro or basil can work, though they’ll shift the flavor profile.
Dried Oregano (1 tsp): Oregano brings a subtle earthiness that deepens the overall taste. It’s the quiet background vocalist that you notice only after the first bite. Fresh oregano can be used, but it’s more potent—use half the amount.
The Texture Crew
Breadcrumbs (½ cup, preferably panko): Breadcrumbs act like tiny sponges, soaking up milk and keeping the meatloaf from crumbling. Panko gives a lighter, airier crumb compared to regular breadcrumbs. If you need a gluten‑free option, use crushed rice crackers or almond flour.
Milk (½ cup): Milk hydrates the breadcrumbs, creating a tender, moist interior. Skipping the milk leads to a dry, dense loaf that feels like chewing on cardboard. Whole milk yields the richest texture, but 2% works fine.
Egg (1 large): The egg is the binding agent that holds everything together, ensuring the loaves keep their shape during baking. A substitute could be a flax‑egg for a vegan twist, though the texture will change slightly.
Olive Oil (2 tbsp): Used for searing the loaves before they go into the oven, olive oil adds a subtle fruitiness and helps develop that coveted crust. You can swap for avocado oil if you prefer a higher smoke point.
The Unexpected Star
Shredded Mozzarella (½ cup): Mozzarella melts into gooey pockets that surprise the eater with a creamy center. It’s the secret indulgence that elevates the dish from simple to spectacular. If you’re dairy‑intolerant, try a plant‑based mozzarella shred.
Garlic Powder (1 tsp): While fresh garlic provides a punch, garlic powder adds a background depth that rounds out the flavor. It’s the subtle background hum that makes the overall taste richer.
Smoked Paprika (1 tsp): This spice lends a smoky undertone and a beautiful reddish hue to the glaze. It’s the visual cue that says “this is serious comfort food.” If you dislike smoke, you can omit it without major loss.
The Final Flourish
Parmesan Cheese (1 cup, grated): The star of the show, this cheese infuses the meat with a nutty, salty richness. It also forms the golden crust when mixed into the glaze. Freshly grated Parmesan melts better than pre‑grated packets.
Butter (2 tbsp, melted): Butter in the glaze adds a silky sheen and a buttery flavor that makes the crust irresistible. Use unsalted butter to control the salt level.
Additional Parmesan (2 tbsp, grated): Sprinkled on top of the glaze, this creates that signature crackly, cheesy crust that shatters delightfully with each slice.
Everything's prepped? Good. Let's get into the real action...
The Method — Step by Step
Preheat your oven to 375°F (190°C). While the oven warms, line a baking sheet with parchment paper and lightly brush it with a teaspoon of olive oil. This prevents sticking and gives the loaves a subtle base flavor. The oven should feel like a gentle hug—steady and reliable.
In a large mixing bowl, combine the ground chicken, minced garlic, chopped parsley, dried oregano, salt, and black pepper. Using your hands (yes, get a little messy), mix until everything is just incorporated. Over‑mixing will develop too much protein, resulting in a tough texture.
Add the breadcrumbs, milk, and egg to the bowl. The milk will soak the breadcrumbs, creating a moist matrix that keeps the meat from drying out. Mix gently—think of it as coaxing the ingredients together, not beating them into submission.
Fold in the grated Parmesan, shredded mozzarella, garlic powder, and smoked paprika. These ingredients are the flavor fireworks that will explode in your mouth later. If you notice clumps, use a spatula to break them up, ensuring an even distribution.
Divide the mixture into two equal portions and shape each into a loaf about 9 inches long and 3 inches wide. Place the loaves onto the prepared baking sheet, leaving a little space between them for even heat circulation.
In a small saucepan, melt the butter over low heat, then stir in the remaining grated Parmesan and a pinch of smoked paprika. Drizzle this glossy glaze over the tops of the loaves, spreading it with the back of a spoon to cover every inch.
Slide the sheet into the preheated oven. Bake for 25‑30 minutes, or until the internal temperature reaches 165°F (74°C) and the glaze turns a deep golden brown. Around the 20‑minute mark, the edges should start pulling away from the pan—a tell‑tale sign they’re done.
Once baked, remove the loaves and let them rest for 5 minutes before slicing. This resting period lets the juices redistribute, ensuring each slice stays moist and tender. Serve hot, and watch as the crust cracks delightfully under the knife.
Insider Tricks for Flawless Results
The Temperature Rule Nobody Follows
Never bake meatloaf at a temperature lower than 350°F unless you have a very long cooking window. Higher heat creates a rapid Maillard reaction, forming that coveted crust while keeping the interior juicy. I once tried a low‑and‑slow 300°F bake and ended up with a pale, soggy loaf that looked more like a casserole than a meatloaf. Trust the heat, and the result will be a golden‑brown masterpiece.
Why Your Nose Knows Best
When the glaze starts to bubble and you catch a faint nutty scent, you’re at the perfect moment to check the crust. Your nose can detect the subtle caramelization before the timer even beeps. If you smell a faint burnt note, pull the loaves out early and cover them loosely with foil to prevent over‑browning.
The 5‑Minute Rest That Changes Everything
Resting isn’t just for steaks. Letting the meatloaf sit for five minutes after baking lets the proteins relax and the juices settle. Skipping this step results in a dry slice as the juices spill out onto the plate. Use this time to prep a quick side—perhaps a crisp green salad or roasted veggies.
Glaze Mastery
The glaze is where the magic happens. Melt the butter just until it foams, then stir in the Parmesan off the heat to avoid clumping. If you want a deeper flavor, add a splash of white wine or a pinch of lemon zest. This extra step adds a bright note that cuts through the richness.
Seasoning Layers
Season each component separately. Salt the meat mixture, season the glaze, and finish with a dash of pepper just before serving. This layered approach builds depth and ensures no single bite is bland. A friend once skipped the glaze seasoning and complained the top was “flat”—never make that mistake.
Creative Twists and Variations
This recipe is a playground. Here are some of my favorite ways to switch things up:
Spicy Jalapeño Kick
Finely dice two jalapeños (seeds removed for less heat) and fold them into the meat mixture. The heat pairs beautifully with the cooling mozzarella, creating a balanced flavor explosion. Perfect for those who love a little fire.
Herb‑Infused Mediterranean
Swap parsley for fresh basil and add a tablespoon of chopped sun‑dried tomatoes. The Mediterranean twist brings a sweet‑tart note that complements the Parmesan beautifully. Serve with a side of tzatziki for an authentic feel.
Cheesy Bacon Bomb
Stir in half a cup of crumbled cooked bacon and increase the mozzarella to three‑quarters cup. The smoky bacon adds crunch, while the extra cheese makes each bite oozy. Ideal for a weekend brunch.
Vegan Victory
Replace ground chicken with a plant‑based mince, use almond milk instead of dairy, and swap Parmesan for nutritional yeast mixed with a bit of miso paste. The texture changes slightly, but the flavor profile remains satisfying.
Italian‑Style Marinara
After baking, spoon a generous ladle of homemade marinara over the sliced loaves and sprinkle with fresh basil. This turns the meatloaf into a hearty, saucy main that pairs well with spaghetti.
Storing and Bringing It Back to Life
Fridge Storage
Allow the meatloaf to cool completely, then wrap each loaf tightly in plastic wrap or aluminum foil. Store in an airtight container for up to four days. When ready to eat, reheat in a 350°F oven for 15 minutes, covered with foil to retain moisture.
Freezer Friendly
Wrap the cooled loaves in a double layer of freezer‑grade foil, then place them in a zip‑top bag. They’ll keep for up to three months. To reheat, thaw overnight in the fridge, then bake at 350°F for 20‑25 minutes, glazing again halfway through.
Best Reheating Method
For the crispiest crust, reheat in a preheated oven rather than a microwave. Add a tiny splash of water (about a tablespoon) to the pan before covering with foil; this creates steam that revives the interior while the glaze re‑crystallizes into a crunchy top.