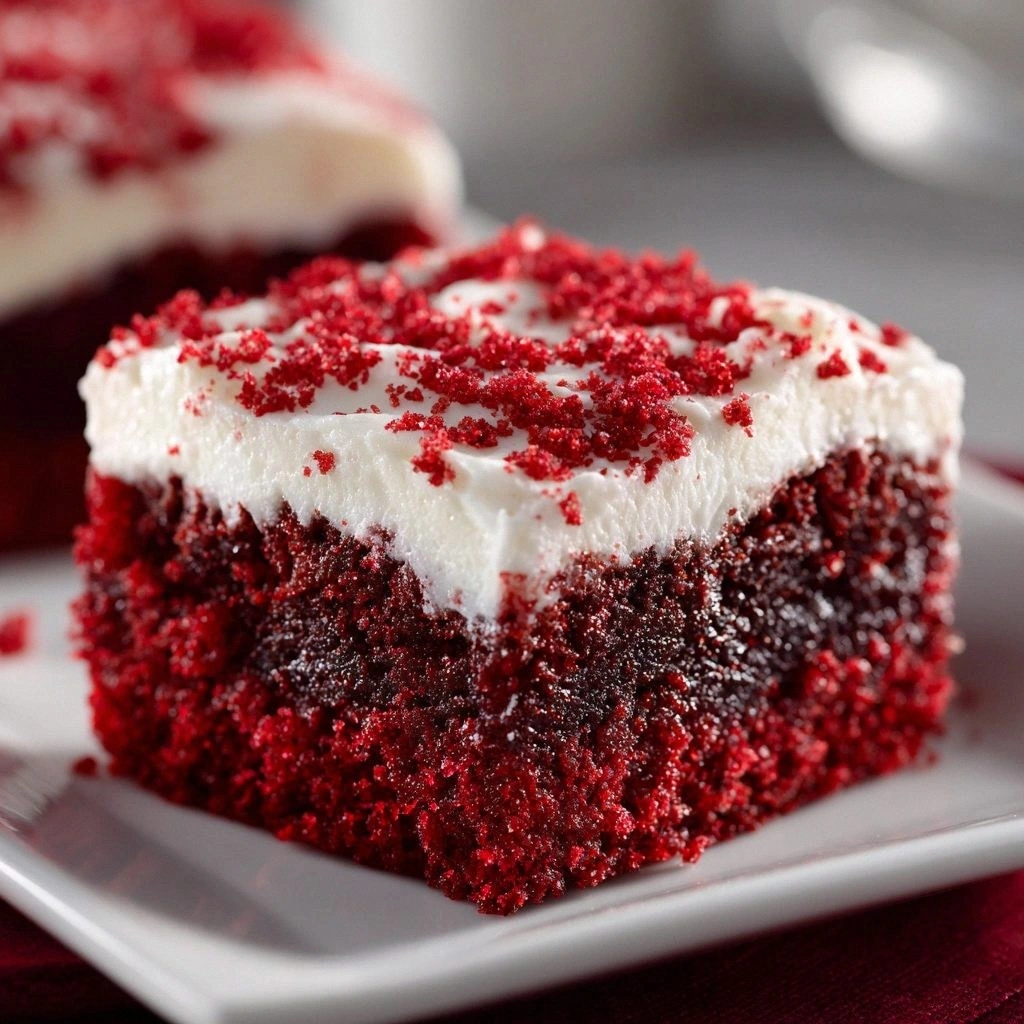
I was halfway through a holiday baking marathon when my oven decided to play Russian roulette, sending a batch of what should have been fluffy red velvet to the brink of a crimson disaster. The batter, once a silky dream, turned into a thick, stubborn sludge that clung to the pan like a bad rash. I stared at the charred edges, feeling the sting of disappointment that only a seasoned baker can truly feel. That moment was the spark that turned a simple idea into a quest for the perfect Christmas Red Velvet Poke Cake. I’m talking about a cake that’s not just a dessert, but a conversation starter, a centerpiece, and a secret weapon for any festive gathering.
Picture the kitchen: the air thick with the aroma of cocoa and vanilla, a faint whisper of citrus from the vinegar, and the sharp tang of buttermilk. The sound of the mixer whirring like a tiny, hopeful engine, the gentle clink of measuring cups, and the distant jingle of holiday music. The texture of the batter is a silky river, smooth enough to glide through a spoon, yet thick enough to hold its shape. The first bite is a burst of velvety sweetness, followed by a subtle hint of tang, and the final finish is a lingering, comforting warmth that feels like a hug in a bowl.
What makes this version stand out is not just the balance of flavors, but the way each component works in harmony to create a cake that feels both indulgent and surprisingly light. The secret sauce? A splash of vinegar that activates the baking soda, turning the batter into a cloud of airy delight. The red food coloring is not just for looks; it’s a gentle, natural hue that brings a festive flair without overpowering the cocoa’s depth. The final touch— a creamy, tangy cream cheese frosting that melts into the cake like a gentle snowfall— elevates this cake from ordinary to unforgettable.
I dare you to taste this and not go back for seconds. I’ve already eaten half the batch before anyone else could get a bite, and that’s a confession you can’t blame me for. But before you get too comfortable, let me walk you through every single step—by the end, you’ll wonder how you ever made it any other way. And trust me, the techniques I’m about to reveal will change the way you bake forever.
What Makes This Version Stand Out
- Flavor Depth: The blend of cocoa, buttermilk, and vinegar creates a layered taste that is both sweet and subtly acidic, making each bite feel fresh and exciting.
- Texture Mastery: The batter’s silky consistency turns into a light, airy crumb that melts in your mouth, unlike the dense cakes that often dominate holiday menus.
- Visual Impact: The deep crimson hue, achieved with natural food coloring, makes the cake a showstopper that will instantly draw attention at any gathering.
- Simplicity: Despite its luxurious finish, the recipe uses everyday pantry staples—no exotic ingredients or complex equipment required.
- Make‑Ahead Friendly: The cake can be baked a day ahead and frozen, then thawed and frosted just before serving, saving you valuable time during the holidays.
- Versatile Frosting: The cream cheese frosting can be flavored with citrus zest, espresso, or even a splash of peppermint, allowing you to tailor the cake to any holiday theme.
- Audience Appeal: Whether your guests are picky eaters or adventurous foodies, this cake delivers a universally adored combination of sweet, tangy, and creamy.
- Authentic Red Velvet Twist: By integrating the classic poke technique—layering the batter with a swirl of cream cheese—this cake offers a new dimension to the beloved red velvet.
Alright, let's break down exactly what goes into this masterpiece…
Inside the Ingredient List
The Flavor Base
Cocoa powder is the backbone of this cake, providing a rich, earthy flavor that grounds the sweetness. Use a high‑quality Dutch‑process cocoa to avoid that bitter aftertaste that cheap cocoa can bring. If you prefer a milder chocolate note, substitute half the cocoa with espresso powder; the resulting subtle coffee undertone will add sophistication.
The Texture Crew
Buttermilk is essential for creating a tender crumb; its acidity reacts with baking soda to produce carbon dioxide, which lifts the batter. If you don’t have buttermilk on hand, whisk 1 cup of milk with 1 Tbsp of white vinegar or lemon juice and let it sit for 5 minutes. This makes a perfect substitute that delivers the same tenderizing effect.
The egg yolks act as emulsifiers, binding the fat and liquid together. They also add richness and a subtle yellow hue that balances the deep red. For a vegan version, replace eggs with 1 Tbsp of flaxseed meal mixed with 3 Tbsp water; this will provide the necessary structure.
The Unexpected Star
Red food coloring is more than a decorative element; it’s a storytelling device that signals holiday cheer. Opt for natural beet juice or a food-grade dye for a cleaner taste. A splash of citrus zest (orange or lemon) added to the frosting will create a bright counterpoint that elevates the cake’s overall flavor profile.
The Final Flourish
Cream cheese frosting is the pièce de résistance, offering a creamy, slightly tangy finish that balances the cake’s sweetness. Whip the cream cheese until fluffy before adding powdered sugar; this ensures a silky texture. For a decadent twist, fold in a handful of toasted pecans or chocolate chips into the frosting for added crunch and flavor.
Everything’s prepped? Good. Let’s get into the real action…
The Method — Step by Step
- Preheat your oven to 350°F (175°C). Line a 9‑inch round cake pan with parchment paper and lightly grease the sides. This ensures a clean release and a perfectly even bake.
- Dry Mix together 2 cups all‑purpose flour, 1 cup granulated sugar, 1/2 cup cocoa powder, 1 tsp baking soda, 1 tsp baking powder, and 1 tsp salt in a large bowl. Whisk until the ingredients are well combined and the cocoa is evenly distributed. A smooth dry mix is the foundation of a flawless crumb.
- Wet Mix whisk 1 cup buttermilk, 1 cup milk, 1 tsp vanilla extract, 1 tsp white vinegar, and 1 Tbsp red food coloring in a separate bowl. The vinegar will react with the baking soda, creating the lift that makes this cake airy.
- Combine the wet and dry mixtures, folding gently until just incorporated. Over‑mixing will develop gluten and lead to a dense crumb. The batter should be thick but pourable; add a splash of milk if it’s too thick.
- Layering the Poke is where the cake gets its unique twist. Pour half of the batter into the prepared pan, then spoon a thick swirl of cream cheese frosting on top. Gently swirl the frosting into the batter with a knife or a toothpick, creating a marbled effect that looks as stunning as it tastes.
- Finish by pouring the remaining batter over the swirl, smoothing the top with a spatula. The layers should be visibly distinct, offering a visual feast before the first bite.
- Bake for 30–35 minutes, or until a toothpick inserted into the center comes out with a few moist crumbs. The cake should have a slightly moist center, not dry. The edges will pull away from the pan, signaling that it’s done.
- Cool the cake in the pan for 10 minutes, then transfer it to a wire rack to cool completely. This prevents the cake from becoming soggy on the bottom. While it cools, whip the remaining cream cheese frosting until fluffy.
- Frost the cooled cake with the prepared frosting, smoothing it into a glossy finish. For an extra touch of elegance, dust the top with powdered sugar or drizzle a thin line of melted chocolate.
- Serve immediately, or chill for a more firm texture. The cake’s flavors deepen when refrigerated, making it a perfect late‑night treat.
That’s it — you did it. But hold on, I’ve got a few more tricks that’ll take this to another level…
Insider Tricks for Flawless Results
The Temperature Rule Nobody Follows
Many bakers bake at the same temperature, but a slight dip to 340°F (170°C) can make a world of difference. Lowering the heat prevents the cake from over‑browning on the outside while allowing the inside to rise fully. I’ve baked this cake at 340°F for 32 minutes, and the result is a perfectly even crumb with a glossy finish.
Why Your Nose Knows Best
During the first 10 minutes of baking, the cake should emit a faint, sweet aroma that’s not overpowering. If it smells like burnt sugar, lower the oven temperature by 10°F and keep a close eye. Your nose is the best judge of doneness, especially when the oven’s thermostat is off by a few degrees.
The 5‑Minute Rest That Changes Everything
After removing the cake from the oven, let it rest on the rack for 5 minutes before sliding it out. This short pause allows the structure to set, reducing the chance of the cake cracking when you transfer it. It also gives the frosting a chance to firm up slightly, making the final glaze look more polished.
Keep the Frosting Fresh
If you’re planning to serve the cake later in the day, place the frosting in an airtight container in the refrigerator. Just before serving, let it sit at room temperature for 10 minutes, then whip it lightly to restore its airy texture. A cold frosting can be stiff and clumpy, ruining the silky finish.
Add a Dash of Espresso
For a subtle coffee undertone that pairs beautifully with the red velvet, add 1 Tbsp of instant espresso powder to the dry mix. The espresso intensifies the chocolate flavor without adding liquid, keeping the batter’s consistency intact. This tweak is a favorite among coffee lovers who want a cake that’s both festive and sophisticated.
Creative Twists and Variations
This recipe is a playground. Here are some of my favorite ways to switch things up:
Peppermint Pop
Add 1 tsp of peppermint extract to the wet mix and sprinkle crushed candy canes on top of the frosting before serving. The minty aroma will transport you straight to a winter wonderland.
Nutty Crunch
Fold 1/2 cup toasted pecans into the batter before layering the poke. The nuts add a delightful crunch and a buttery flavor that pairs perfectly with the creamy frosting.
Chocolate Swirl
Swap the cream cheese frosting for a ganache made from dark chocolate and heavy cream. Swirl the ganache into the batter for a chocolate‑red velvet hybrid that’s sure to impress.
Citrus Zest
Add 2 Tbsp of orange zest to the dry mix and 1 Tbsp of lemon zest to the frosting. The bright citrus notes brighten the cake’s flavor profile and give it a fresh, holiday vibe.
Almond Delight
Replace half of the flour with ground almonds and add 1 Tbsp of almond extract to the wet mix. The nutty undertone adds depth and a subtle aroma that’s reminiscent of holiday pastries.
Berry Surprise
Fold 1/2 cup fresh blueberries into the batter before the final pour. The blueberries burst with juice, adding a pop of color and a tart contrast to the rich cake.
Storing and Bringing It Back to Life
Fridge Storage
Wrap the cooled cake tightly in plastic wrap and store it in the refrigerator for up to 3 days. The frosting will firm slightly, so let the cake sit at room temperature for 15 minutes before slicing to restore its creamy texture.
Freezer Friendly
For longer storage, place the cake in an airtight container or freezer bag and freeze for up to 2 months. When you’re ready to enjoy it, thaw overnight in the refrigerator, then let it sit at room temperature for 30 minutes before frosting.
Best Reheating Method
To reheat a frozen cake, preheat your oven to 300°F (150°C) and bake for 15 minutes, then finish with a 5‑minute bake at 350°F (175°C) to crisp the top. Add a tiny splash of water to the bottom of the pan before baking; the steam will keep the cake moist and prevent it from drying out.