I burnt the first batch so badly the smoke detector started singing Christmas carols. There I was, standing in my kitchen at midnight on December 23rd, waving a dish towel at the ceiling and wondering how I'd managed to turn a simple brownie recipe into a festive disaster. But here's the thing about kitchen failures — they force you to dig deeper, to understand why things go sideways, and sometimes they lead you to something far better than you ever expected. That charred catastrophe sent me down a three-week rabbit hole of testing, tweaking, and tasting until I landed on what I'm about to share with you.
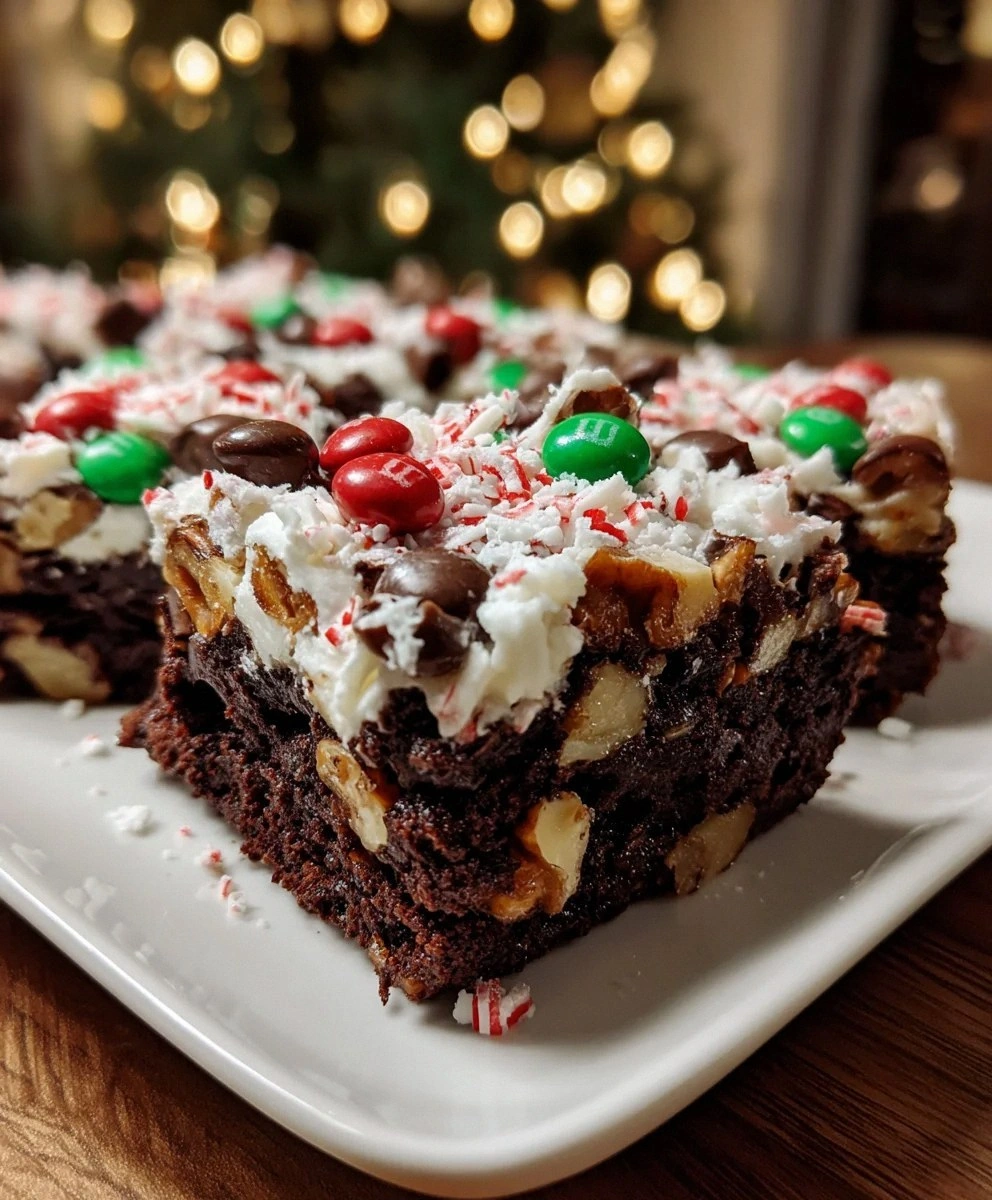
Picture this instead: It's Christmas morning, you're still in your pajamas, and you pull a pan of these Christmas Magic Layer Brownie Bars from the oven. The chocolate chips have melted into pools of glossy perfection, the coconut has toasted to golden ribbons, and those holiday M&Ms are gleaming like tiny edible ornaments. The smell alone is enough to make your neighbors knock on your door with empty plates in hand. I dare you to taste these and not go back for seconds — actually, I double-dog dare you, because I've watched grown adults hide the last piece in their coat pockets at parties.
Most recipes get this completely wrong. They treat layered bars like a construction project, stacking dry layers that sit there like awkward strangers at a party. What you end up with is a bar that falls apart when you cut it, or worse, layers that taste like they belong in different desserts entirely. The magic happens when each layer talks to the next, when the fudgy brownie base whispers to the creamy coconut, when the candy coating melts just enough to create these incredible pockets of chocolate that burst when you bite into them. Stay with me here — this is worth it.
I've made these bars seventeen times in the past month. Seventeen. My mail carrier now expects a sample when she delivers packages. My neighbor's eight-year-old wrote a letter to Santa specifically requesting "more of those amazing Christmas bars from next door." And I'll be honest — I ate half the batch before anyone else got to try it. Every single time. Let me walk you through every single step — by the end, you'll wonder how you ever made it any other way.
What Makes This Version Stand Out
Fudgy Foundation: We're not messing around with cakey brownies here. This base stays moist for days thanks to that extra yolk and the perfect chocolate-to-butter ratio. It's the difference between a brownie that crumbles like sawdust and one that bends like velvet.
Layer Harmony: Each component is designed to complement, not compete. The coconut adds texture without overwhelming, the condensed milk creates a caramel-like binding that holds everything together, and those M&Ms provide pops of color and chocolate that make every bite feel like finding treasure.
Make-Ahead Magic: These bars actually taste better the second day, which means you can bake them ahead of your holiday chaos. The flavors meld, the layers settle, and you become the person who has their life together — even if your Christmas tree is still in the garage.
Visual Impact: These don't just taste amazing — they look like Christmas exploded in the best possible way. The red and green M&Ms against the toasted coconut create a dessert that practically demands to be photographed before it's devoured.
Foolproof Technique: No candy thermometers, no tempering chocolate, no skills that require culinary school. If you can melt butter and press buttons on your microwave, you can make these bars. I've tested this on friends who burn water, and they nailed it.
Customizable Canvas: Once you master the base technique, you can swap flavors for any holiday. Valentine's Day? Use pink and red M&Ms. Fourth of July? Red, white, and blue. The base recipe is your playground.
Crowd Psychology: Something happens when you set these out at a party. People gather around them like they're watching a sporting event. I've seen introverts start conversations over these bars. They're basically edible social lubricant.
Texture Symphony: The contrast between the chewy brownie, the creamy condensed milk layer, the slight crunch from the coconut, and the candy shell snap of the M&Ms creates a texture experience that keeps you coming back for "just one more bite" until the pan is mysteriously empty.
Alright, let's break down exactly what goes into this masterpiece...
Inside the Ingredient List
The Flavor Foundation
Semi-sweet chocolate chips aren't just chocolate — they're the backbone of everything that makes these bars incredible. When you melt them with butter, they create this glossy, rich base that sets the tone for every layer above. I tested this with expensive artisanal chocolate and regular supermarket chips, and honestly? The cheap ones won. They melt more smoothly, they stay fudgy longer, and they have that nostalgic chocolate flavor that takes you straight back to being eight years old and licking brownie batter from the spoon.
Salted butter is your secret weapon here. I know, I know — every baking blog tells you to use unsalted so you can "control the salt." But here's what they don't tell you: salted butter has a slightly lower water content, which means your brownies stay fudgy instead of turning into chocolate-flavored cake. Plus, that hint of salt makes the chocolate taste more chocolatey. It's like turning up the volume on your favorite song — same song, just better.
Granulated sugar isn't just for sweetness — it's structural. As it melts into the butter and chocolate, it creates these tiny air pockets that give your brownie just enough lift to stay out of brick territory. Brown sugar will work in a pinch, but it brings a molasses note that competes with the chocolate. Save that swap for when you're making these in January and want a deeper, more wintery flavor profile.
The Texture Crew
That extra egg yolk? Pure genius disguised as cholesterol. It adds fat and lecithin, which sounds boring until you understand that lecithin is basically nature's emulsifier. It keeps your brownie from separating into greasy and dry patches. I learned this trick from a French pastry chef who swore by it for "les brownies Americaine," which is apparently what the French call our national dessert when they want to make it sound exotic.
All-purpose flour is the Goldilocks choice here — not too much protein (which would make tough bars), not too little (which would make them fall apart). Measure it correctly, people. Scoop and sweep, don't pack it down like you're trying to win a compression contest. One packed cup of flour can add up to three extra tablespoons, and suddenly your fudgy bars are auditioning for building materials.
Vanilla extract is the supporting actor that never wins awards but makes everyone else look better. Use the real stuff, not the imitation. I can tell when someone's used fake vanilla — it has this weird chemical aftertaste that lingers like a bad houseguest. Real vanilla adds warmth and depth that makes people say "what's that amazing flavor?" without being able to put their finger on it.
The Star Players
Mini holiday M&Ms are your secret weapon for distribution. Their smaller size means you get more pieces per square inch, which translates to more chocolate surprises in every bite. Regular M&Ms work too, but there's something about the mini ones that makes them feel more luxurious, like you planned this instead of just raiding the holiday candy aisle at Target.
Sweetened flaked coconut is where people start to get nervous. "But I don't like coconut," they whine. Listen, I get it — I once felt the same way. But toasting transforms coconut from "why is this in my candy bar" to "what is this incredible nutty flavor that adds texture without screaming coconut." It toasts along with the bars, turning golden and crispy around the edges while staying chewy in the middle. If you absolutely cannot do coconut, you can leave it out, but you'll lose one of the key textural elements that makes these bars special.
Sweetened condensed milk is the glue that holds this whole operation together. It's science in a can — milk with most of the water removed and sugar added, which means it caramelizes slightly in the oven, creating this creamy, almost dulce-de-leche-like layer that binds everything above it to everything below it. Don't try to substitute evaporated milk. I did, once. The result was a sad, watery mess that slid off the brownie like it was trying to escape.
The Final Flourish
Holiday sprinkles aren't just decorative — they add tiny bursts of sugar that provide a pleasant crunch against the softer layers. Choose your sprinkles wisely. The cheap ones taste like wax and feel like eating plastic confetti. Good sprinkles dissolve slightly on your tongue while maintaining just enough crunch to be interesting. I keep a stash of fancy ones from a baking supply store that cost more than I care to admit, but they make people ask where I got them.
Nuts are optional, but if you're using them, toast them first. Raw nuts have this weird green, almost grassy flavor that competes with everything else. Toasting brings out their natural oils and gives you that rich, warm flavor that makes people think you know what you're doing in the kitchen. Walnuts add a slight bitterness that balances the sweetness, while pecans bring a buttery richness that plays beautifully with the chocolate.
Everything's prepped? Good. Let's get into the real action...
The Method — Step by Step
- Preheat your oven to 350°F (175°C), but don't just trust that dial. Most ovens run hot or cold by 25 degrees, which can be the difference between fudgy and dry. Get an oven thermometer — they're like three dollars and will save you from more baking disasters than I care to count. While it's heating, line a 9x13 inch pan with parchment paper, leaving wings that hang over the sides. These wings are your handles later, so make them generous — about 2 inches on each side. Spray the parchment with non-stick spray, because we're not animals here, and set the pan aside where you won't accidentally knock it onto the floor while you're in the chocolate zone.
- Melt the chocolate chips and butter together, but here's the key — use a double boiler or microwave at 50% power. Direct high heat will seize your chocolate faster than you can say "Christmas catastrophe." If you're using the microwave, do it in 30-second bursts, stirring between each one. The chocolate will hold its shape even when melted, so stir, don't guess. When it's glossy and smooth with no visible chunks, you're there. This should take about 2-3 minutes total, depending on your microwave's mood that day.
- Whisk in the sugar while the chocolate mixture is still warm. This helps the sugar dissolve slightly, which prevents that gritty texture that makes people think you forgot to mix properly. Use a real whisk, not a fork — you want to incorporate air without splattering chocolate all over your kitchen like some kind of abstract art project. The mixture should look like thick, glossy pudding at this point. If it's separating or looks oily, your chocolate was too hot. Let it cool for a few minutes and whisk again — usually it comes back together like nothing happened.
- Add the eggs and that extra yolk, but here's the trick — crack them into a separate bowl first. Nothing ruins brownie batter like a piece of eggshell that you can't fish out because it's already disappeared into chocolate oblivion. Beat the eggs lightly before adding them, then whisk them into the chocolate mixture until the batter looks like satin. This should take about a minute of vigorous whisking. Don't overdo it — you're not trying to whip air into this, just combine everything smoothly.
- Fold in the flour and vanilla using a spatula, not the whisk. Overmixing develops gluten, which turns your fudgy dreams into tough reality. Add the flour in two additions, folding just until you don't see dry pockets anymore. The batter should be thick but pourable, like really good chocolate mousse. If you've added nuts, fold them in now. They should be evenly distributed but not breaking up from overzealous mixing.
- Pour the batter into your prepared pan and smooth the top with an offset spatula or the back of a spoon. Don't press down too hard — you want to keep that airy texture you just created. The batter should fill the pan about halfway up the sides. If it looks too thin, you've either got the wrong pan size or you accidentally left out half the batter (don't laugh, it's happened). Give the pan a gentle tap on the counter to release any air bubbles that might create weird holes in your finished bars.
- Now for the magic layer — drizzle the sweetened condensed milk evenly over the brownie batter. Don't just dump it in the center and hope for the best. Start at one corner and work in a zigzag pattern, trying to cover as much surface area as possible. The milk will sink slightly into the batter, which is exactly what you want. It creates these veins of caramel that wind through the finished bars like edible rivers of gold.
- Sprinkle the coconut over the condensed milk, making sure to get it all the way to the edges. Don't pack it down — you want it loose so it toasts properly. The coconut will seem like too much at first, but it shrinks as it cooks, so be generous. If you're using nuts, scatter them over the coconut now. They'll toast along with everything else, developing that rich, nutty flavor that makes people think you spent way more time on this than you actually did.
- Finally, add your M&Ms and sprinkles. Start with the mini ones, scattering them evenly, then add the regular-sized ones for visual impact. Think of it like decorating a Christmas tree — you want clusters and variation, not a perfect grid. The sprinkles go on last, and be generous. They add color and that slight sugar crunch that makes these bars feel extra special.
- Bake for 25-30 minutes, but start checking at 20. The edges should be set and slightly pulling away from the pan, while the center should still have a slight jiggle. If you insert a toothpick, it should come out with a few moist crumbs — not wet batter, but not completely clean either. The coconut should be golden brown in spots, and the M&Ms should look glossy but not melted into puddles. Every oven is different, so trust your eyes and nose more than the timer.
- Cool completely before cutting — and I mean completely. I know it's torture, but warm bars will fall apart into a delicious mess that you'll end up eating with a spoon over the sink. Let them cool in the pan for at least an hour, then use the parchment wings to lift the whole slab onto a cutting board. For clean cuts, use a sharp knife dipped in hot water, wiping between cuts. Or just embrace the rustic look and hack away — they taste the same either way, and I've found that imperfect bars disappear faster because people feel less guilty about taking them.
That's it — you did it. But hold on, I've got a few more tricks that'll take this to another level...
Insider Tricks for Flawless Results
The Temperature Rule Nobody Follows
Room temperature ingredients aren't just a suggestion — they're the difference between brownies that rise evenly and ones that look like they've been through an earthquake. Take your eggs out of the fridge 30 minutes before you start. Cold eggs hitting warm chocolate can cause the chocolate to seize up into grainy chunks that no amount of whisking will fix. Same goes for your butter if you're using the kind that comes in sticks. Leave it on the counter while you prep everything else, and you'll avoid the dreaded chocolate curdle that ruins more brownies than overbaking.
Why Your Nose Knows Best
Forget timers — your nose is the most accurate kitchen tool you own. When these bars are perfectly baked, your kitchen will smell like a chocolate factory had a baby with a candy store. The coconut will smell toasty and nutty, not burnt. If you smell chocolate and sugar but no coconut, give it another few minutes. If you smell anything approaching burnt sugar, get those bars out immediately. That smell means the sugars are caramelizing past the point of delicious and heading into bitter territory.
The 5-Minute Rest That Changes Everything
Here's what separates amateur bakers from the pros: the rest period. After you take the bars out of the oven, let them sit undisturbed for exactly 5 minutes. During this time, the carryover heat finishes setting the center while the top layers settle into place. If you cut too early, you'll have chocolate lava. Too late, and the condensed milk layer will have cooled too much, creating a chewy texture that's not unpleasant but not the silky magic we're after. Set a timer for 5 minutes, walk away, and trust the process.
The Storage Secret That Keeps Them Fresh
These bars actually get better with age — up to a point. Store them in an airtight container with a piece of bread. Yes, bread. The bread will go stale instead of your bars, keeping them soft and fudgy for up to a week. Replace the bread every couple of days. It's like having a tiny humidity control system that costs practically nothing. A friend tried skipping this step once — let's just say her bars turned into chocolate-flavored hockey pucks by day four.
The Cutting Technique That Prevents Crumbling
Use a plastic knife. I'm serious — the kind you get with takeout that you always throw away. Plastic knives have just enough flexibility to cut through the layers without dragging and pulling like metal knives do. They also don't conduct heat, so they won't melt the chocolate as you cut. If you don't have plastic knives, use a sharp chef's knife dipped in hot water, but wipe it clean between cuts. Either way, cut straight down, not sawing back and forth. Sawing is what creates those sad, crumbly edges that make your bars look like they've been through a food processor.
The Flavor Booster Nobody Expects
Add a quarter teaspoon of espresso powder to the chocolate mixture. Not coffee — espresso powder. It won't make your bars taste like a mocha, but it will amplify the chocolate flavor in a way that makes people ask what your secret ingredient is. Chocolate has over 600 flavor compounds, and coffee helps unlock more of them. It's like turning up the contrast on a photo — same image, just more defined and interesting. If you've ever struggled with brownies that taste flat or one-dimensional, this is your fix.
Creative Twists and Variations
This recipe is a playground. Here are some of my favorite ways to switch things up:
Valentine's Day Romance Bars
Swap the holiday M&Ms for pink and red ones, and add a teaspoon of raspberry extract to the brownie batter. The fruit flavor pairs beautifully with the chocolate, creating a sophisticated twist that tastes like expensive candy from a boutique chocolate shop. Top with white chocolate shavings instead of sprinkles for an elegant finish that says "I love you" better than flowers ever could.
Fourth of July Freedom Bars
Use red, white, and blue M&Ms, and replace half the coconut with crushed potato chips. The salty-sweet combination is pure Americana, and the chips add an unexpected crunch that makes people do a double-take. Add a drizzle of white chocolate over the top for the "fireworks" effect. These disappear faster than sparklers at a backyard barbecue.
Halloween Monster Bars
Use orange and black M&Ms, and add a cup of mini marshmallows to the topping. They'll toast to golden perfection, creating a s'mores-like effect that's perfect for fall. Mix in some candy corn if you're feeling controversial — people either love it or hate it, but everyone talks about it. The marshmallows create these gooey pockets that stretch like edible spider webs.
Easter Garden Bars
Pastel M&Ms and coconut that's been tinted green with a few drops of food coloring create a spring garden effect. Press some jelly beans into the top right after baking for "flowers" and add some edible glitter for morning dew. Kids go absolutely bonkers for these, and they make a great centerpiece for Easter brunch tables.
Thanksgiving Harvest Bars
Use autumn-colored M&Ms and add a teaspoon of pumpkin pie spice to the brownie batter. Replace half the coconut with chopped pecans that have been tossed in maple syrup. The result tastes like fall in bar form — warm spices, maple sweetness, and that perfect combination of chocolate and nuts that makes you want to curl up with these and watch football.
Birthday Cake Confetti Bars
Use regular M&Ms and replace the coconut with rainbow sprinkles mixed into the condensed milk layer. Add a teaspoon of almond extract to the brownie batter for that classic birthday cake flavor. Top with more sprinkles and a drizzle of vanilla frosting once cooled. These taste like childhood parties and make everyone feel like it's their birthday, even if it's just Tuesday.
Storing and Bringing It Back to Life
Fridge Storage
These bars keep beautifully in the fridge for up to a week, but they need to be wrapped properly. Cut them into individual pieces and layer them between sheets of parchment paper in an airtight container. The cold makes the chocolate layers firm and almost truffle-like, which some people actually prefer. Let them come to room temperature for 15 minutes before serving — cold chocolate doesn't release its flavors as well, and you'll miss some of the complexity if you eat them straight from the fridge.
Freezer Friendly
These freeze like champions for up to three months. Wrap individual pieces tightly in plastic wrap, then place them in a freezer bag with as much air removed as possible. When you're ready to eat them, let them thaw in the fridge overnight, or at room temperature for a couple of hours. Don't microwave them — it changes the texture of the condensed milk layer and can make the M&Ms crack. If you're in a hurry, a 10-minute rest on the counter is better than 30 seconds in the microwave.
Best Reheating Method
If your bars have been stored and you want to recreate that fresh-from-the-oven experience, here's what works: Preheat your oven to 250°F, wrap the bars loosely in foil, and warm them for 8-10 minutes. This gently reheats without melting the M&Ms into puddles. For a quick fix, place a piece on a warm plate (run it under hot water then dry it) — the gentle heat from below will soften the chocolate just enough to make it taste fresh-baked without any risk of overheating.